Effects Part 1: Portamento, Note Cuts and Volume Control.
This is the first in a three-part series on effects. Effects are a huge area of composing in hUGEtracker. While most effects only change minor things, using them in conjunction takes a song from feeling flat & dull to bursting with character. I recommend focusing on learning one effect at a time. Each works slightly differently.
Using effects
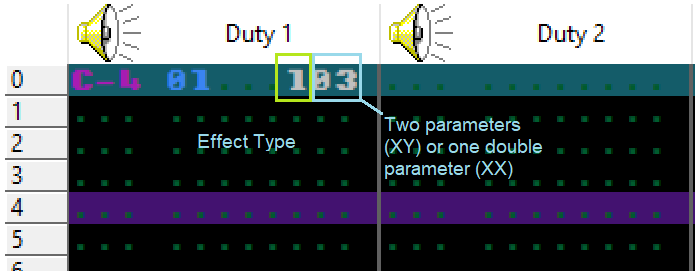
Effects are placed with the keyboard just like notes. However they go in the 3rd column of each channel. Each effect has a hex value that identifies the effect type, and then two hex values that are the parameters of the effect. Sometimes both values are used together, and sometimes each one controls something different. Some effects work differently on noise or wave channels too. Some only impact a note that is triggered (started) on the same row, some modify already playing notes on the fly. This will also be covered.
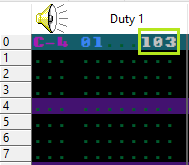
On Trigger – An effect played on a triggered note. It starts working as soon as the note’s row is played.
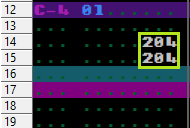
On Playing – Multiple effect calls on an already playing note. They will be applied to the already in progress sound as the row they are on is reached.
So, what are the parameters and are they hard to use? Some of them are, they require hex math and bit masking, but the good news is hUGEtracker gives you a wonderful UI interface for each effect! After placing an effect value, double click it to bring up its special UI.
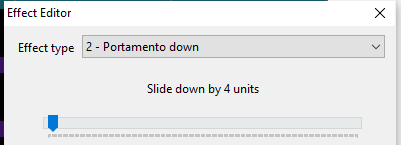
How we talk about effects
New folks are often confused in #audio-help by the way we talk about effects. If someone tells you: “use 8xx on the noise channel,” it means use the effect with values that suit you on that channel. This is also how they’re explained in the hUGETracker manual.
If someone says “Cxy” that means the two hex values are separated, if they say “Fxx” it means the two values work together.
Each effect type will be explained along with a screenshot of an example usage you can try for yourself. We will dive right in with one of the easiest ones.
Note cut
| Effect Value | E |
| Parameters | XX = Cut after XX tickets |
| On Trigger | ✅ |
| On Playing Note | ✅ |
| Works on Duty | ✅ |
| Works on Wave | ✅ |
| Works on Noise | ✅ |

The note cut is simple and easy to use. Placing this in any channel stops any note that is playing when the row it’s on is reached. It works the same on all channels. If placed with a note on the same row, the note will not play. It’s usually used to stop long or infinite notes sometime after they are triggered. The parameter is how many ticks after it’s fired that the note will be stopped. Personally I usually just use E01 to stop a note immediately. This effect is especially useful on the wave track since there are no envelope-type settings.
Portamento
| Effect Value | 1 (up) or 2 (down) |
| Parameters | XX = Bend up or down X units |
| On Trigger | ✅ |
| On Playing Note | ✅ |
| Works on Duty | ✅ |
| Works on Wave | ✅ |
| Works on Noise | 🚫 |
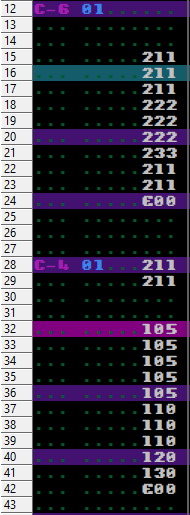
A note that dives downward, followed by one that goes down and then up.
Nothing says synthesizer like a bending note. There are two portamento commands: one goes up (1xx), and one goes down (2xx). It can be used when triggering a note or after it’s started to play. It’s great for risers in dance music, dive bombing 80s guitar solos, and eerie out of tune vibes. You can place a portamento effect on a line for an already-playing note or right when a note is triggered. Portamiento does not work on the noise channel.
Unlike other trackers, placing a single 201 on one row will bend the note down just a tiny bit only one time. It does not continue over the following rows. You have to keep putting in the effect if you want the note to continue to drop. This may seem like more work compared to Furnace tracker, but the reality is that it offers you very precise and finite control.
If you want notes to smoothly bend to another in-tune note, see this article which shows my tuning technique. It’s done in GBS tracker but it works exactly the same. Later on we will learn how to make punchy drums using Portamento effects.
Volume Control
Volume control is so complex we are going to look at the wave and duty channels separately. The volume tools don’t work on the noise channels.
Duty Channel
| Effect Value | C |
| Parameters | X = Set attack or decay (see UI) or leave 0 to not touch the envelope.Y = Set starting volume level. |
| On Trigger | ✅ |
| On Playing Note | ✅ |
| Works on Duty | ✅ |
| Works on Wave | ✅ |
| Works on Noise | 🚫 |
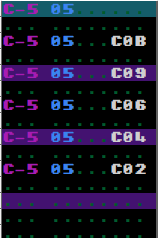
A note which echoes away quieter and quieter.
On the duty channel the volume effect only works when triggering a note. That means the effect can’t be on a line without an accompanying note (it’ll just be ignored). Use the UI to understand the parameters easily. Usually on the duty channel volume control is used to make an echo effect without creating a second instrument. Or morphing the envelope setting of a series of notes for the same instrument.
Wave channel
| Effect Value | C |
| Parameters | X = Has no impact on wave.Y = Set new volume level. |
| On Trigger | ✅ |
| On Playing Note | ✅ |
| Works on Duty | ✅ |
| Works on Wave | ✅ |
| Works on Noise | 🚫 |
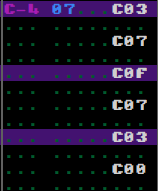
A wave note started on-trigger at 25% volume, moving up on playing to 50% then 100% and then gradually back down to 0.
Because the wave channel has no envelope settings, the volume effect will be crucial in making volume changes to your wave channels. But wait, there’s even more caveats! The wave channel only has three volume settings to choose from. On the wave channel the volume command works on a triggers note or an already-playing one. Your only choices are:
- C00 – This mutes the channel. This may seem useless but it’s not. You can use it to momentarily mute the wave channel while still bending it up or down. This is good for DJ-like punch outs and transitions.
- C03 – The wave will play at 25% of its maximum volume.
- C07 – The wave will play at 50% of its maximum volume.
- C0F – The wave will play at its maximum volume.
Using this you can more or less make envelope-like adjustments to the wave channel. But one more thing (yes really): changing the volume makes a small audio click on the wave channel. You can cover it up by doing the changes on beat where drums will hide the click or the click will just seem like extra percussion.
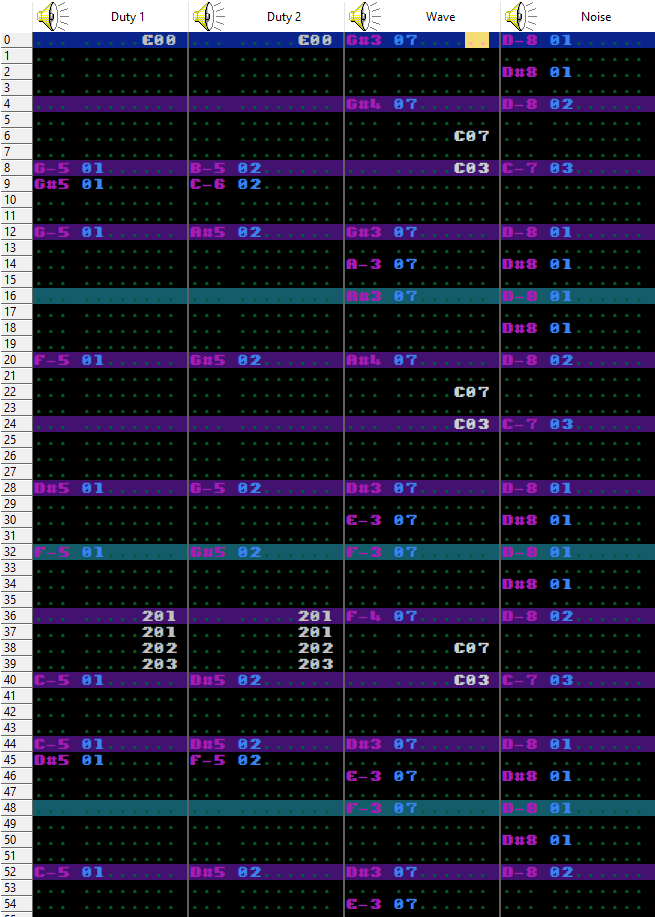
To practice you can apply the effects as shown to our demo song:
Downloads
You can download the demo files used in this article here:

Beatscribe has composed and produced soundtracks for games on Nintendo DS, Nintendo Switch, PS4, Xbox1, Sega Genesis and numerous iOs and Android games for over a decade, but his true passion is creating epic moods on ancient hardware like the Game Boy and NES.
