
This series will cover the use of the hUGETracker software. hUGETracker is a standalone app native to the hUGEDriver which allows you to create music that is playable on the Gameboy. hUGEDriver is a powerful driver allowing you to compose dynamic Gameboy songs without eating up so many resources that it can’t play music during a busy Gameboy game.
This article will briefly cover the installation and UI as well as taking a quick look at a sample song which explores what the Gameboy can do. This article is centered on using hUGETracker for GB Studio, but you can use it to create songs for GBDK, RGBDS and any other platform that can use .wav files.
Installation
hUGETracker is a cross-platform stand-alone tracker. This article will cover just the basic installation. If you are using a version of GB Studio that comes before version 3.2, you’ll want to download hUGETracker version 1.0 beta 9.
This link will take you to the latest version to install for GB Studio version 3.2 or higher. Just unzip all the files into a directory of your liking, then run hUGETracker.exe. You can make a pinned or desktop shortcut if you’d like as well.
User Interface
If you’ve used other trackers such as OpenMPT or Famitracker, the hUGETracker interface will seem very familiar. We will assume you’ve never touched a tracker before, and start from scratch in this series.
Let’s start with the basics. Download the htt-demo.uge here (the sample UGE was made in 1b9 version but its forwards-compatible with any other hUGETracker versions, once you save it in a later version though, you cannot go back), drop it somewhere on your hard drive and then go to File > Open… in hUGETracker and locate it. You should see something like the picture below. Don’t be intimidated, we will soon learn what everything does and how it works. Before we go any further, let’s learn what all the components are called.
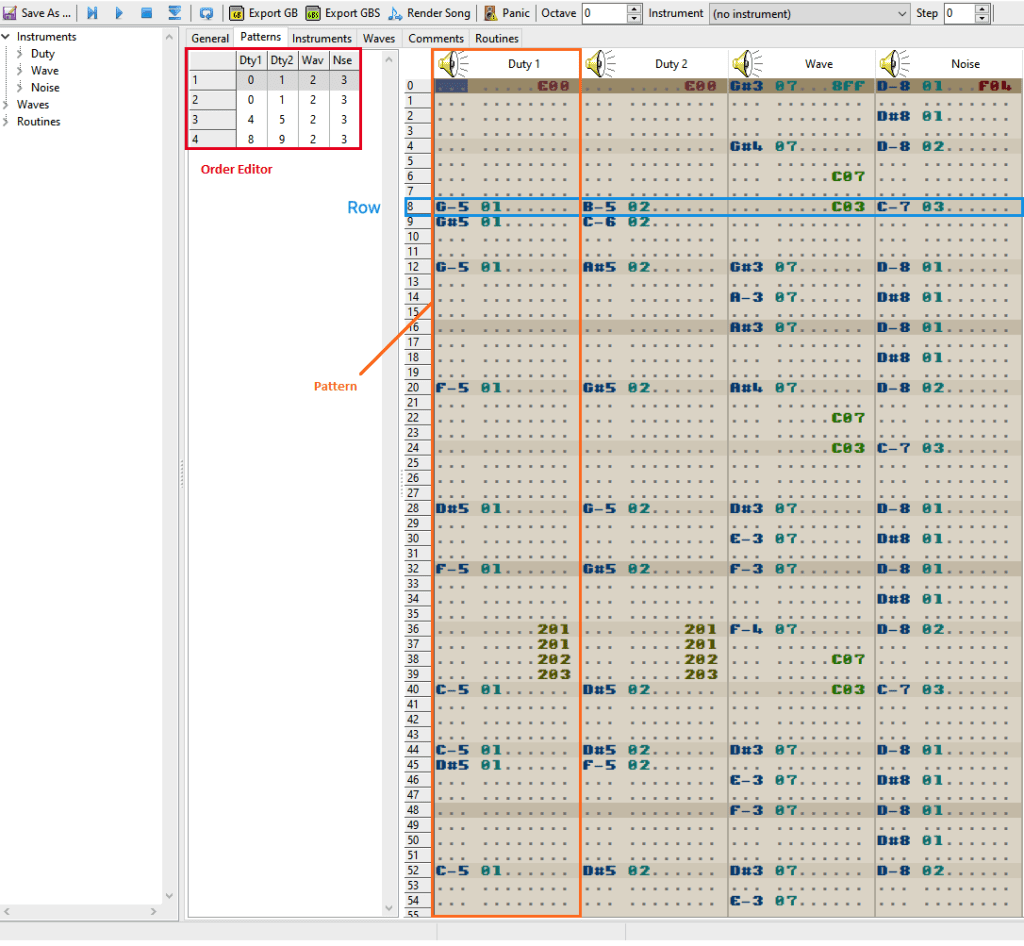
The main part of the screen (gray section) is the Tracker Grid. This is where you compose your song. Don’t worry about what all the numbers and letters in the grid mean right now. Let’s start by looking at the overall layout and how it works.
At the top you’ll notice 4 columns labeled Duty 1, Duty 2, Wave, and Noise. These represent the 4 channels the DMG sound chip is capable of playing. We will look at them briefly here, but dive into more details later on.
Duty 1 / Duty 2 – These are simple Pulse channels. They make up the sounds you hear mostly as melodies and leads in Gameboy music. They can make a thin or fat simple 8-bit tone and have a few other features we will look at later on.
Wave – The Wave channel is what gives the Gameboy its distinct crunchy sound. More often than not the Wave channel provides the bassline or bass kick drum sound of a song. The wave channel is highly configurable and can make beefy noisy blasts or delicate smooth tones.
Noise – The Noise channel basically molds atonal static into sounds of drums, buzzing machines, explosions, bells, ocean waves sounds, and wind. You almost always use it for drums or special effects.
The lines below each channel represent a pattern. In hUGETracker, a pattern is a list of commands for a single channel. The four patterns will play simultaneously at the same time through the soundchip. We will get into the insides of a pattern in a moment.
Each pattern is made up of 64 rows. A row is a single moment in time in the song. It might start a note, stop a note, or make some modification to the song’s properties. Each row’s events across the four channels are executed simultaneously. The speed at which they occur is controlled by the tempo.
To the left of the Tracker Grid is the Order Editor. This is a high level view of your song. The highlighted gray background row is the row you’re currently viewing in the Tracker Grid. If you click on another row, the Tracker Grid will display the patterns in that row. In the example on the screenshot, we are viewing the first order of the song, which contains patterns 0 1 2 and 3. The Order Editor’s cells can be edited, you can change the number of a pattern to assign a different pattern to a certain channel for an order of the song. We will get more into this later.
Note: Although the UI sometimes refers to rows in the Order Editor as a “row,” they are really called Orders. An Order is a set of 4 patterns that are played together.
Now let’s dive into the internal components of a pattern.
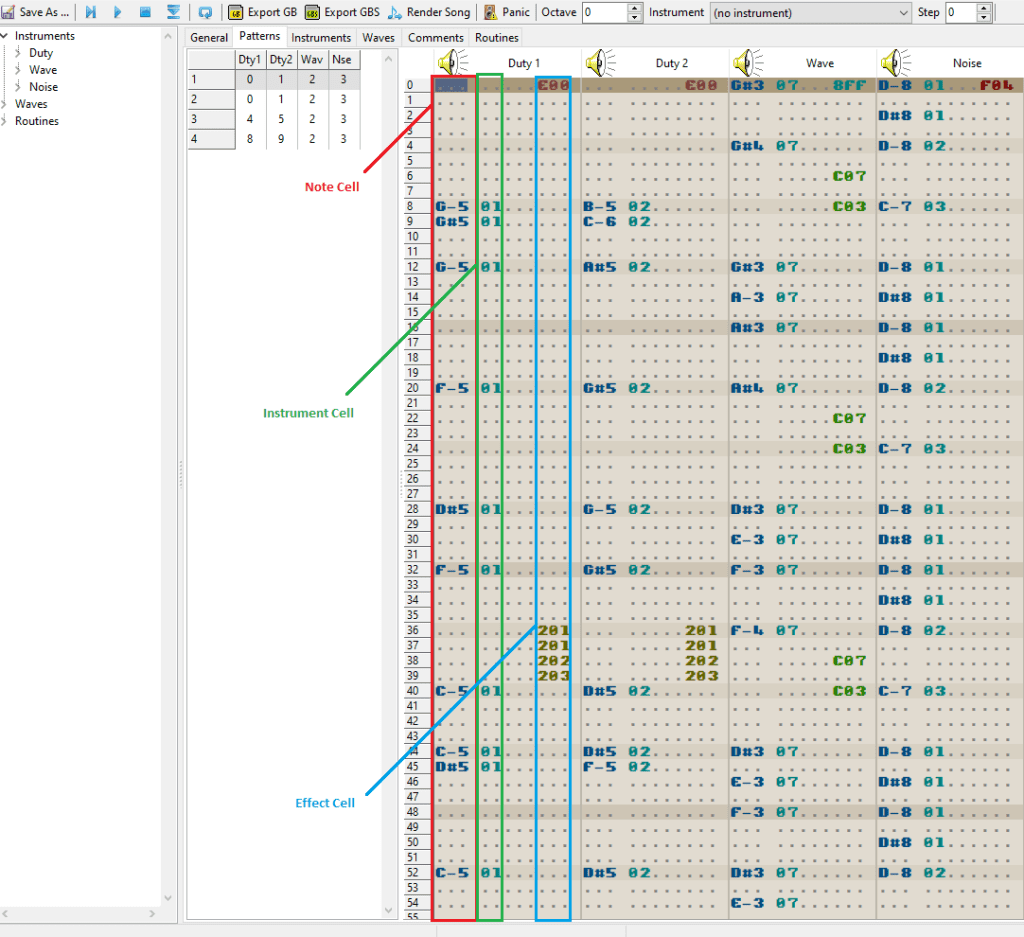
Each of the four channels’ patterns contain the same properties. The Note Cell tells the tracker what note to fire off when this row is reached. It might be a tone or a drum noise depending on the channel.
Next is the Instrument Cell, this tells the tracker what instrument to play the Note Cell’s note through. We will learn about instruments later, but imagine them as a bass guitar, a drum, a trumpet, etc. The number corresponds to the instruments you see on the far left of the screen per channel.
Finally we have the Effect Cell. Effects do things like make a note quieter, change their stereo location, stop a note, or bend a note up or down. We will get way more into this later.
So to read things, let’s practice, look at Row 20. When the tracker is playing a song and it reaches Row 20, it says “Ok, Duty 1, you play a F5 note out of instrument 1. Duty 2, you’re gonna play a G#5 out of instrument 2. Wave channel, I need you to fire off a A#4 with instrument 4’s wave. Noise channel, give me a D8 out of instrument 2.” This all happens at once.
What does that sound like? Let’s learn how to play a song now and examine its pieces.
Playing A Song
At the top of the UI, you will see buttons that say Start, Cursor, and Stop. These control the playback of your song. Most composers will play chunks of the song, stop it, and make adjustments many many times (at least I do).
Pressing Start will start the song at the first pattern in the first row. Basically it plays the song from the beginning.
Pressing Cursor will start the song playing from whichever row is highlighted in the Tracker Grid. This may result in a song playing at a different tempo or not having all the notes playing until it has played for a few rows. It is handy when working on a long song and playing back just one section to review it.
Pressing stop will kill all sounds and put the cursor back where it was prior to pressing play or cursor.
Ok, now let’s hear some sounds. Press play and listen to some funky goodness.
As you can see, the highlighted line in the Tracker Grid shows you what’s playing and what you’re hearing as a result. As the song progresses notice the Order Editor also updates the Tracker Grid to show whichever order is currently playing. When it reaches the end it’ll start over.
Muting/Solo’ing Channels
Now let’s learn to isolate a channel. Isolating channels is useful when you’re not sure what’s causing an issue with your sound, or if you’d like to learn how another musician has compiled his channels to work together (it’s not always obvious). In music production speech, muting a channel means it won’t play along with the other parts of the song. Solo’ing a channel means the other channels will be silenced so you can only hear one.
Click the little sound speaker icon on all the channels except Wave. Your UI should now look like this:
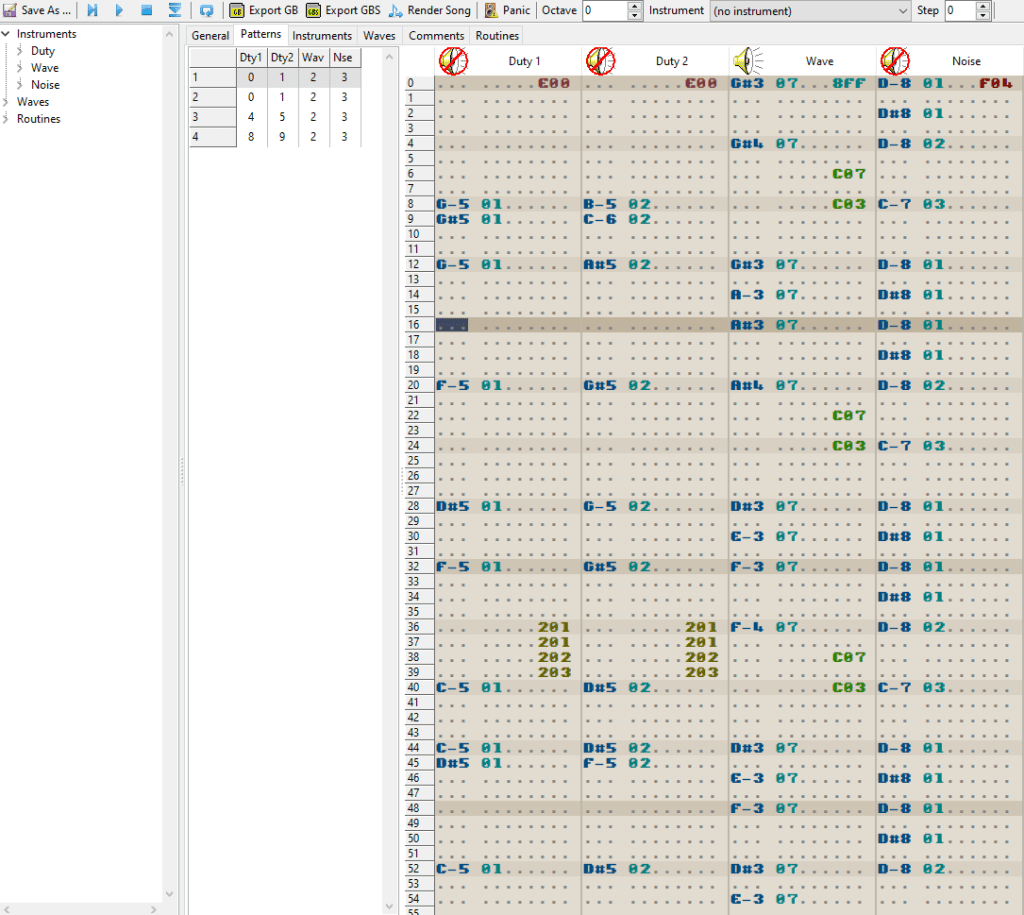
The red cross-out icon means the channel will not play when you press Play or Cursor. The data is still there, this is just for you to hear as you playback. Press Play now. You should hear the bassline with no other instruments.
Play around and solo each channel to understand how the song is composed. Hopefully you come to this conclusion:
Duty 1 – This plays the main lead. It has a kind of thick sound and is fairly loud. At the very end the pattern it plays some 8-bit tom tom drum notes in a little roll-styled bit.
Duty 2 – Duty 2 has a thinner sound than Duty 1 and is playing a harmonic version of the same lead. After a few orders, the harmony is dropped in favor of a quieter backing pad note which plays in a sustained way behind the lead of Duty 1.
Wave – The Wave is just playing the funky bassline. It is crunchy and curiously plays pattern 2 across all the orders.
Noise – The Noise channel uses a couple different instruments to produce a disco-styled beat. The beat pattern 3 also plays across all four orders.
When to use hUGETracker or GB Studio Tracker
There are benefits to using GB Studio Tracker or hUGETracker depending on your needs. For short simple songs, and especially when you’re just starting out, GB Studio tracker is a lot less confusing to use. In GB Studio Tracker the concept of a pattern is a bit different than in hUGETracker but we won’t go into it here.
hUGETracker is better for songs that will be long and for which you desire to reuse some patterns along with other unique patterns within an order. It also has more export features you need if you aren’t using GB Studio (export to .gbs, .wav, .c, .asm).
Outside of exporting to other formats, the honest truth is there is nothing you can do in hUGETracker that you cannot do in GB Studio Tracker. You just have a little less granular control over patterns and orders in GB Studio Tracker, but you should use whichever you prefer.
Next Steps
So, although we’ve yet to put down a single note of our own design, we should understand fairly well how all the individual pieces come together. The next lesson will get into making your own song and first instruments as well as using the noise channel to make some simple drums.

Beatscribe has composed and produced soundtracks for games on Nintendo DS, Nintendo Switch, PS4, Xbox1, Sega Genesis and numerous iOs and Android games for over a decade, but his true passion is creating epic moods on ancient hardware like the Game Boy and NES.
