
The RPG Series
RPGs are one of gaming’s most popular and longest lived genres, and some of the most popular series in the world have had entries (or even got their start) on the GameBoy. And now, thanks to GB Studio, it’s your turn to create an RPG of your own!
In this series, we will cover how to use GB Studio’s built-in events to create a basic RPG system that you can expand on for your own game. All project files will be available to download at the end of the article, and inside you’ll have all the examples and assets we use in each article (along with some additional comments). You can use these as a reference or even expand on them to create your own game.
Quest 1, Part 2: Enemy, Effects, and Stats
Now that we have the basic turn sequence established, let’s make this start functioning like a real battle. An RPG wouldn’t be much of a game if the monsters just stood there looking menacing, now would it?
In today’s article, we’ll add a monster to our battle scene, give it two types of attacks, and also start tracking some basic stats for the character & the monster like HP, Attack Power, and more.
Let’s go!
Character Creation
In order to begin tracking stats for our game, we’re going to need to utilize variables. If you’re new to GB Studio, you may want to check out our Basics series on Variables, as they’re the backbone of almost every kind of game.
To cover the basics of our Battle, we’ll want to have a few basic stats, but we’ll be adding more down the line. You can also customize these as you get a better idea of how you want your game’s progression and various formulas to work, but for this series’ purposes, we’ll assume you’re following this basic setup.
Let’s start setting up our main character. Head over to the Boot Scene we created in Quest 1. In the ON INIT tab of the scene, create an [Event Group] to contain our player stats – this will help with organization, but has no function on its own.
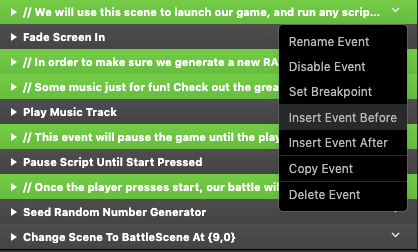
Since our ON INIT tab already has some events, you’ll notice that the “Add Event” button is beneath the current scripts. You’ll want to make sure this event is placed before the scene change – any events placed after a [Change Scene] event will not run! You can do this by dragging the event around to change the order, or by clicking the down arrow in the corner of an existing event and selecting “Insert Event Before”.
Once you’ve created your event group, add a [Set Variable to Value] event inside:
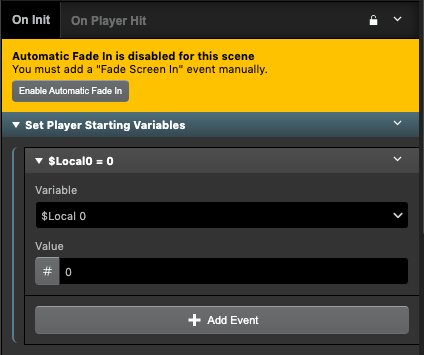
The [Set Variable to Value] event defaults to a Local variable; since our player stats will be used in more than just this script, we’ll want to set these to a Global variable. You can use the dropdown box to select an unused Global Variable (in this project, it’s Variable 0). Then, let’s rename it so that we can remember what the variable controls when we use it later on.
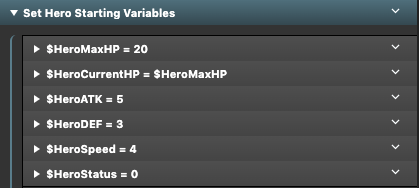
We’ll need to create a few stats, so create a [Set Variable to Value] event for each one, using a new Global variable for each stat. For this article, we’ll create:
HERO MAX HP
Our Max HP will be used to determine our total HP, and will be useful for keeping track of HP when we need to do things like heal. Let’s set this to 20 to start.
HERO CURRENT HP
The Current HP will be what we actually modify when we take damage. Since we’re starting out at full, we’ll want to set this to 20 (our Max HP).
HERO ATK
Our ATK stat, or “Attack”, will be used to determine if our fight actions are successful. Let’s set this to 5.
HERO DEF
Our DEF, or “Defense”, will be used to check if an enemy’s Attacks are successful. Let’s set this to 3.
HERO SPEED
Our SPEED stat will be used to check success when we try to flee from battle. Let’s set this to 4.
HERO STATUS
Finally, our STATUS will be used to track what kind of special conditions we’re affected by, like being Poisoned. Since we’re starting out healthy, we’ll set this to 0.
Once your stats are set up, your event group should look something like this:
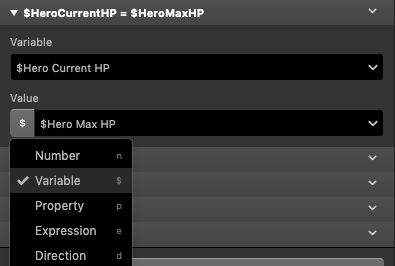
But wait! In this screenshot, our Hero Current HP stat isn’t set to a value – it’s set to another variable! Since our game is just beginning, our Hero’s “Current” HP should be equal to the “Max”, so we can use a function of the [Set Variable to Value] event to do this. When we set our Hero Current HP, click the # symbol next to where we enter a variable, and from that drop down, we can select a Variable instead of a Value. Select the “Hero Max HP” variable, and now when our game begins, our current HP will start at the Max!
With our Hero’s stats confirmed, let’s move on to our Monster.
A Monster Appears
Unlike our Hero, a Monster’s stats won’t need to be set up during the start of the game. These will be set when a battle begins, so let’s head back to our Battle Scene.
In the ON INIT tab of the Battle Scene, we’ll create an event group for setting up our monster just like we did for the Hero. In that event group, we’ll use [Set Variable to Value] events to assign values to the stats in the same way.
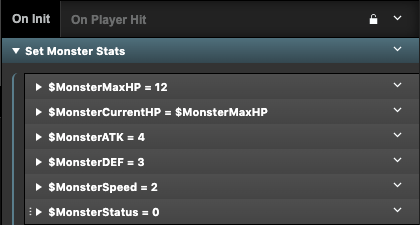
Note that even though these variables will only usually be used in a Battle scene, they will still need to be GLOBAL variables, as we’ll want to use them in other scripts. Luckily, we can re-use these in other battle scenes, so we won’t need to worry about different monsters duplicating variables.
Monster Actions
Now that our monster has stats, let’s make it do something on its turn. To keep things interesting, we’ll give our monster a Normal Attack, but there will be a small chance for it to sometimes do a Special Attack.
First, let’s head to our Monster Turn trigger. You can delete the placeholder dialogue from earlier.
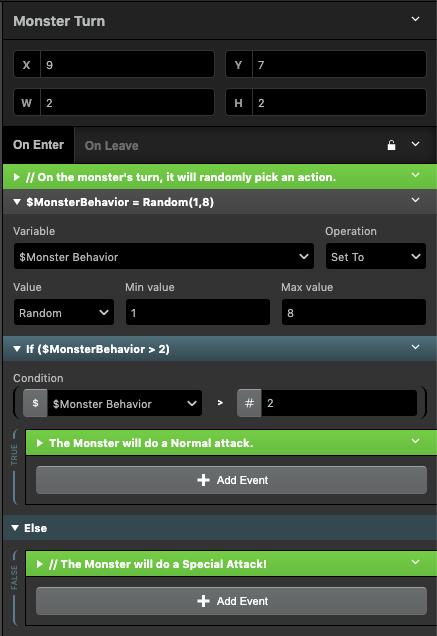
We’ll start by using a [Math Functions] event to generate a random number between 1 and 8. I used Local 0, and renamed it to “Monster Behavior”.
Next, use a [Compare Variable to Value] event to see if the value of that variable is greater than 2. If it is, we’ll have the monster do a Normal Attack. But if it rolls low, we’ll have it do a Special Attack.
Normal Attacks
In our previous article, our combat formulas were simple dice rolls. Now that we have assigned some basic stats, let’s start fleshing those out, beginning with our monster’s Normal Attack. To start using our variables in our formulas, we’ll want to use Math Expressions.
Combat formulas can come in all shapes and sizes, and working out how your stats your will impact your game is part of the fun of creating an RPG. For our tutorial, we’ll be using a simple formula influenced by common tabletop RPG mechanics.
To determine if an attack hits, we’ll have the attacker make an attack roll, which will be another [Math Functions] event. For this, we’ll set a variable to a random value between 1 and 20.

But instead of having a static target value to compare our result against to determine success or failure, let’s start factoring in our stats.
Create a [Compare Variable to Variable] event, and using the drop down fields next to their value entry, select “Expression”. This will allow you to write a Math Expression in place of entering a static number.
To get our Monster’s attack power, we’ll combine the Attack Roll variable, our Monster Speed variable, and our Monster ATK variable. Then, we’ll compare that against the Hero’s DEF, plus their Hero Speed, and a flat defense value of 10.
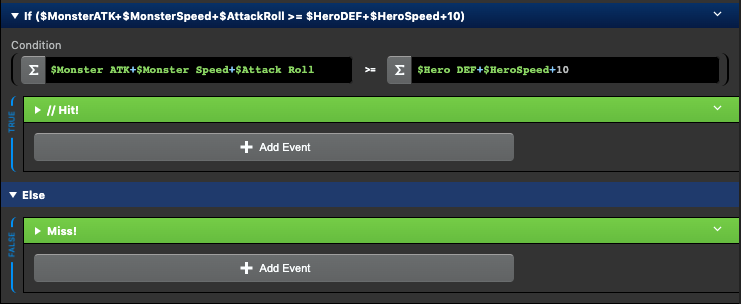
With this combat formula, our Hero has a defense value of 17. Our monster’s ATK and Speed are equal to 6, so we’ll need to roll an 11 or higher to hit the Hero, meaning we’ll hit just under 50% of the time.
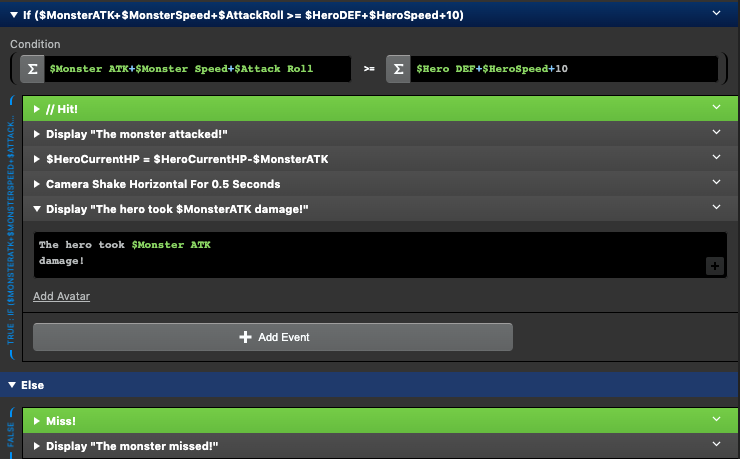
If we do hit, we can deal damage to the Hero. Our damage formula is straightforward; we’ll use another [Math Expression] to set the Hero Current HP to “Hero Current HP – Monster Attack”.

We can use [Display Dialogue] and [Camera Shake] to add a little flavor to our attack sequence, too. By displaying the Monster Attack variable in dialogue, we can also show how much damage the player took, and if we miss, we’ll show a message using [Display Dialogue].
Special Attacks
For our special attack, let’s have our monster try and give the hero a status condition! We can use many of the same functions we just built, so following the same method as our Normal Attack, create an attack roll and comparison event.
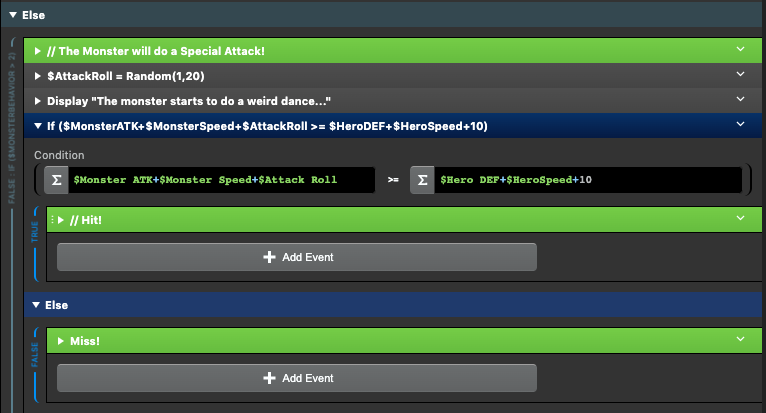
Instead of having our hero take damage on a Hit, we’ll have it change their Status variable, but only if they don’t already have a status condition.
To do this, create an [If Variable is False] event, using the Hero Status variable. Then, in the event, add a [Set Variable to Value] event to change the Hero Status variable to 1. This will assign a status, which we’ll decide is the “Poison” status. Since we can’t rename a value, we’ll have to write this down and for future reference. A comment event can be helpful to record what our values represent, or a separate text file in our project folder can keep track.
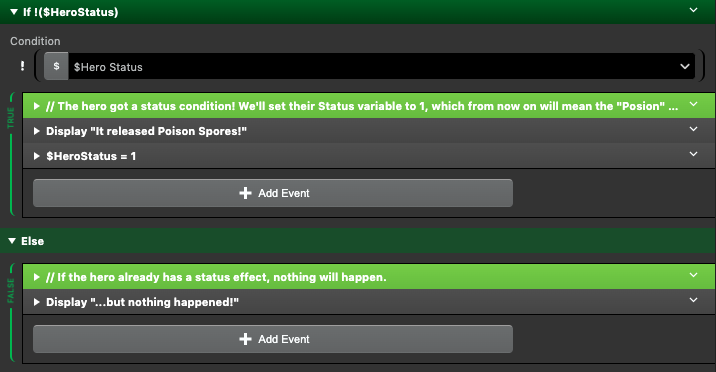
If the player already has a status condition, we can add a [Display Dialogue] event or other way to show that nothing happened, just as if we missed.
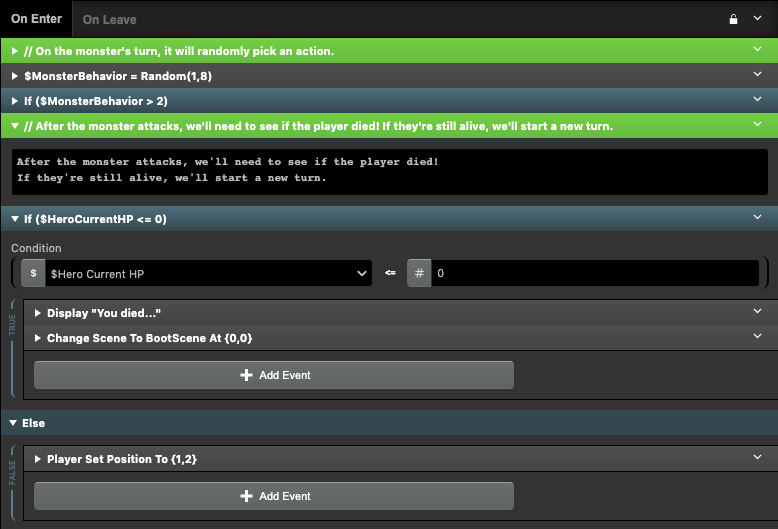
Ending the Turn
With our Monster’s attack resolved, we’ll need to see if the player was defeated or if we’ll continue into a new turn.
Using a [Compare Variable to Value] event, create a check to see if the Hero Current HP is less than or equal to 0. If it is, we’ll send the player back to the Boot Scene (eventually, we’ll have a game over screen later on), but if they still have HP remaining, we’ll start a new turn by sending the player actor back to our Player Turn trigger.
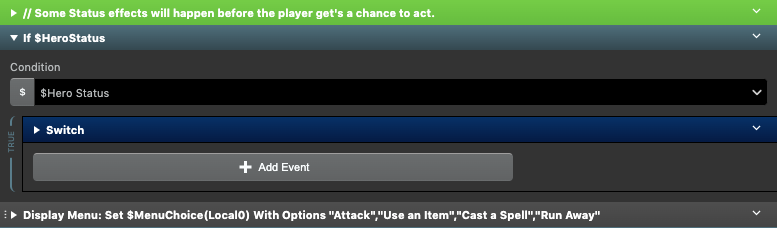
Status Effects
Now that our player can be poisoned, we’ll need to make that take effect. We’ll have poison damage happen at the start of the player’s turn, so head over to the Player Turn trigger.
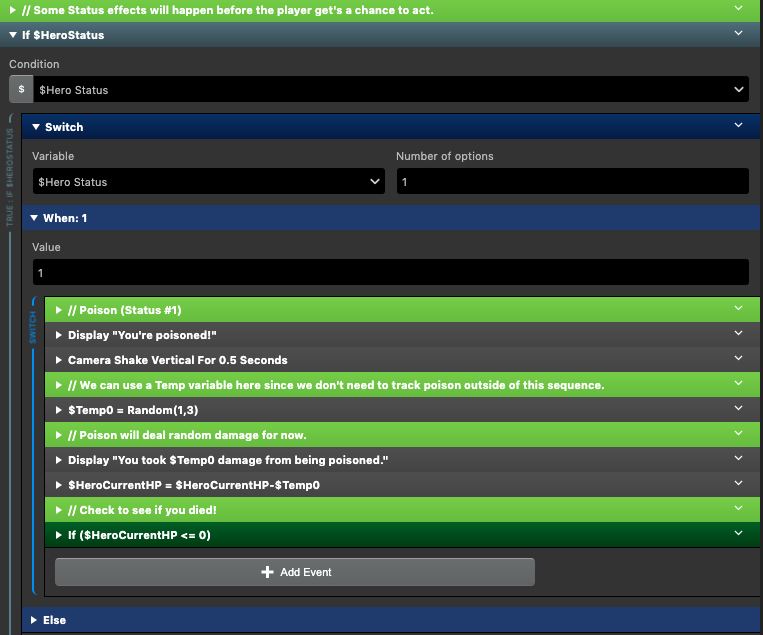
Before our Menu event, add an [If Variable is True] event, selecting our Hero Status variable. Inside, we’ll place a [Switch] – right now it will only have 1 option, but we’ll add more later on.
Let’s make poison damage deal a random amount of damage. You know the drill – add a [Math Function], and have the range be 1 to 3. Since we don’t need to keep track of the poison damage outside of this event, we’ll use a Temp Variable to track our poison damage.

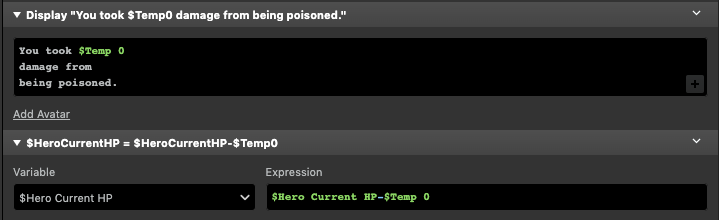
Then, just like in our Monster’s normal attack, we can add a [Display Dialogue] referencing $Temp0 to show how much damage we took, and a [Math Expression] that sets Current HP to Current HP – Temp 0 to actually deal the damage.
Using another [If Variable Compare to Value] event, check if the Hero’s Current HP is 0 to see if we died, and if we didn’t, we’ll continue the turn as normal.
And there you go, our status condition checks are all set!
Wait, aren’t we forgetting something?
Hold on – if we’re checking for poison damage at the start of our player turn, every time we enter that trigger, even if we cancel a menu choice, we’ll be checking to see if we’re poisoned. We’ve had our first bug, and that’s no good!
Proper sequencing and controlling scripts is hard to get right, especially as our games get more complex. Luckily, we can fix this with a variable!
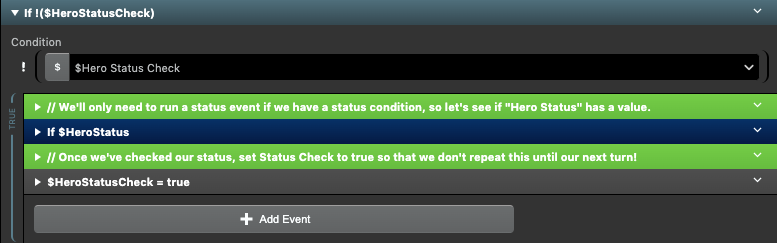
Using another [If Variable is False] event, let’s make a check for a new global variable called “Status Check”. If this is false, we’ll run the script to check if we have a status condition, and when a status check happens we’ll set this variable to True. This way, if we go back and forth in a menu during the player’s turn, we’ll only ever run this once! We’ll set the status check variable to false at the end of the Monster’s turn so that we can check it again on the next player turn.
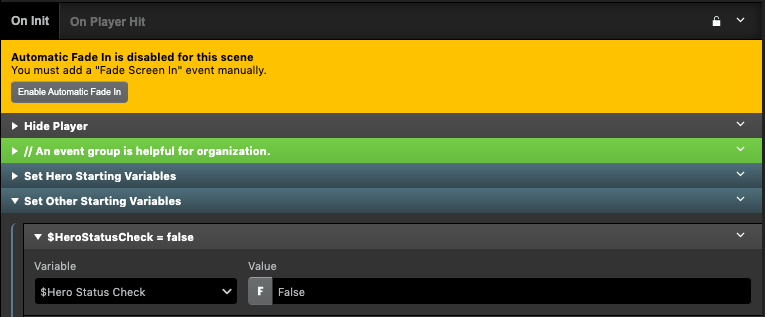
You’ll also want to add this into our Boot Scene so that whenever we begin a battle, Status Check is set to false.
Pop Quiz!
Using what we learned with the Monster turn, we can go back to our player’s Attack and Flee actions and update those scripts to use similar attack, damage, and other formulas. For example, to run from a battle, we could try a different calculation like a “roll off” against the monster to compare who is faster.
Try and put your new knowledge to the test and update these yourself; the project file has the updated sequences, so you can check your work against the download!
You can download this tutorial’s project files below, or visit the project on Itch.io!
Up Next:
Wait a second…who’s that mean looking guy in our Battle Scene? In our next article, we’ll start to add some more sprites and effects to our scene, and dip our toes into GBVM to display our HP in a HUD!

Friendly Neighborhood Game Designer, Podcaster, and (ex)Librarian (he/him)
GB Studio Games | Tabletop Games


