
The RPG Series
RPGs are one of gaming’s most popular and longest lived genres, and some of the most popular series in the world have had entries (or even got their start) on the Game Boy. And now, thanks to GB Studio, it’s your turn to create an RPG of your own!
In this series, we will cover how to use GB Studio’s built-in events to create a basic RPG system that you can expand on for your own game. All project files will be available to download at the end of the article, and inside you’ll have all the examples and assets we use in each article (along with some additional comments). You can use these as a reference or even expand on them to create your own game.
Quest 3: Back to Town Part 1 – The Inn
Now that our battle system has a way to hand out rewards, we’ll need to actually give the player the opportunity to do something with all that money! In Quest 3, we’ll create a town scene for our player to explore and provide various services. In our first part, we’ll begin with a classic RPG staple – the Inn.
Creating a Town
We’ll start off by creating a small town for our player to explore. If you’re following along with our project assets, you’ll see a few new scenes added to our project: a Town, an Inn, a Shop, and a mysterious Cave. We’ve borrowed these maps from the GB Studio Sample Game (with a few modifications – thanks Chris!).
In your typical RPG, Towns offer a player opportunities to rest after exploring, acquire new items, take on quests, and learn more about the world or story of a game. Don’t worry about fleshing out your world just yet – we’ve populated ours with a few NPCs and events for fun, but for now we’ll be focused on the basic functions of a town.
Let’s start with the Inn.
Rest and Relaxation
Inns are a staple of RPGs, and usually provide two key functions for a game. The first is to give the player a place to restore their HP and MP without expending items (usually for a modest fee), and the second is to provide a place to save your game. For our game, we’re going to have the Inn provide both features!
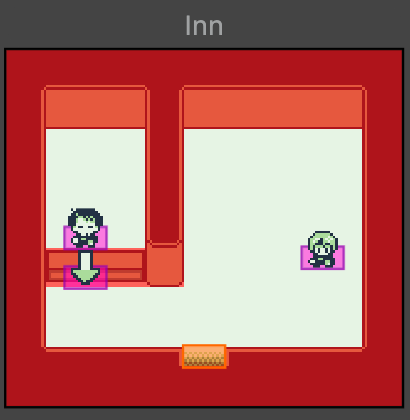
In our Inn scene, we’ve placed a trigger near our Innkeeper NPC. Since he’s behind a desk, and we’ve set that as a blocked area, we’ll need a way to interact with that Actor. To do this, we’ll use a different actor to run our scripts, and the Innkeeper sprite will be purely cosmetic.
Designer’s Note:
If you need to conserve actors in a scene, you could also accomplish this by creating a sprite that has its collision area below the character, allowing you to interact with it further away (a trick we’ll use in our next article). You could also utilize triggers and the [Attach Script to Button] event, but since this is a simple scene, we can afford to commit an extra actor in this instance.
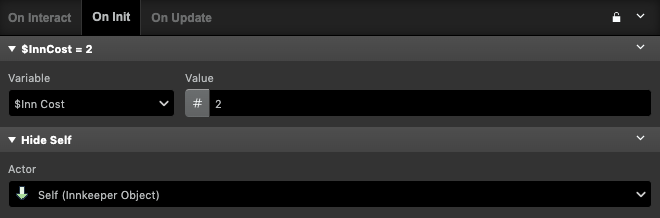
First, in the On Init area of our Innkeeper Object, we’ll create a Local variable to use as the cost of the room. We’ll use a variable to do this so that we can easily reference the value in dialogue and math events, as well as reuse the scripts for other Inns and easily adjust the price! After that, we’ll use [Hide Actor] so that we don’t actually see the arrow sprite.
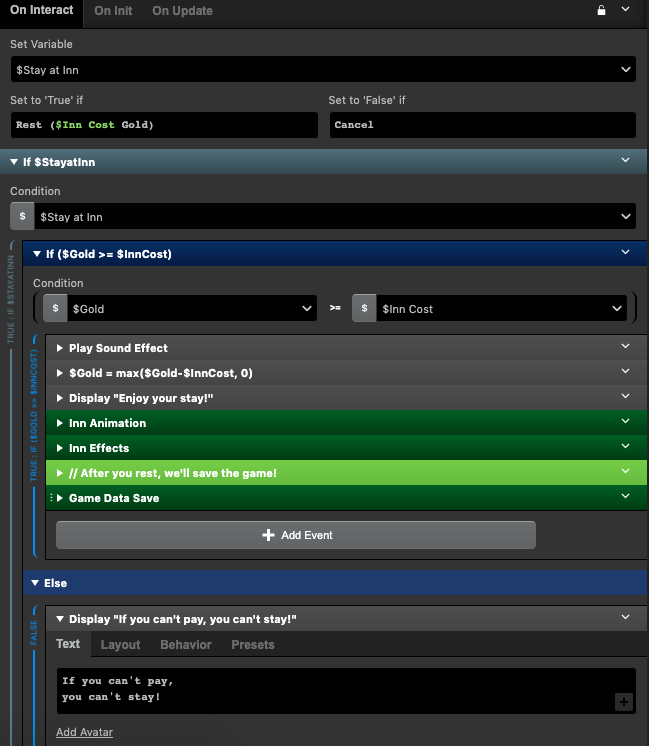
In the On Interact section, we’ll add some dialogue to act like the Innkeeper. After that, we can get into our actual Inn event script.
Using a [Display Multiple Choice] event, we’ll give the player the choice to stay at the Inn or not. If they do choose to stay, we’ll need to make sure they can afford the room. With a [Compare Variable to Variable] event, we can check if the player’s $Gold (Global variable) is greater than or equal to the $Inn Cost (Local Variable).
If the player has enough gold, we’ll use an [Evaluate Math Expression] event to deduct the cost from our gold (and using the max( function we’ll make sure we don’t go below 0). Then, we can run the Inn’s functions.
For a little flavor, we’ll [Play Music Track] and [Fade Screen Out]. Then, while the screen is black, we’ll [Set Player Position] to make it look like we used the Inn, and then we can [Fade Screen In] once our player has been moved to complete our sequence.
We’ll also use this opportunity to restore our player’s HP and MP. Using the [Set Variable to Value], we’ll set $Hero Current HP to the $Hero Max HP variable. We can do the same for MP (Note: If you’re using the project files, we’ve created those variables for this Quest, but haven’t implemented them in our Battle system just yet).
Once we’ve added all the effects of sleeping at the Inn, we can use [Game Data Save] to save the game. Now, whenever a player starts the game, we can start from this Inn instead of starting fresh.
Continuing the Quest
Since we’ve now given the player the ability to save the game, let’s take advantage of that and add in a Continue system.
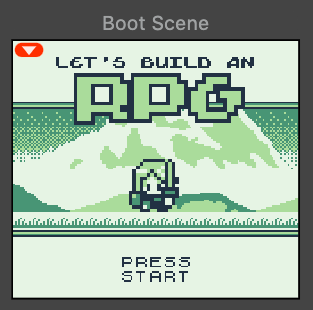
Head over to our Boot Scene. Since this is where our project begins, we’ll repurpose this scene as our Title Screen.
In our On Init section, we’ll re-organize our boot script and add in the option of continuing our game.
First, we’ll still want to [Hide Player], and to make sure we can keep our Random Seed generating properly, we’ll also want to [Pause Script Until Input Pressed] after our [Fade Screen In] event.

Now, once the player presses Start, we’ll use a [If Game Data Saved] event to check if there is any data saved in Save Slot 1.
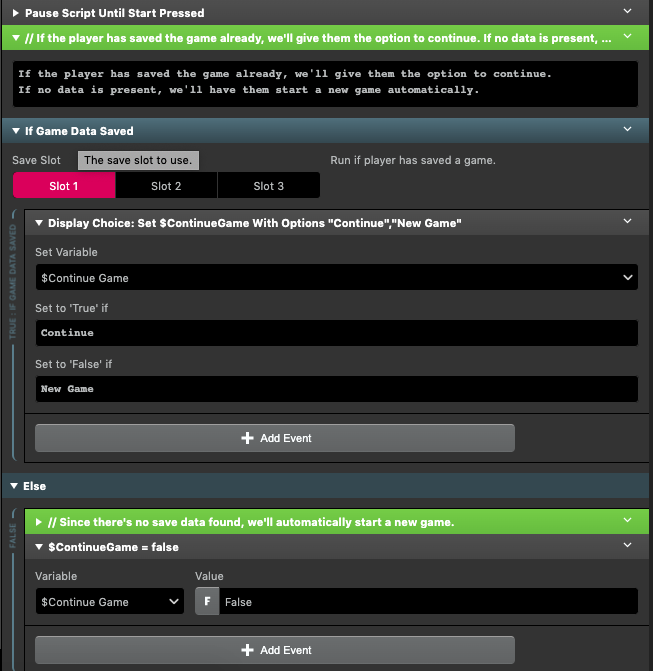
If Save Data is found, we’ll want to give the player the chance to either continue their game or start a new one. Using a [Display Multiple Choice] event, we’ll set a choice variable to be true if they continue, or false if they want to start a new game.
Then, using an [If Variable True] event, we’ll [Load Game Data] if they chose to continue.
If no data is found, or if the player chose to start a new Game, our choice variable will be false. In that case, we’ll have the game start a New Game automatically, and we’ll run all the events we ran in previous articles as part of our original ‘boot scene’ – setting up our starting stats, gold, etc. Then, we’ll change the scene to the start of our game, which for now we’ll change to being a location in town.
Designer’s Note:
We’ve made a few changes to our text boxes throughout the game just to make things a little easier on the eyes. Take advantage of GB STUDIO 4’s Behavior Presets feature in dialogue events to customize your settings and differentiate between things like Battle messages and NPC dialogue.
Coming Up:
Our heroes are now well rested and ready to head back into town for a shopping spree! In Part 2, we’ll create our Shop scene and learn how to buy items.
You can download the project files here, and don’t forget to visit the project page on itch.io to ask questions or provide feedback. See you next time.

Friendly Neighborhood Game Designer (he/him)
GB Studio Games | Tabletop Games
