
Welcome to the first chapter of GB Studio: Getting Started with Games! The goal of this series is to learn the basics of game development while creating a cool little game.
In this first chapter, we’ll learn how to handle different types of sprites, including sprite frames, using projectiles as sprites, creating animations that change depending on variables, and some basic scripting concepts like random variables, switches, attaching scripts to buttons, and conditional scripts. You can download the source project to check out any of the steps or reuse the multimedia resources.
The Game: Helping Linda, the Pirate Kitten!
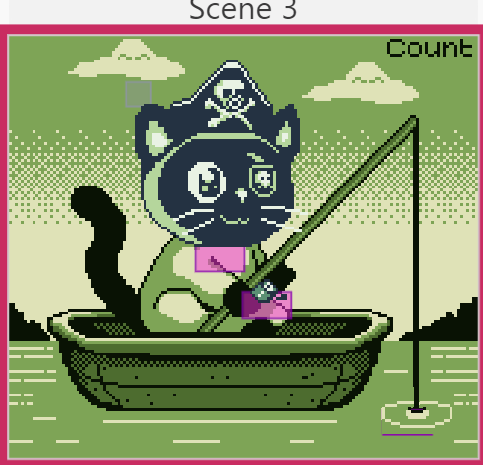
Linda is an adorable pirate kitten on a boat looking for lunch. We need to help her by creating a mini-game that allows her to fish for some tasty fish! The goal is to trigger an event where, after a while, a fish bites the hook. At that moment, the player must press the A button repeatedly to catch the fish. If we succeed, a timer will increase. Let’s get started!
Setting Up the Scene
After creating a new project, we’ll add a new scene (it doesn’t matter which type since we won’t be using any predefined features). Once the scene is selected, the right-hand side of the screen will display all the scene’s information. Click on “Background” and choose a scene you’ve previously drawn (placed in the Assets\Backgrounds\ folder). In my case, I’ve used a 160 x 144 scene with 157 unique tiles.
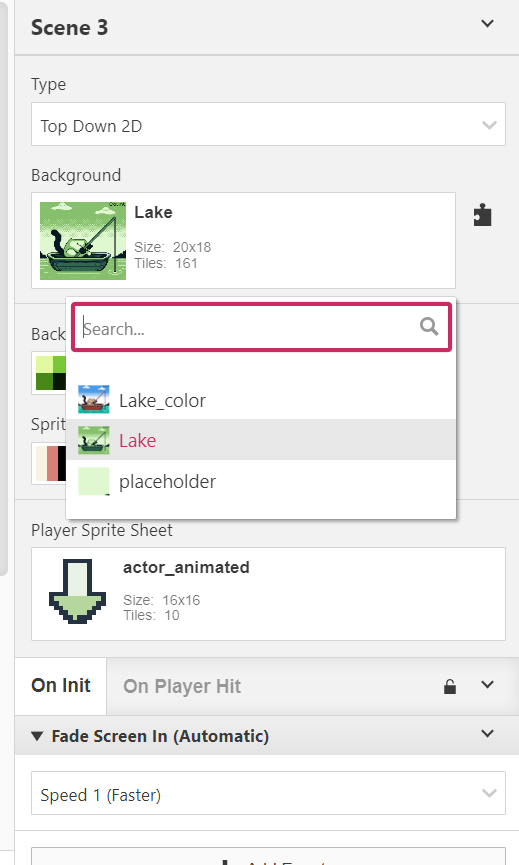
Next, click on “Add Actor” (an actor is a dynamic object independent of the scene, and if we want it to have animations, the PNG file should include all the frames). Select a previously created PNG file located in the Assets\Sprites folder. The transparent part will use the color #65ff00. I’ve used a large actor sprite to represent the kitten’s head, instead of including it in the background. We’ll change the expression depending on the situation later.
Optionally, I’ve also created an actor for the fishing reel to add some action to the scene, as it will shake. We’ll add another actor for the water area that will include animations for the buoy underwater and the caught fish.
Finally, we’ll add a very interesting actor to represent the fish count, which we’ll explain how to set up in the next section.
The Fish Count Actor
We want to create an actor that shows the real-time fish count. First, we’ll create a PNG file that includes all the numbers we want to display, from 0 to 9. As this is a sprite, remember that we can only use 3 colors, since the 4th color will represent the transparent part, which won’t block the scene. Now, access the sprite editor to define each of the possible frames. It’s important to organize them, as we’ll later need them to depend on a variable that increments at specific moments. The idea is to increment the variable, and each time it does, the sprite frame will change from 0 to 1, 1 to 2, and so on.
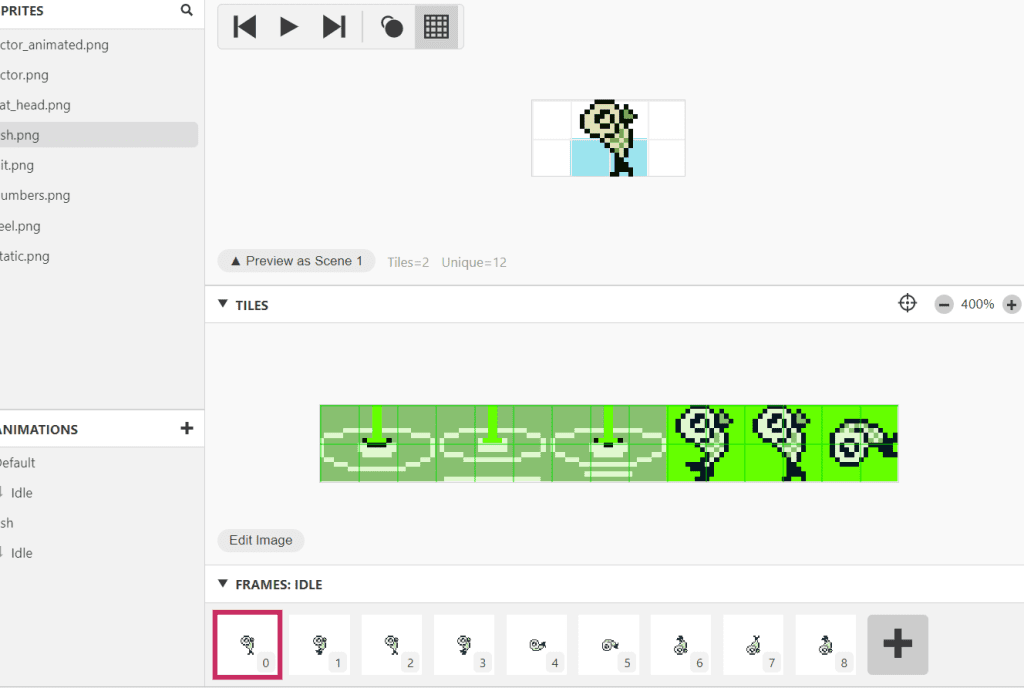
Once inside the sprite editor, find the PNG file (in my case, numbers.PNG) on the left sidebar. After selecting it, set the sprite animation to “Fixed direction.” Then, create the different frames in order to represent each number. I went ahead and created frames for 00 to 99.
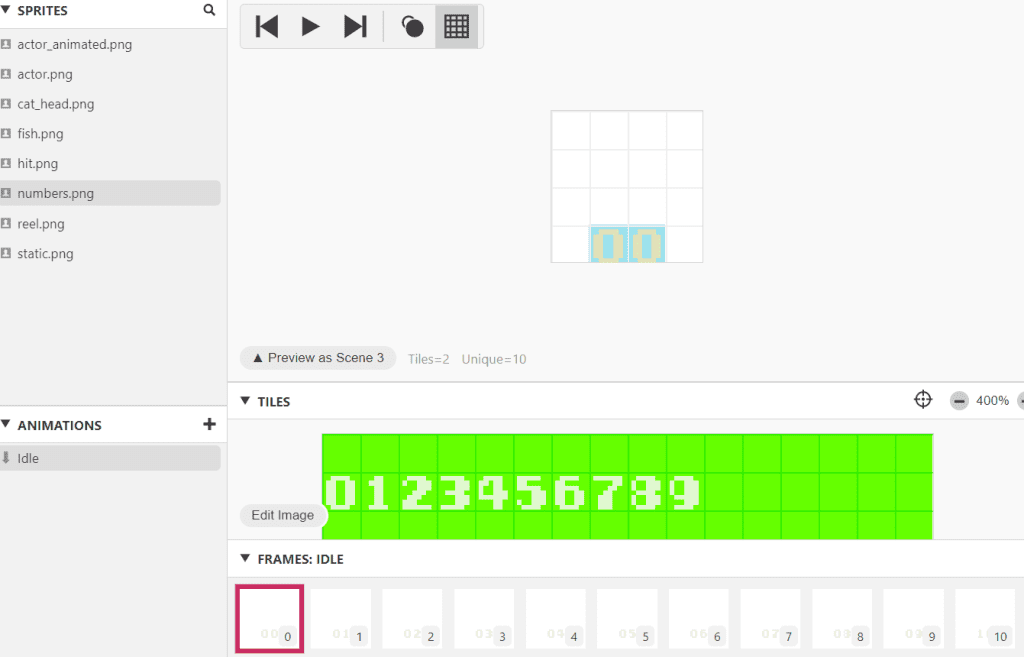
The last important step is to set the animation speed of the number actor to “None.” This can be done via script with the “set actor animation speed” command or simply by clicking the “Animation speed” option in the right-hand info panel when selecting the actor. With this, our scene is ready. Now, let’s get to the fun part: scripting!
Initial Script
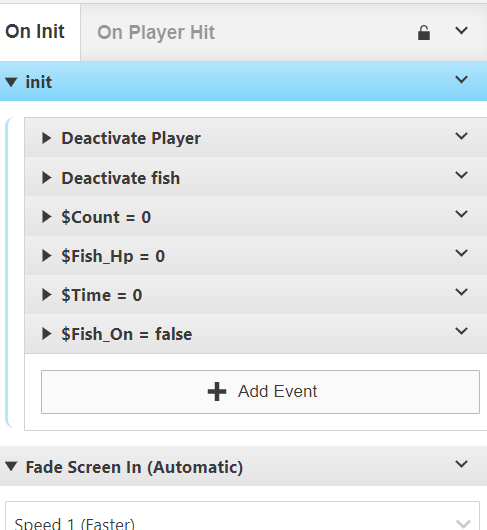
I don’t want to sound like your mom, but I highly recommend keeping everything organized! (It’ll save you a headache in larger projects when you need to tweak or search for something). To do this, click on “Add event” under the “on Init” section of the main scene. This section allows us to create scripts that will run when the scene starts and also add scripts to buttons. These events typically run in order and only once. We’ll create an event to help with organization: “Event Group.” By clicking on the “v” in the event’s corner, we can change its name. I named it “Init,” and I’ll use it to assign initial values to variables or place actors.
Next, we’ll click “Add event” within this new group. The first thing we’ll do is use the “Deactivate actor” command, and the actor we’ll deactivate is Player (we won’t need it for this scene). We’ll also deactivate the buoy actor and the fish actor. Then, we’ll use the “variable set to value” command, choose any global variable, rename it to “$Count,” and assign it a value of “0.” We’ll repeat this process for other variables we’ll need, such as “$Fish_Hp” and “$Time,” assigning them all a value of “0.” Lastly, we’ll set the variable $Fish_On to “False.”
Fish On!
Poor Linda needs to eat, so in this section, we’ll program the fish activation when it bites the hook. We need to access the “On Update” section of an actor that won’t be deactivated, so I’ve chosen the kitten’s head. Once inside, we’ll add a conditional event “If variable is false,” as we only want the next actions to occur when there is no fish (i.e., when the $Fish_On variable is false).
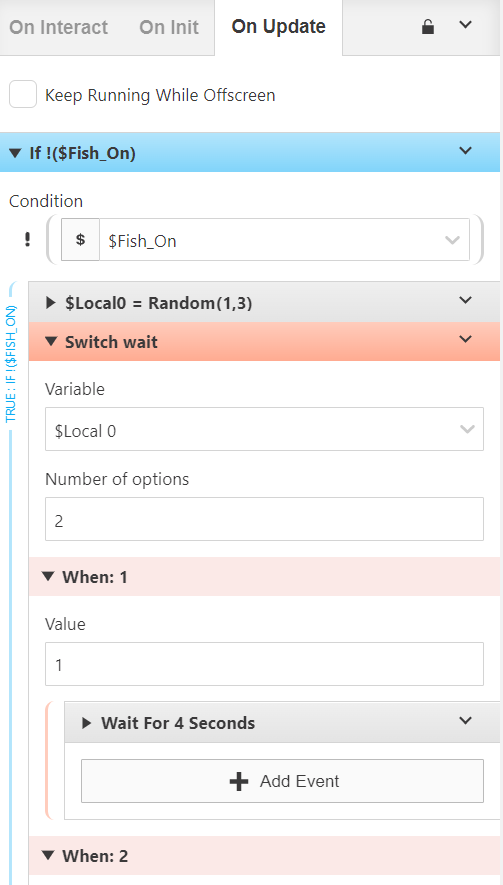
This part is optional, but for added fun, let’s make the time for the next fish appearance random. We’ll use the “Math functions” event, which lets us assign a random value to a variable (I used $local0), for example, between 1 and 3. Then we’ll use the “Switch” command, selecting the $local0 variable. This will allow us to trigger different scripts depending on the value of $local0. We’ll set different wait times using the “Wait” command (e.g., 4, 6, or 8 seconds), and we could even set the fish’s health (variable $Fish_Hp) here. I separated this into two switches: one for time and another for the fish’s health, to add variety (the variable $Fish_Hp represents the fish’s resistance to being caught. Later, we will reduce this resistance in an attempt to catch it).
Now, we’ll activate the actor with the sprite of the buoy moving. To save resources, I’ve used the same actor for the buoy movement and the caught fish animation (Actor Fish). We’ll achieve this by adding different animation states to the sprite. We’ll go back to the sprite editor and select the Fish.PNG file, which contains all the necessary animations. In the “Animations” section, we’ll find the “Default” tab, where we’ll set the frames for the animation when the fish bites and the buoy moves. We’ll click the “+” symbol to add a new animation state (which we can rename). In this case, we’ll choose the frames where the fish is coming out of the water toward the boat.
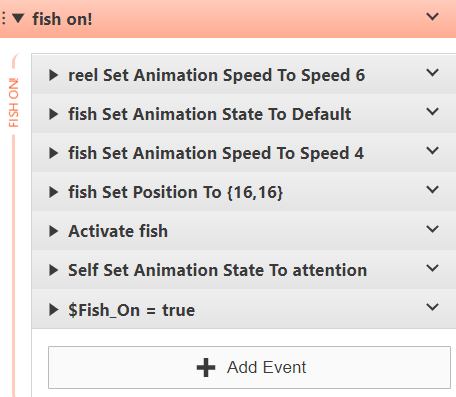
Back in the “On Update” section of the actor, we’ll create a new event group with the necessary commands to show the fish biting the buoy. The command to change an actor’s animation state is “Set actor animation state” (Actor Fish), where we select “Default.” We’ll set the actor’s position using the “Set actor position” command (I placed it over a static buoy in the background, so it looks like it’s always been there). Finally, we’ll activate the “Fish” actor, as we had deactivated it at the beginning. Optionally, we can also add a state change for the kitten’s face (showing joy when the fish bites).
At this point, you should be able to see the scene, and after a few seconds, the buoy will start moving, and the kitten’s joyful expression will appear.
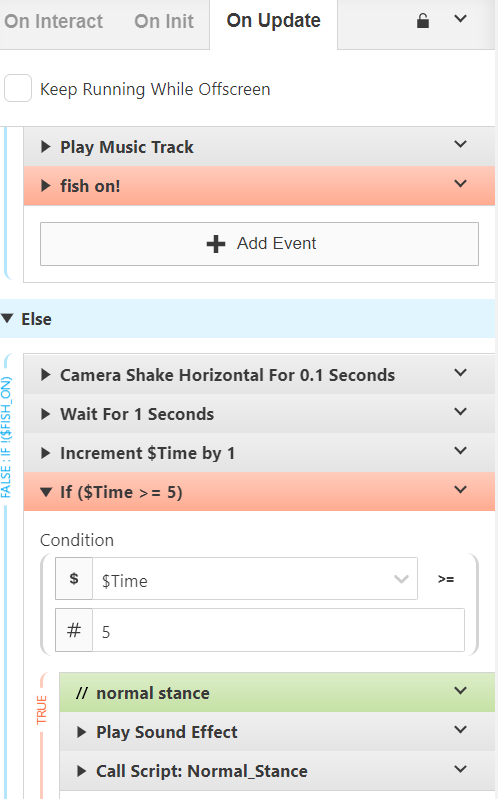
When the fish bites the hook, it’s time to handle the situation where the $Fish_On variable is True. Here, we’ll add a timer to represent the fish escaping if we take too long to catch it. First, we’ll add a small “Camera Shake” for tension, then a “Wait” for 1 second to count the time. After that, we’ll increment the $Time variable by 1. Next, we’ll use the “If Variable Compare with Value” command to compare the value of $Time when it’s greater than or equal to 5. If this condition is met, we’ll reset the $Time variable to 0, deactivate the fish/buoy actor, set $Fish_On to False, and return the kitten’s face to its default state using “Set actor animation state.”
In my case, I created this script as a custom script, which I then call using the “Call Script” command. You can explore how it works by checking out my project (Custom scripts are located on the left side, right above where you find the variables) .
Time to Fish!
We’re almost there! The final touch is adding the script to catch fish when pressing the A button. We’ll go back to the main scene’s script, after the “Init” event group, and add the “Attach Script to Button” command. In my case, I used the A button. Now, we just need to add everything we want to happen when the button is pressed.
First, we’ll add a conditional event “If $Fish_On is true” (we only want to fish when a fish bites the hook, as we set up in the kitten’s head actor script). To keep things organized, we’ll create an “Event Group” called “Hit,” and inside, we’ll use the “Variable decrement by 1” command for $Fish_Hp (this was set in the fish random appearance script).
For an extra touch, I added a small effect near the fishing reel to make it seem like we’re reeling in the fish. To do this, I used the “Launch Projectile” command (projectiles can serve various purposes). For the projectile, we’ll need to specify the source (the reel), the sprite, and the duration and speed, though we won’t need the other parameters. It’ll simply appear each time we reel in.
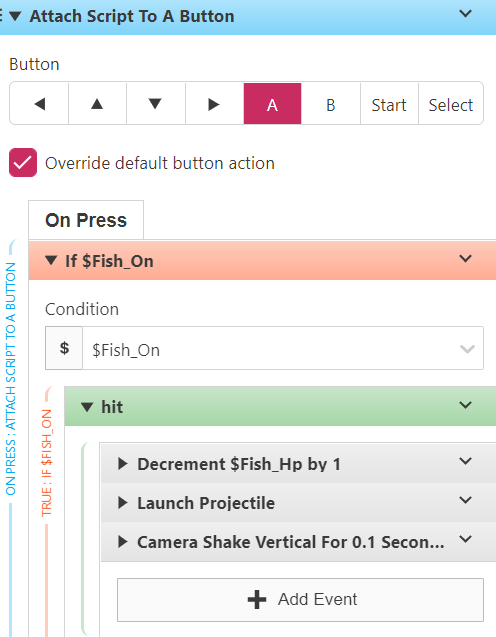
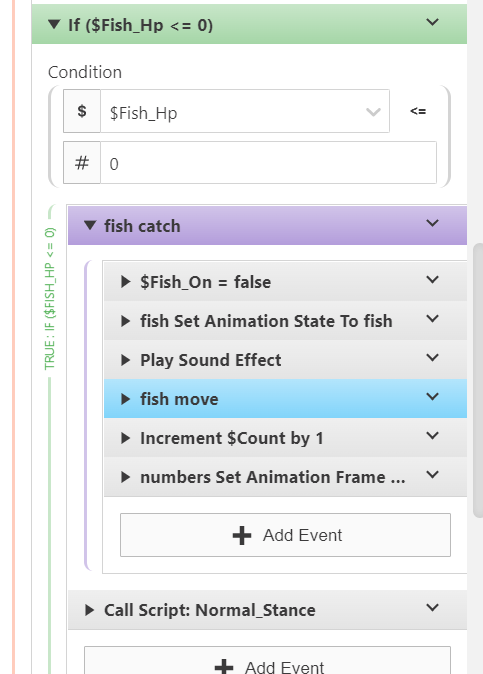
Next, we’ll add a “Camera Shake” effect for some excitement. The idea is that we’ll repeatedly press the A button to deplete the fish’s health and catch it. We’ll do this by adding another conditional event after the “Hit” group that checks when $Fish_Hp is less than or equal to 0. Inside this condition, we’ll create an event group (named something like “Fish Catch”) to handle everything that happens when we successfully catch the fish. We’ll set $Fish_On to False, change the fish/buoy actor to the one representing the caught fish, and move it from the water into the boat using “Actor move to.”
We’ll then increment the $Count variable, and finally, use the “Set Actor Animation Frame” command to update the fish count display. Instead of using a number value, we’ll link it to the $Count variable.
Lastly, we’ll copy the event group we created earlier to reset the kitten’s face to its default state in the kitten’s head actor’s “On Update” section, bringing things back to calm after the action.
Oh, and I’ve added a wonderful song from the talented “Beatscribe,” which you can download for free. It’ll really immerse you in the sea atmosphere.
That’s it! Now you can help Linda catch some fish for lunch on this beautiful day at sea.
Homework:
Are you up for inventing a story at the beginning to set the scene for the player? You could also write an ending for the story once you’ve caught a certain number of fish. To write a dialogue, you can use the “Display Dialogue” command, I’ll leave it at that. If you like it and decide to try it out, feel free to make your own version and share it on social media tagging GB Studio.
I hope you enjoyed this tutorial, if you download the source project, you’ll find a version of the scene in color. Stay tuned for the next chapter, where we’ll learn how to use color in both scenes and actors. See you soon!