This is Part 2 for the GB Studio Tracker series. Part 1 can be found here if you haven’t read it yet.
In this lesson, we are going to make drums! The best place to start when making a song is with simple placeholder drums. This helps you make sure you’re not imagining the tempo being different than it actually is. We will start by making a metronome to help hold your song together.
Later on we will go back and make more realistic drums. But, one step at a time.
Making a New Song
In GB Studio’s Music Editor, Click the “+” button on the top left next to “Songs” in the sidebar and you’ll see song_template_1.uge appear on the side (it may be 2 or 3, which doesn’t matter). Click the new song_template_x.uge that appears. You can go into /assets/music and change the name of this to something you want it to be: my_demo.uge or whatever.
Making Your First Instrument
If you’re using GB Studio 3.0 or higher, you’ll find that some basic instruments already exist in the template. We are going to overwrite them in order to learn what everything does. Don’t worry about erasing them, you’ll get them back whenever you make a new song in the future.
We are going to make a basic hi-hat instrument. If you don’t have any music background, the hi-hat is a small cymbal next to the snare drum that can be open and closed to change the way it sounds.
A hi-hat hits softer than a snare drum and has a quick decay. It’s a short, sharp sound. But first, it’d be good to learn what the noise channel actually does by default before we try to control it. Click the triangle next to the Noise heading on the sidebar on the left and then click on 01: Closed Hi-Hat. Change the settings of the Noise 1 instrument to match this:
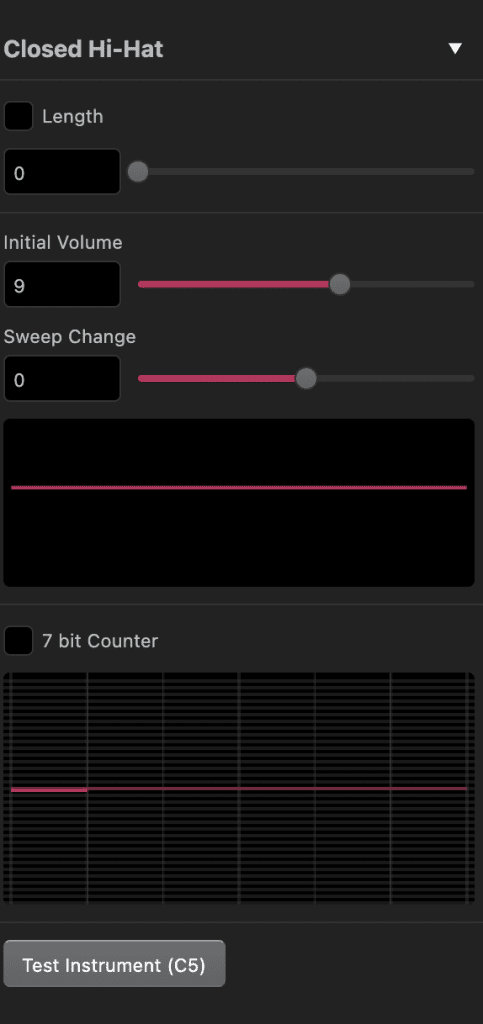
If you hit the test button you won’t hear much. Just a little rumble, not very appealing. That’s because the noise channel doesn’t make much noise at lower octaves. Don’t worry about it now, you’ll get to hear it in a moment.
Make sure the editor is in Tracker mode and set the dropdowns on the top to Instrument 1 and Octave 6 (see image below for reference). Click on the first slot in the Noise channel (set of three dots, “…”) and push A on your keyboard – you should hear a note play and “C-7” will appear in there.
Notice how every 8 rows the shading of the cell changes? We can imagine these as beats in a song, and each row divides these beats into 8th notes. In GB Studio’s tracker, there are 64 rows in a pattern, so you can consider an entire pattern like an 8 beat measure or “chunk” of a song. You can also think of them as 2 sets of 4 beats if that’s easier. To flesh out the beat or pulse of the song, put the same C7 note on every colored line (see the image below).
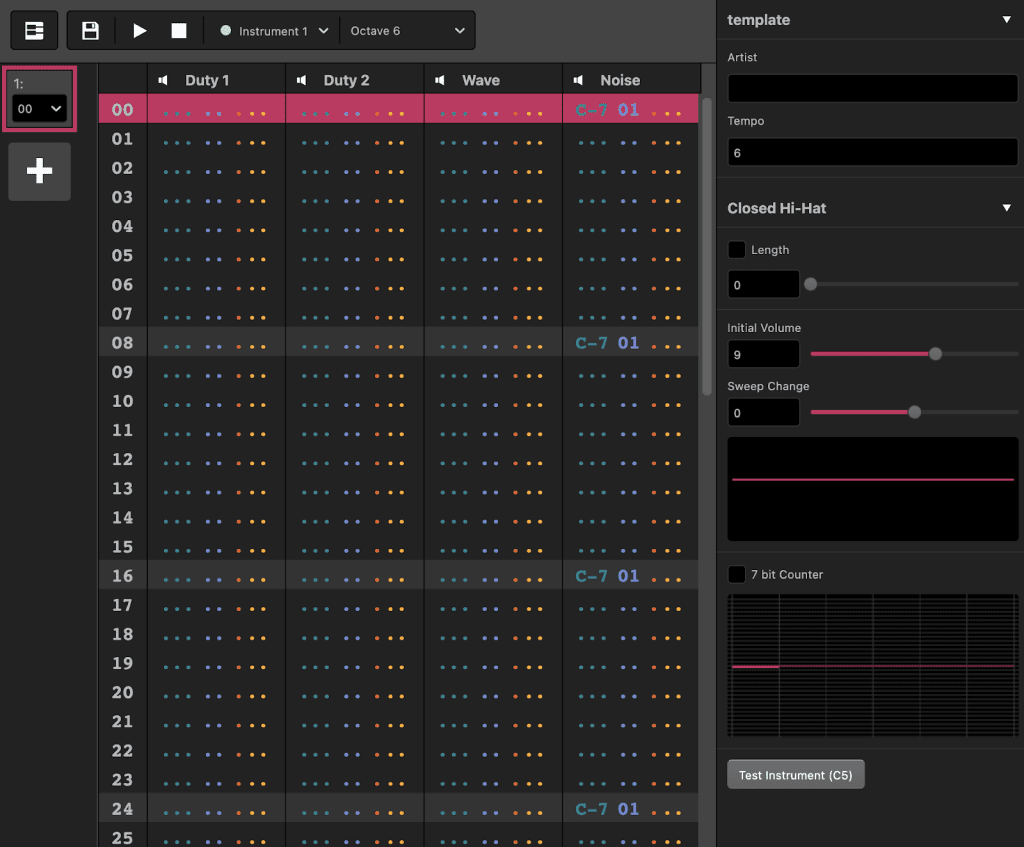
You’ll notice the note name (C-7) shows what is going to be triggered when the tracker hits that line. Next to it is 01, which is the instrument number, corresponding to how they’re listed out in the sidebar on the left.
Now we can finally press play! Ouch! The static blasting out of the speakers is not really what we want. We’re going to apply an envelope, which will shape how the sound changes in volume over time. Change the Initial Volume to 8 and Sweep Change to -7:
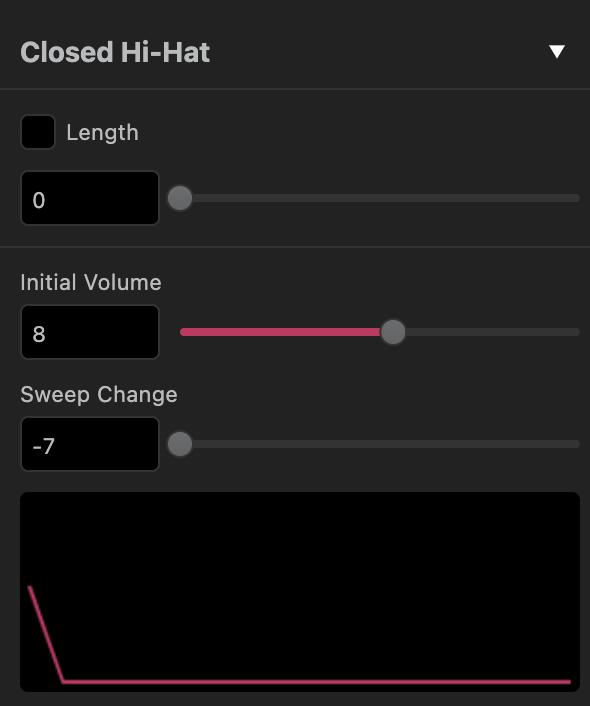
Hit play once again. Now it sounds like hi-hats. We basically told the system, “every time you reach a note on the noise channel pattern, turn the volume up real fast and then back down right away”. This is what the line graph is representing for us under those settings. Adjust Sweep Change and play it again to hear the difference. You can also click the length box and then specify how many ticks should go by before you cut off the sound. We won’t apply this here, but will in later lessons.
Making a Snare Drum
Before we move on, let’s make a snare drum to show off a little bit more of the noise channel settings. Go to Noise Instrument 2 by clicking on it on the left. Adjust the settings as shown here.
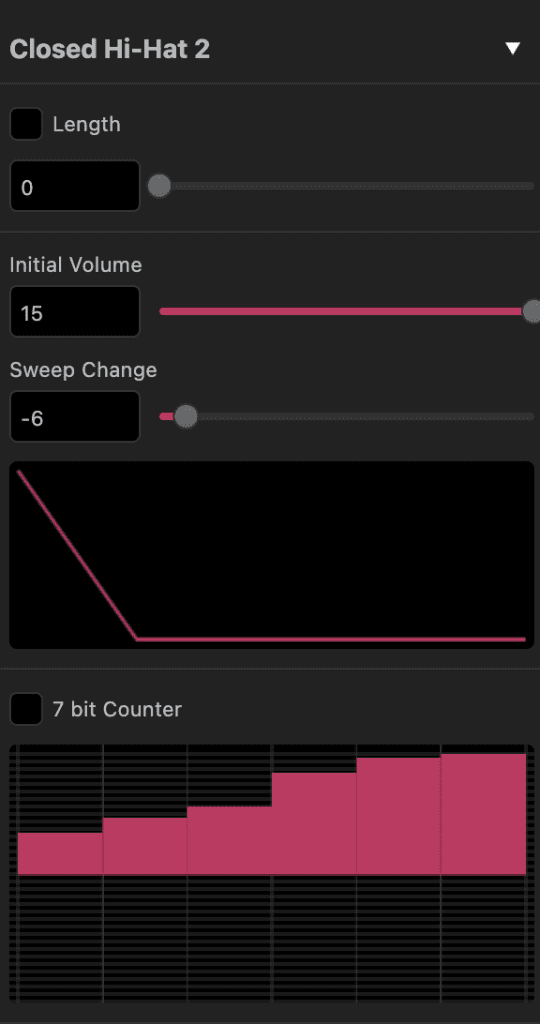
What’s the new section you see at the bottom that looks like a bar chart? This will make tiny increments in the note’s pitch every tick (a very short amount of time in the song). In the previous example, since the graph was flat there was no change in the note. In this setting, the pitch will increase quickly. Notice we also put the Initial Volume higher. At the top of the tracker, set it to Octave 4 and add an (F-5) note (H on your keyboard) to lines 16 and 48 in the pattern. Press play and you should hear something resembling a simple beat now.
Great job! You are underway in making your first song! We will come back to drums in the effects section and do some more tricks. But for now, save what you have and get ready to continue.
Now we’re ready to actually make some musical melodies play. The next lesson will cover the Duty channel.

Beatscribe has composed and produced soundtracks for games on Nintendo DS, Nintendo Switch, PS4, Xbox1, Sega Genesis and numerous iOs and Android games for over a decade, but his true passion is creating epic moods on ancient hardware like the Game Boy and NES.
