
So, we got used to the hUGETracker interface last time. Now it’s time to actually put down some notes and get more familiar with the tracker. The last article showed you a sample song. Now we’re going to start making one from scratch.
Start a new song in hUGETracker. There are lots of ways to write a song, but I like to start with the drums. The reason for this is that it’s very easy to get off-tempo in a tracker, meaning you’re imagining a certain tempo when, in fact, it’s not aligned to the grid. Drums are also an easy place to start as they’re mostly atonal; you don’t need to worry about such concerns as keys and chord progressions.
Important Terminology
Here are some important terms you’ll need to understand as we delve into these lessons:
.UGE
A .uge file is a song basically; it’s a special file that GB Studio Tracker, the hUGEDriver, and other music trackers like hUGETracker can read and modify.
Tick
A tiny portion of time that passes as a song plays.
Tracker
A tracker is a special editor for making, modifying and playing back music. Like Microsoft Word can open a .docx file, trackers like hUGEtracker and GB Studio Tracker can open .uge files.
Tempo
Ever heard a song that starts with someone yelling “1, 2, 3, 4”? This is the invisible clock for the song. Everything is playing at the speed of the 1, 2, 3, 4, on the numbers or on divided increments of it.
Channel
One of the four Game Boy sound types that the sound chip can generate as explained previously.
Pattern
A set of 64 notes (numbered 0 to 63) that the four channels will play together. Think of it like the holes an old player piano reads.
Instrument
A collection of settings for a certain channel type which produce a sound. Settings are things like the envelope, the volume level, wave form, etc.
Envelope
Imagine that each time a note is played, an invisible hand turns the volume knob up or down on that instrument, this is the envelope.
Attack
The start of the envelope or how fast the invisible hand turns the imaginary knob up to full.
Decay
The end of the envelope or how fast and when the invisible hand turns the imaginary knob to 0.
Effect
Special commands that change a note in some way, they change its stereo panning, bend it up or down, or change its volume. Some of them impact the entire song, like ending a pattern early or jumping back to a previous pattern.
Making Your First Instrument
Making an instrument in hUGETracker is fairly simple. A chiptune instrument is much like a real one. It’s a configuration that generates a certain character of sound. Unlike a real instrument, a hUGETracker instrument has just a couple of settings.
The drums – as we learned in the last article – come mostly from the noise channel. Instruments are divided into three groups on the left hand side. Duty, Wave, and Noise – 15 instruments for each of the 3 channel types. By default, there are some configured as duty and wave instruments. But we are going to make our first noise instrument from scratch. Expand the noise instrument section, and double click on number 1.
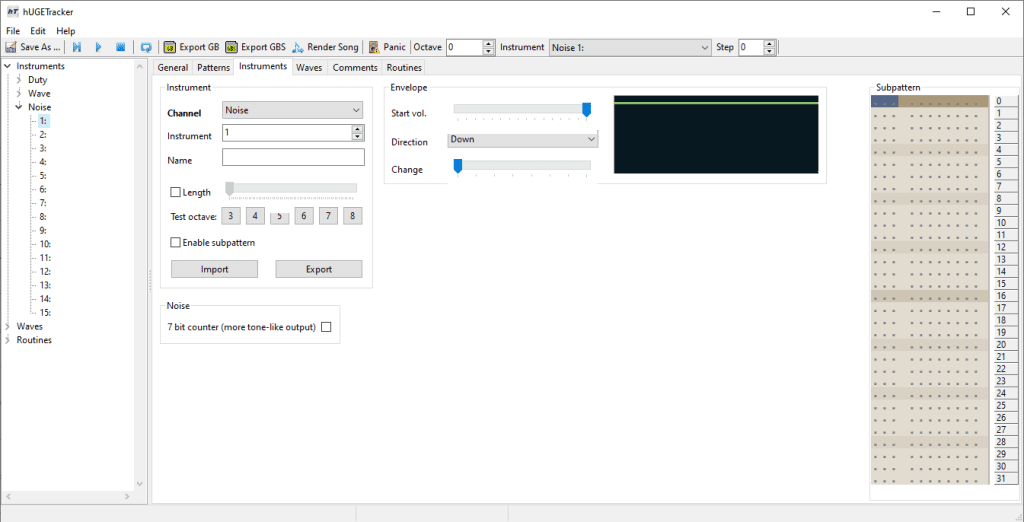
Instrument Settings
These have to do with how the instrument is identified and sounds.
NOTE: The other channels have slightly different controls. We will cover the unique parts when we reach them in the tutorial. Most of the settings here apply to all instrument channel types.
Channel and Instrument
These are basically navigational shortcuts you can use to change what instrument you’re editing or what channel type. Any changes are automatically saved when you go to the next one.
Name
This is to help you find the instrument when composing. Meaningful names go a long way in helping you stay organized.
Length
Designates how long the note will play, also known as decay. It may seem backwards but it would seem to imply how much of the original envelope gets trimmed off (so higher value means less of the original note plays).
Test Octave
Lets you preview how the instrument will sound at different octaves.
Enabled Subpattern
Click this if you want to use the subpattern (will get into what this is later).
Import and Export
You can save an instrument as a stand-alone .ugi file. You can generate these with export and bring them in with import. If you’re using beta9 for older versions of GB Studio there is a bug where the instrument settings won’t update when you import. You’ll have to go to another instrument and come back to see the settings (but it does work).
Envelope Settings
As you adjust the envelope settings and (and also length) it will change the shape of the visualization of the instruments envelope.
Start Volume
This is the level the sound is playing at when it is first triggered.
Direction
Once the note is played you can “turn the volume” up or down (or leave it alone). This designates if the sound is going to move up or down in volume as it plays.
Change
This is the degree of change over time of the envelope, or how fast the “volume knob” is turned up or down.”
Subpattern
Allows you to configure a string of modifications to the instrument that fire off each time it plays.
Noise Specific Settings
7-bit Counter
Selecting this changes the noise from more atonal white noise to a tone like sound. You check this for buzzy and distorted sounding instruments.
Let’s make our first instrument. Name it closed hat and configure it according to the image shown here:
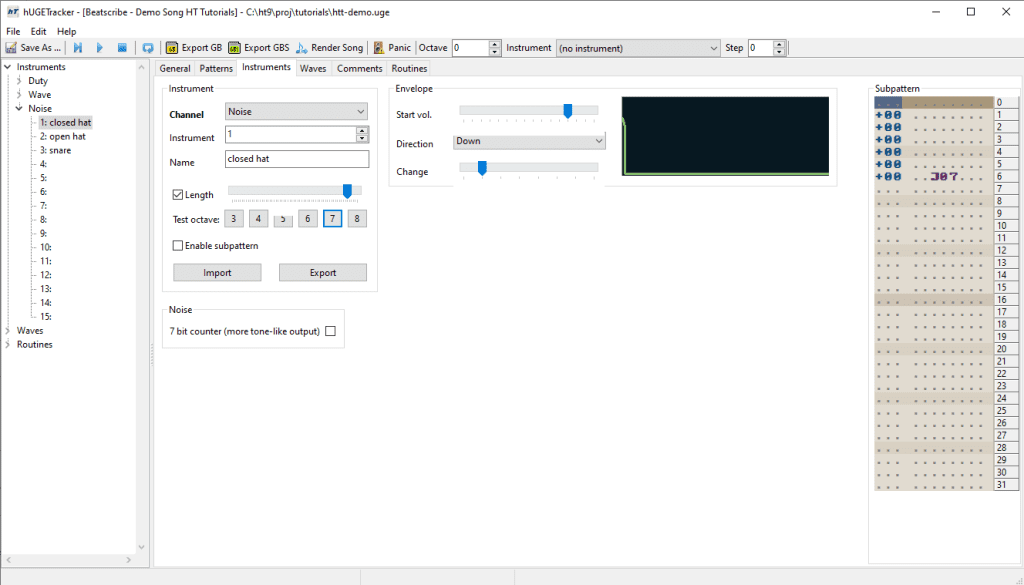
If you test octave 8, you should hear something resembling a closed hi-hat.
Playing and Placing Notes
Now that we’ve made an instrument, the time has come to finally actually lay down a note. Go to the patterns tab, and pull down the instrument drop down, and select Noise 1: closed hat. Now position the cursor in the first row on the noise channel.
When we want to put down notes we use the keyboard. Once you’re in a cell in the tracker, the keyboard becomes your piano keys. Here’s how it’s laid out:

If you press “Q”, you’ll probably hear a barely audible blip of rumbling buzz or low static. Doesn’t sound great. That’s ok. This is because the noise instrument has the most shape and sound at its higher level octaves. To change the octaves of your keyboard, pull down the octave box and select 3. Now try pressing Q, A, and then Z. You’ll hear each one is an octave higher starting at octave 3. When you pressed Z, it probably sounded closest to a closed hi-hat.
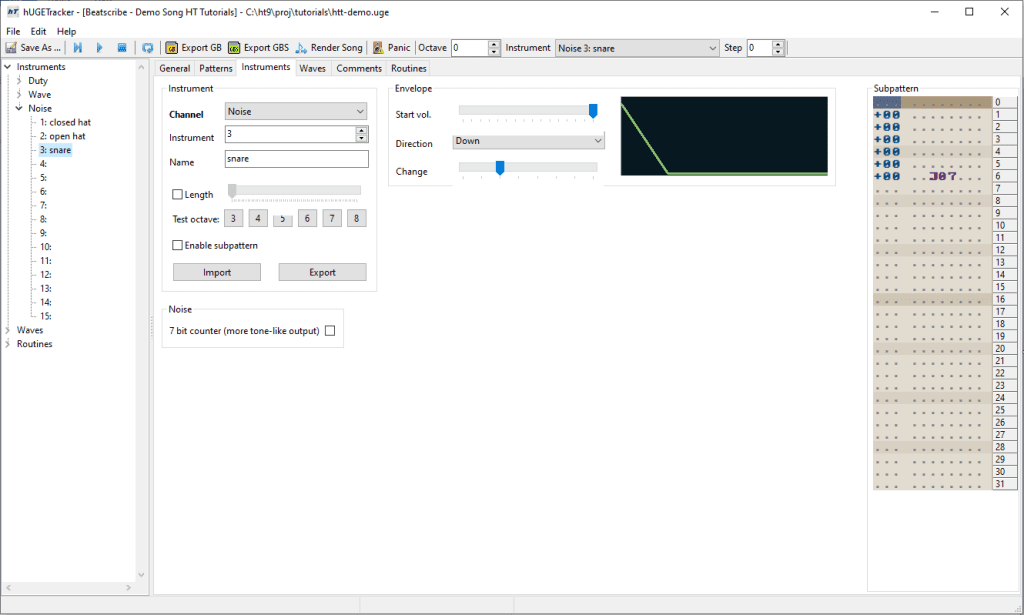
Try pressing C or V. You’ll notice these sounds are closest to the hi-hat sound we want. Try going all the way up the bottom level of the keyboard, you’ll notice after pressing V, the higher notes basically just end up being low static again. This just means you passed the range of the noise channel so it went back to the bottom. If you look at the sample song, you’ll see the first two notes are a D8 (press C) and a D#8 (V) with a blank tick in-between. But before you can go further, you’re going to need the open hi-hat and the snare instrument made. Use what you learned to build them yourself based on these pics:
Open Hi-Hat

Snare
Now that we have all three, lay out the pattern as shown here, changing instruments when needed.
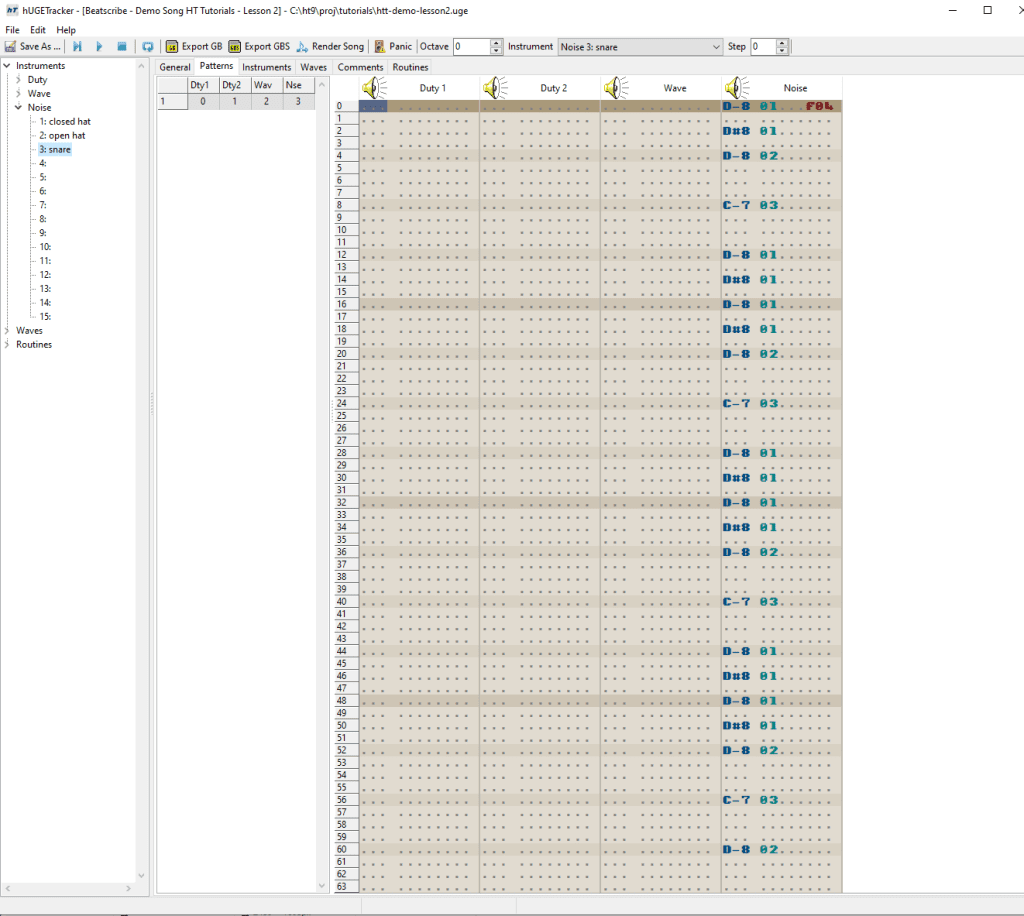
Notice that if you’re doing things right, most of the notes will be on the highlighted lines or directly between them. You might notice your song sounds slower than the demo. Don’t worry about that, we will come back to that later on. You should have what’s contained in this file at this point.
For now our song only consists of one order with one pattern made for the noise channel. Don’t worry about that either. We will slowly build on what we know to create a full song as the series continues.

Beatscribe has composed and produced soundtracks for games on Nintendo DS, Nintendo Switch, PS4, Xbox1, Sega Genesis and numerous iOs and Android games for over a decade, but his true passion is creating epic moods on ancient hardware like the Game Boy and NES.
