Setting Up The Electric Slide
With all our movement set up, it’s time to transition the puzzle into its proper form. The artwork we currently have set up is great, but we need to make those tiles slide and move around. Considering the limitations of GB Studio, we quickly encounter two key challenges: a restriction of only 10 actors in 160×144-sized scenes and graphical issues when actors overlap during movements (in DMG or non-color mode).
For that reason alone, we need to prepare our graphics to use tile-swapping for our puzzle. Starting with the background, we will need unique tiles for each one we are swapping, otherwise if we swap one, we swap any other identical tiles within the scene. So instead of our previously complete-looking artwork for the puzzle, we end up with something that looks like this:
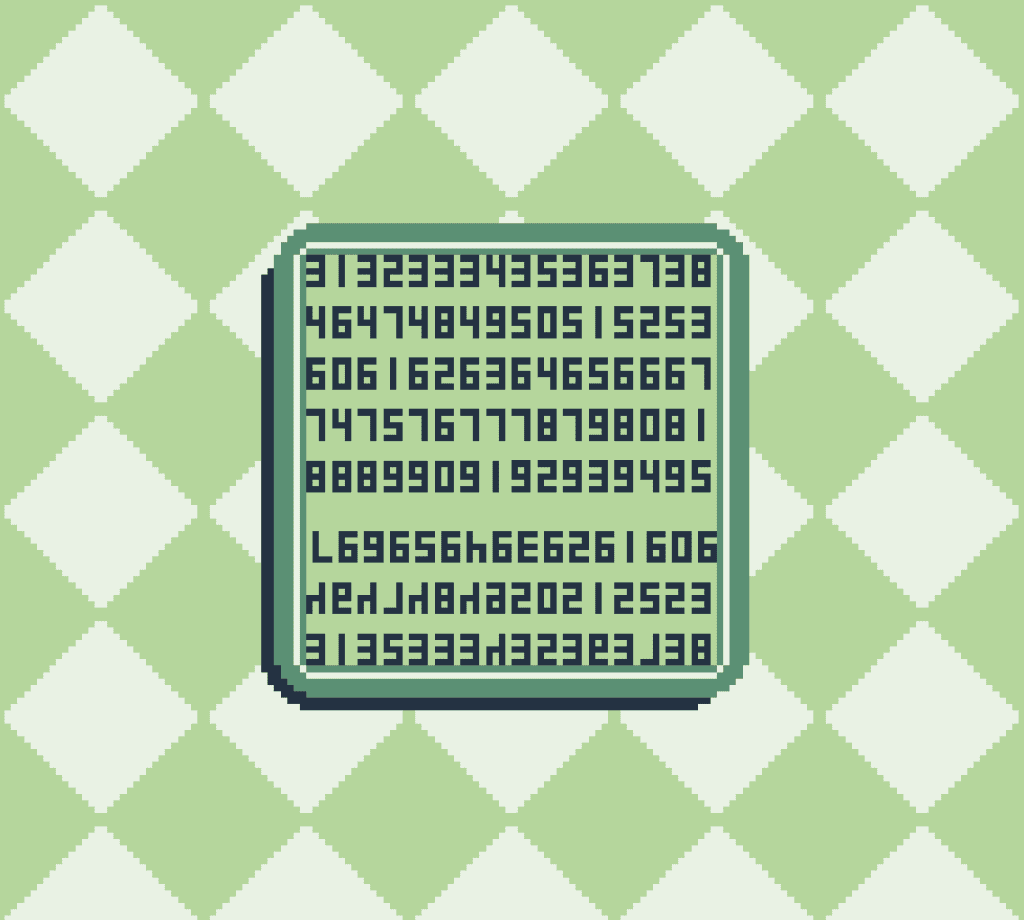
Yes it’s a jumbled mess, but it guarantees unique tiles, and that’s all that matters. Another option is to put pixel dots on each tile, starting from the top left, moving to the right down to the next row, and so on. This would leave you with 64 unique tiles (8 columns by 8 rows), which is exactly what we need for this puzzle. You may wish to personalize the art to define your puzzle intentions, of course, this is just how I would handle the problem.
Now that our background is set up, we will need to transfer all our tiles for the puzzle to their new background. I always try to place the “blank” tile in the top left of the layout of this background, and then follow it in the easiest pattern. Since we have 15 tiles to move around, we’ll place those next to it and follow to the next row.
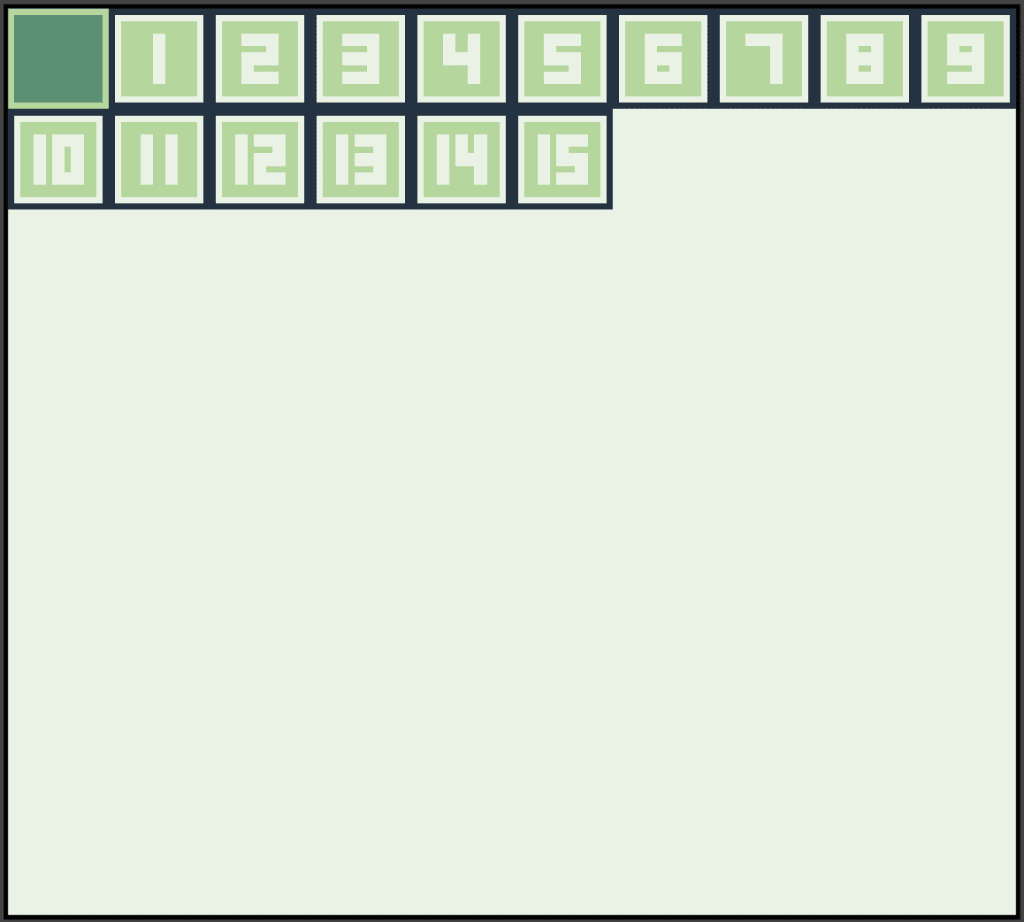
Those of you who have used tile-swapping before, perhaps with the older ways, will instantly cry foul with this layout, as you can immediately tell there are duplicate tiles. While that might be true, there’s a way to avoid complications. By setting the new scene type to [Logo], we make each tile unique, regardless of content. While it seems like we could use the same trick in the main puzzle scene, we need actors to handle our tile-sliding animations and some contextual text, and Logo scenes don’t support actors.
Another important distinction is even though we are tile-swapping, we will use the Swap Tiles Var plugin to handle the process. Instead of putting our Tile-swapping background in our tileset folder inside the assets folder within our project, we should put them in the backgrounds folder instead.
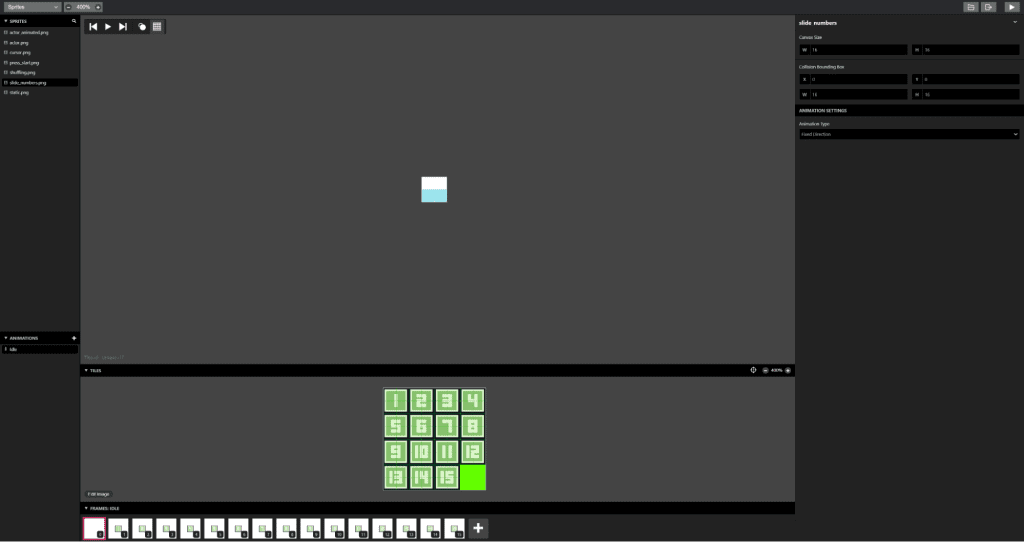
We also need a sprite to handle the tiles we move using a separate actor. You’ll set up the “slide_numbers” sprite as in the following screenshot, noting the Animation Type and Canvas Size. For Animation Type, we want to set it to ‘Fixed Direction,’ and our Canvas Size is set to 16×16. Another thing you will need to set up is the frames, leaving the first one blank, and then adding new frames and moving each of the 15 16×16 squares into the frame.
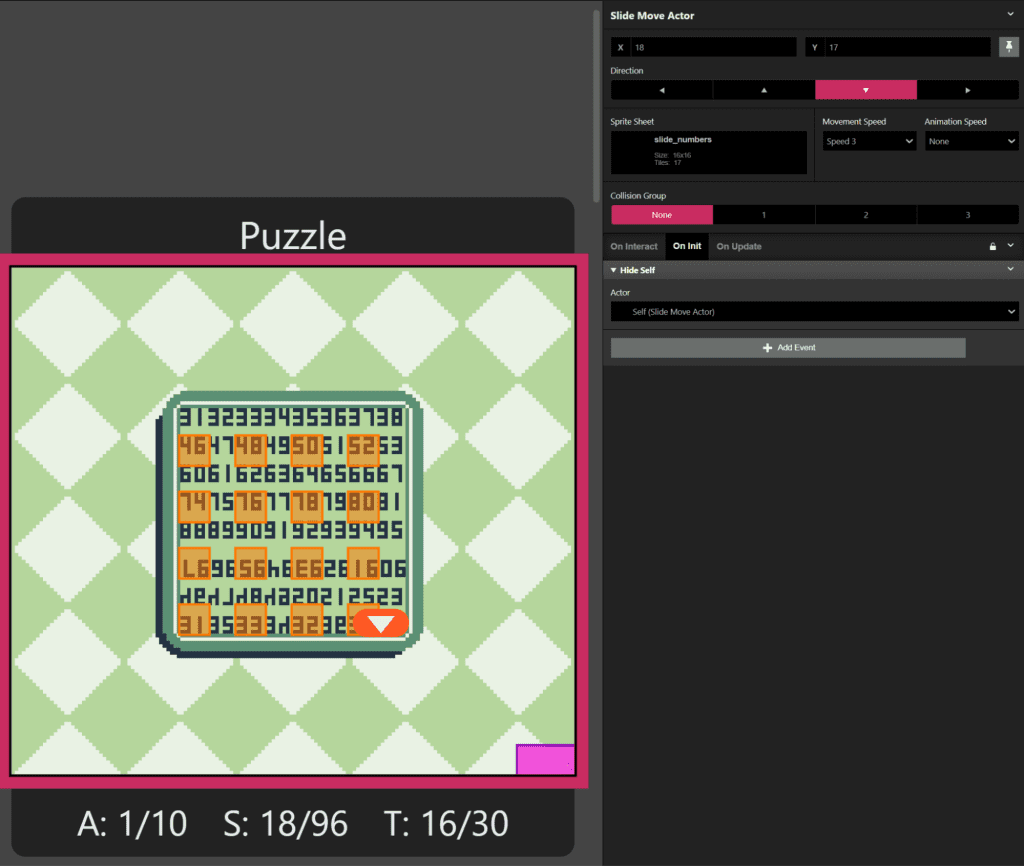
You will need to add this new actor to the scene, and you can place it wherever you want, but I chose to put it in the bottom-right portion. Set it to the sprite we just set up in the previous step. This Actor is meant to be invisible when not in use, so to ensure it doesn’t animate through the frames we created for the sprite, we also need to set it to [Animation Speed: None]. To ensure there won’t be any part of it visible during load, I put a [Hide Actor] event in this actor’s On Init section and left it set to “Self.”
Variables and Values
To store the information for each Tile, we need an assortment of variables to hold each value. You can start by creating the variables Tile 1 through Tile 16. Each of these represents the trigger the player can affect and what slide tile value is currently there. When we slide, we will update the current Tile to 0 and move the value of the current Tile to the value of the place it slid to.
Next, we will create six variables for positioning tile swaps: Tile X, Tile Y, Swap Tile X, Swap Tile Y, Move to Swap Tile X, and Move To Swap Tile Y. Tile X and Tile Y will provide the X and Y values of where the [Swap Tiles Var] event should swap within the puzzle scene, whereas Swap Tile X and Swap Tile Y are used for positioning the swaps on our tile reference background or Tilemap.
Positioning is important in a puzzle like this, so let’s create one more variable: Current Tile. We will use this variable to set our current tile value and offer a base point to provide predefined values from a [Switch] event inside a custom script we will set up next.
The Swap Tiles Var Plugin
The improvements to GB Studio over the years, especially in version 4, can’t be overstated. There have been so many quality-of-life improvements from handling scripts, color, and most recently, tile-swapping. While tile-swapping as a native feature is a blessing, it doesn’t naturally offer a 16×16 swap mode like the Swap Tiles Plugin does. For that reason, and ease of using variables instead of number values in the Var version of the plugin, we will be using this plugin in our project.
We will first create a [Swap Tiles Var] event that hides our unique tiles from the background. We don’t want the player to see this, so we’ll swap it out on Scene Initialization in our Puzzle scene. You’ll notice that the Tileset values are represented by 0, as our blank Tile appears at 0,0 on our Tilemap background. We set the number to 16 tiles and each one’s X and Y position will be the top left of the 16×16 square for each slot.
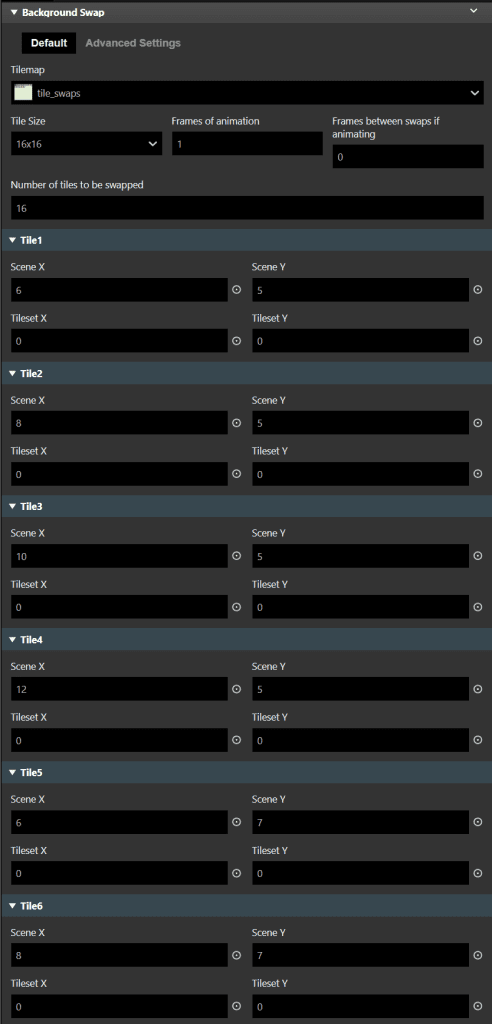
After putting this event into the On Init of the Puzzle scene, running the game will show all blank tiles. This is a good sign, but far from where we need to be to get our puzzle up and running. Let’s dive into the logic behind the puzzle before we put everything together.
Time for Logic
When we plan out any complex scene with many moving parts and visuals, we first need to determine the best order and course of action before we get too far ahead of ourselves. Creating a plan for the logic used in a puzzle scene is essential and by breaking down what we have, need, and how to tie it all together, we can tackle this challenge.
Each of the 16 triggers already moves us around the puzzle space, which is great. To create the illusion of moving a tile from one space to another, we’ll look at the breakdown of steps to determine what is missing:
- Move the Slide Move Actor to the current trigger space (entering the trigger already does this)
- Set the animation frame of the Slide Move Actor to the Current Tile variable value
- Hide the Player, Show the Slide Move Actor
- Swap the tiles behind the Slide Move Actor to blank
- Move the Slide Move Actor to its destination Tile, get the new Tile location information for tile-swapping
- Swap the tiles behind the Slide Move Actor to the correct Tile number
- Hide the Slide Move Actor, Show the Player
- Check for Win
While these steps are pretty straightforward, there are many variables and events in-between to make it work. Ultimately, the largest focus is the illusion of a Tile sliding from its current space to the blank space which will take precedence over everything else. Now that we have an outline, you can begin the hardest part of designing the puzzle: coding it.
Taming the Beast
When creating the code for each trigger, we also check the available Tiles near them. For example, the bottom right trigger, Tile 16, is adjacent to Tile 12 and Tile 15. Some tiles will have up to four Tiles near them, so you must set up your script to check each Tile to see if it’s False or has the value 0, representing the blank Tile.
An example of this written out logically would look like this:
- If Tile 12 == False
- Run the rest of the code
- If Tile 15 == False
- Run the rest of the code
This check will be used for every option for every trigger (a total of 48!), so it’s important to understand this concept as it’s what makes the script work.
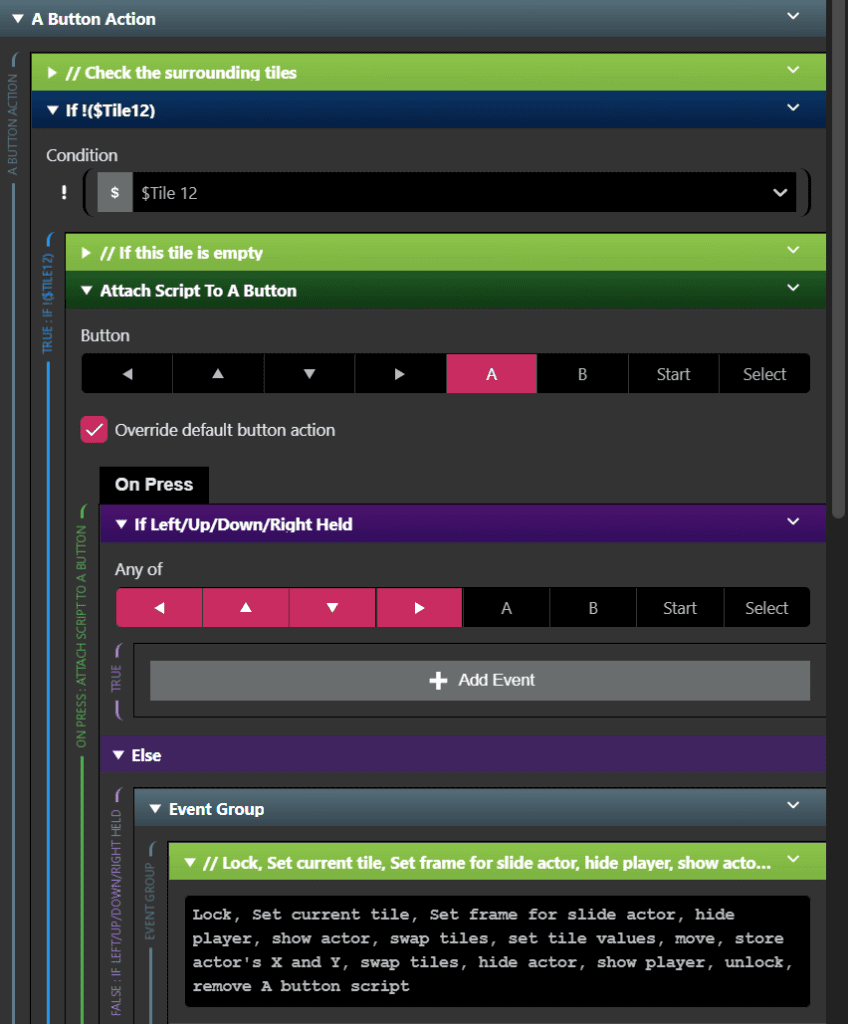
The first part of the script is an [If Variable Is False] event that envelops the rest of it. In this example, if Tile 12 is the blank space, it can move on to the rest of the code. Within it is the [Attach Script To Button] event, which is immediately followed by an [If Button Held] event with all the directions set to on, to ensure no other directions are pressed before execution, or the player could move to a new spot and execute the code simultaneously. Note that you will put the main section of your script in the Else section of this event, as it only works if you check that they are not pressed.

Start with a Script Lock to ensure players cannot move or otherwise during the script’s execution. Next, set your Current Tile variable to the variable value of our current tile with a [Variable Set To Value] event, which in this example is Tile 16 (You need to click the # sign under the word Value to change it to $ Variable instead). Use a [Set Actor Animation Frame] event, set the actor to our Slide Move Actor, change from value to variable like before, and set the variable accordingly.

Add two more events for the next part: [Hide Actor] and [Show Actor]. Set these to the Player and Slide Move Actor, respectively. Next, we need to create a custom script to use every time we want to get the tile values for swapping. Go to the SCRIPTS section on the left side of the GB Studio interface, and hit the + button to create a new one.
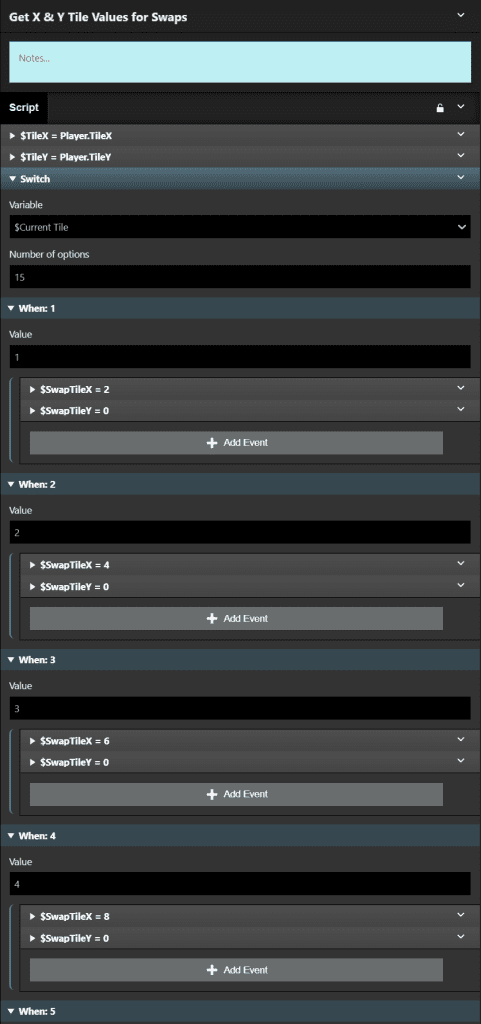
The first two events in this script are [Set Variable To Value], converted this time to Properties. We are applying the Player’s Tile X and Tile Y values to the Tile X and Tile Y variables.
Next, create a [Switch] event with 15 options, set to the variable Current Tile. Within each numbered section, put two [Set Variable To Value] events, one for the X value in the Tilemap background where that number appears and one for the Y value, and set to the Swap Tile X and Swap Tile Y variables, respectively.
Each (A) Button script will check this Current Tile variable and provide the X and Y coordinates from the Tilemap background to plug into the [Swap Tiles Var] event after this custom script. Return to your trigger script and add a [Call Script] event, setting it to the script we created.
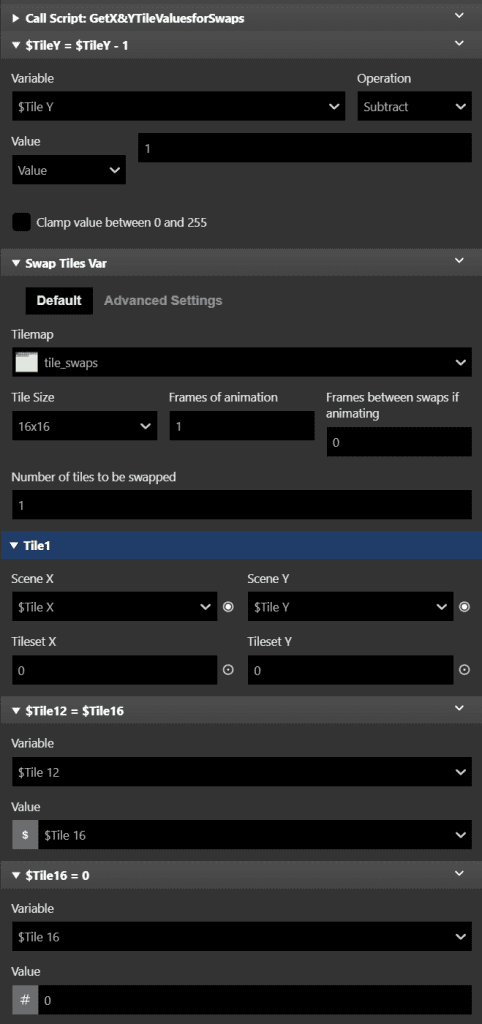
Before you apply the [Swap Tiles Var] event, you will subtract 1 from the Tile Y position with a [Math Functions] event. We did this before the swap as the top left of the 16×16 tile we will be swapping is the starting position for the tile-swapping code. Next, add the [Swap Tiles Var] event, assigning the Scene X and Scene Y to the Tile X and Tile Y variables we retrieved and altered. Finally, set the Tile # variable of the tile we’re moving to as the current Tile # variable and set the current Tile # variable to zero (the value of the blank space in this puzzle), using modified [Set Variable To Value] events.
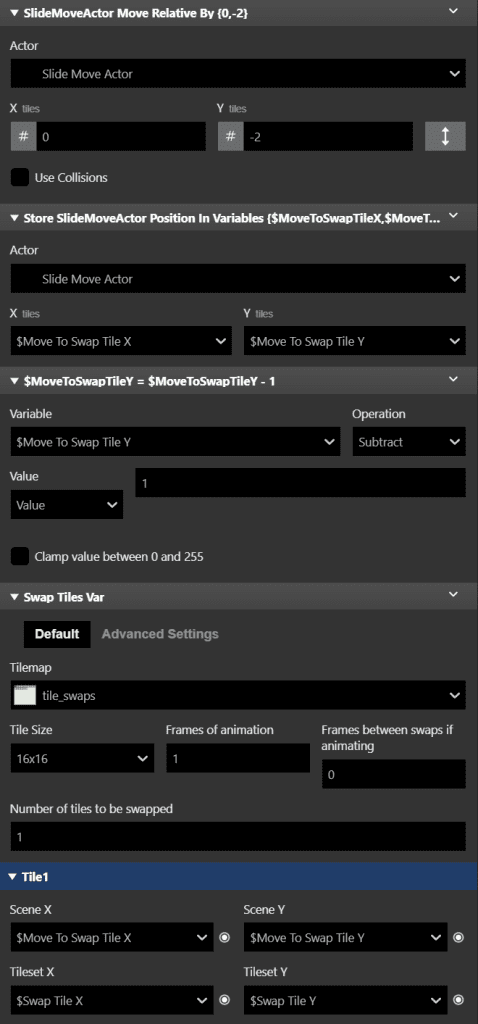
Add an [Actor Move Relative] event, plug in our Slide Move Actor, and set it to the direction of the tile we are moving to:
- Up is {0,-2}
- Down is {0,2}
- Left is {-2,0}
- Right is {2,0}
Next, use a [Store Actor Position In Variables] event to store our newly moved actor’s X and Y coordinates in variables Move To Swap Tile X and Move To Swap Tile Y. Repeat the previous action of offsetting the Y coordinate with a [Math Fuctions] event, this time subtracting 1 from the Move To Swap Tile Y variable to prepare for our next event, the [Swap Tiles Var]. Change the Scene X and Scene Y to the Move To Swap Tile X and Move To Swap Tile Y variables you retrieved and altered, and then set the Tileset X and Tileset Y to the Swap Tile X and Swap Tile Y variables you got when you called the Get X & Y Tile Values for Swaps script and then edited the Y value. This will swap the tile you moved to behind the actor before you hide it. Finally, use [Hide Actor] on the Slide Move Actor and [Show Actor] on the Player to reveal the player’s cursor.
To finish everything we’ve done, you will create another custom script named Check For Win. This one will check to see if all the tiles match their appropriate values, and if so, you solved the puzzle. Start with creating an [If Math Expression] event, using the following expression within:
($Tile 1 == 1) && ($Tile 2 == 2) && ($Tile 3 == 3) && ($Tile 4 == 4) && ($Tile 5 == 5) && ($Tile 6 == 6) && ($Tile 7 == 7) && ($Tile 8 == 8) && ($Tile 9 == 9) && ($Tile 10 == 10) && ($Tile 11 == 11) && ($Tile 12 == 12) && ($Tile 13 == 13) && ($Tile 14 == 14) && ($Tile 15 == 15) && ($Tile 16 == 0)
For a true expression, it will hide the player with a [Hide Actor] event and display an appropriate [Display Dialogue] event with something along the lines of “You Solved The Puzzle!” Return to the trigger script you were on and use a [Call Script] event to call the Check For Win script. Add a [Script Unlock] event and finally, a [Remove Button Script] set to the (A) button. Now that this script is assembled, it’s time to spread it and alter it for each of the triggers on the grid.
Scripts in Bloom
Usually, when you reuse a set of events repeatedly, you use a custom script, however, values within certain events of this script are altered for each option. Let’s highlight what you need to change in each version of this script:
- The Tile # variable at the top, seeing if the tile you intend to move to is false/empty/0 or not
- The Current Tile = Tile # (only needed to be changed once for each trigger, then copied to the script for the other directional option. Example: Tile 12 and Tile 15 – both have a Current Tile value of Tile 16)
- Set the animation frame of the Slide Move Actor to the current Tile # (Example: Tile 16)
- After the first tile swap to blank behind the actor, you made the tile you are moving the same value as the current tile (Example: Tile 12 = Tile 16)
- The current tile is set to 0 (Example: Tile 16 = 0)
- The [Actor Move Relative] event which is dependent on which direction the intended tile is (Example: Move {0,-2})
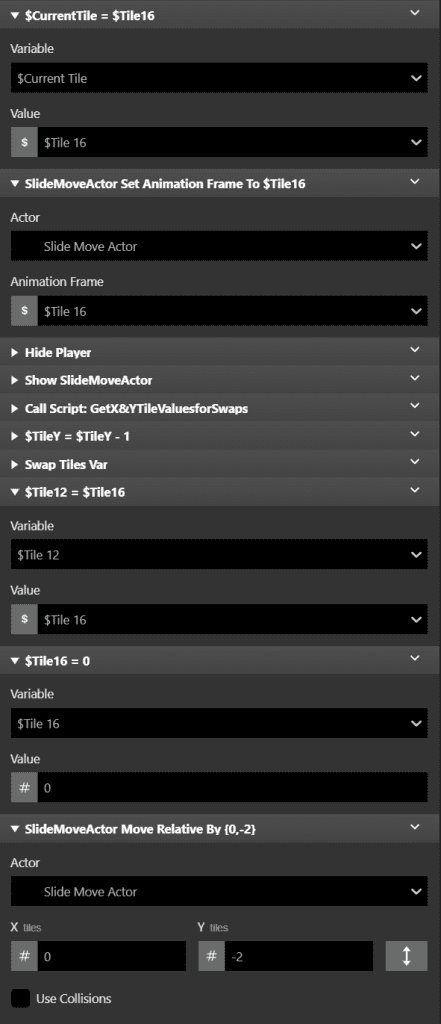
Since only one Tile # variable can be set to 0, you don’t need to include the code in nested Else, as most scripts do. Instead, you will just paste the script you filled out, leaving the Current Tile the same, for however many directions are available for each one.

To set up the rest of the grid, you set up the possible tiles that can be traveled to from each trigger. Here’s a list of each option for each grid position:
- Tile 2, Tile 5
- Tile 1, Tile 3, Tile 6
- Tile 2, Tile 4, Tile 7
- Tile 3, Tile 8
- Tile 1, Tile 6, Tile 9
- Tile 2, Tile 5, Tile 7, Tile 10
- Tile 3, Tile 6, Tile 8, Tile 11
- Tile 4, Tile 7, Tile 12
- Tile 5, Tile 10, Tile 13
- Tile 6, Tile 9, Tile 11, Tile 14
- Tile 7, Tile 10, Tile 12, Tile 15
- Tile 8, Tile 11, Tile 16
- Tile 9, Tile 14
- Tile 10, Tile 13, Tile 15
- Tile 11, Tile 14, Tile 16
- Tile 12, Tile 15
Once all of those are set up, you will need a way to test everything is working properly. It’s time to set up some debug options.
Debug is love, debug is life
Debugging, or adding sample code that tests things without actually performing those actions, is essential for testing any game, especially a puzzle game. Another feature within the latest versions of GB Studio is the ability to watch variables as they are affected by gameplay. Let’s set up both so we can test out everything you’ve coded so far.
First, make an event group called “Debug” and put it into the On Init space of the Scene you are working in. Next, use an array of 16 [Variable Set To Value] events. Set each Tile # to its respective value, except 16, which is set to 0, like this:
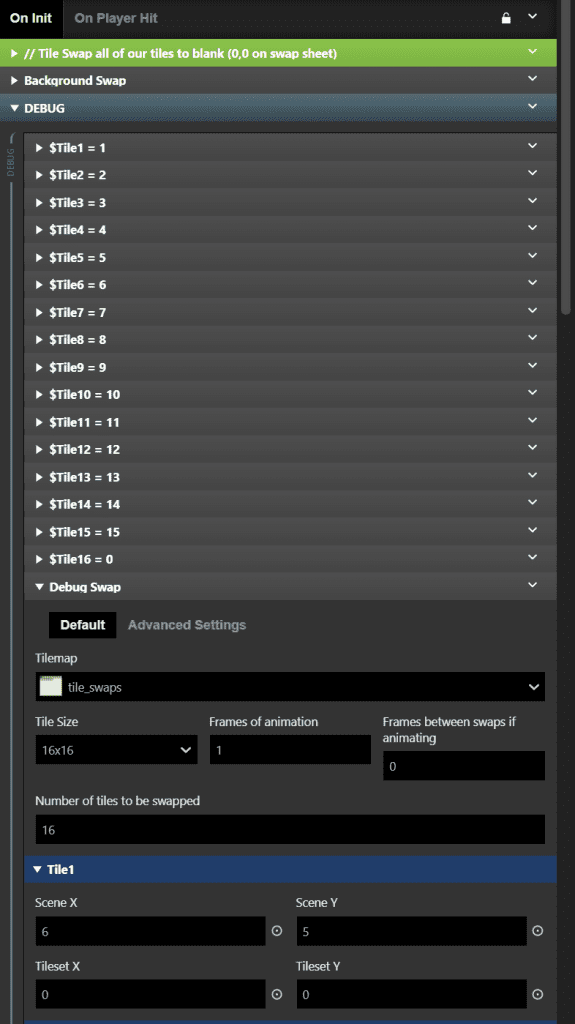
We will reuse our [Swap Tiles Var] event from the beginning and fill in the locations of all the numbered tiles from our Tile Swaps scene. Here are the Tileset X and Tileset Y values for each:
- 2, 0
- 4, 0
- 6, 0
- 8, 0
- 10, 0
- 12, 0
- 14, 0
- 16, 0
- 18, 0
- 0, 2
- 2, 2
- 4, 2
- 6, 2
- 8, 2
- 10, 2
- 0, 0
Now, we are ready to run the scene with debugging on. Head to the Game menu at the top left of GB Studio and select “Run With Debugging.”
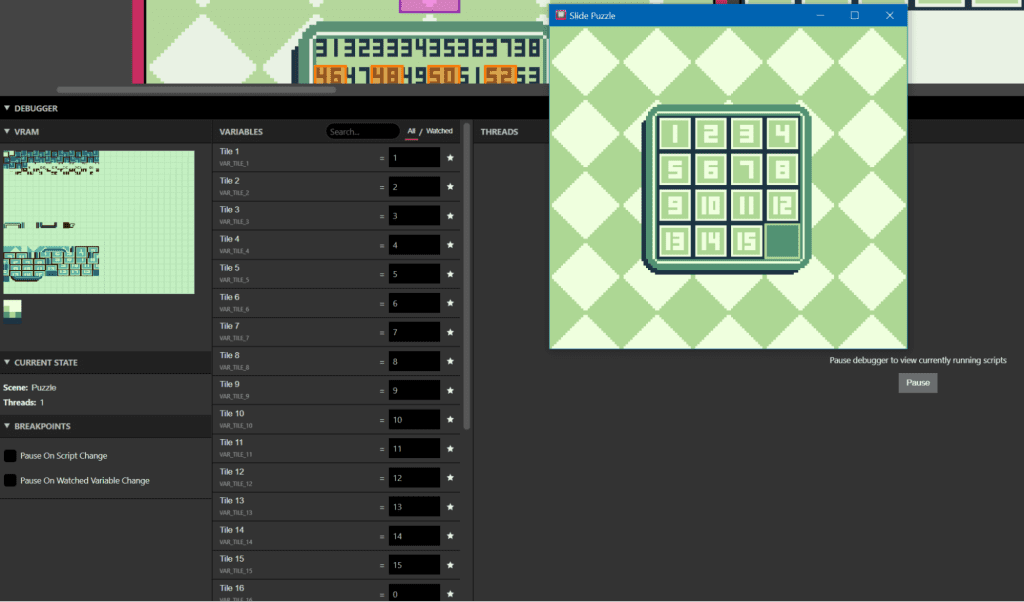
You’ll see a list of variables behind the running game. Hit the star next to all the Tile # variables, and click on “Watched” to the right where it currently says “All.” As you play around with the puzzle, you’ll notice the values switching around in the Debugger menu. This will show you how the variables are working or whether they are not working correctly. Move the blank space around the entire playing field, the values should move along with it. If not, you might have messed up some code somewhere.
Hopefully, you have now confirmed that all of your code is working. Close the game window and open it again, move the 15th tile to the 16th spot, and revert it. You should activate the “Win” state, and receive the message you set up earlier in the Check For Win script.
If so, congratulations, you have a working sliding puzzle! If it’s still not working, retread your steps and determine where you went wrong. Use the debugger for additional clues to check what values you are getting on your variables as you move around and use the (A) button.
Choose your Setup
You have a couple of options for how to set this puzzle up. You could convert the tiles to a picture and change the graphics from numbers to parts of the whole picture, or you could jumble up the numbers and have the player try to slide it back to the winning setup. For the sake of simplicity, let’s assume you merely want to jumble the numbers up.
Let’s return to our “Debug” section that we set up earlier. Rename it to “Puzzle Set Up” and then figure out what numbers you want where and change the Tile # values to match. Then, edit your [Swap Tiles Var] event inside to match the positions accordingly. You can also disable the blank Background Swap [Swap Tiles Var] event we used above our event group as we no longer need to swap the entire puzzle to blank spaces. Finally, test your new puzzle and see if you can solve it yourself. If so, let someone else have a try and see if they can figure it out as well!
In Part 3, we will set up random puzzle generation and a menu system, and add some additional visual flair to our Sliding Tile Puzzle.

Writer, Game Designer, Engine Bender, Retro Enthusiast. Co-creator of In The Dark. (He/Him)
