
In my previous Sprite Editor article, I went over how to use the Sprite Editor in GB Studio to create your own sprites and animations. After playing around with it a bit, you have hopefully grasped the main concepts and are comfortable with it. There are a few nuances in terms of how sprites work that makes it beneficial to examine in depth, so let’s take a deeper dive into how GB Studio handles sprites and how you can get the most out of it.
Note: this article assumes you already have an basic understanding of the Sprite Editor, so make sure to read the previous article if you are unsure of anything.
Limitations
The reason why you’d want to learn about tile management is because even though GB Studio 3.0 opened up a lot in terms of resources – they are still limited. This is partially due to how GB Studio handles sprites, graphics and memory, and also just the very nature of the Game Boy hardware and how it works. Let’s look at the Game World and see what happens when we add an actor to it. For this example, I’ll be using assets from the Sample Game but, for simplicity, I will be placing them into a blank project.

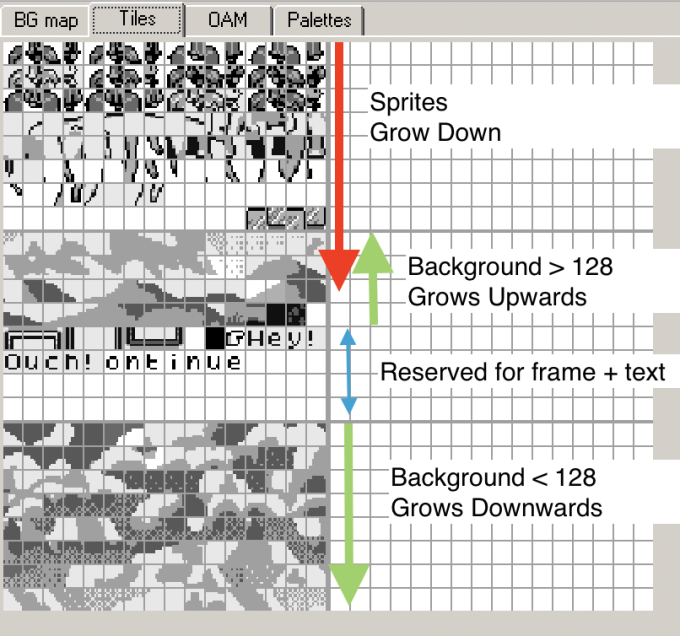
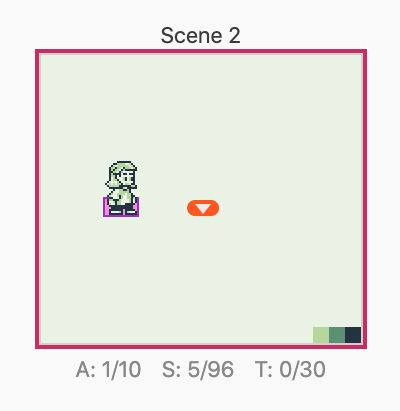
A new scene using the placeholder background has three definitions below it, A: 0/10, S: 0/96 and T: 0/30. A stands for Actors, S is for Sprite Tiles and T are the Triggers (you can click on any of these numbers to see that explanation). By using the placeholder as a background, only 4 tiles are being used to build it which means we have 96 tiles left for sprites. If we were to use a more complex scene (more than 128 tiles), this number would decrease to 64. This is because the graphics space in memory is shared between the backgrounds, sprites, text, emotes and UI. The following graphic demonstrates how things are allocated when a game is loaded. As you can see, the sprites and background tiles can “spill” into each other and share the graphics space.
The total number of tiles combined allowed in a scene is 384, so it is possible to exceed these limits if you decide to not use any text, but it then becomes a balancing act of manually taking into account what tiles you have left to work with. With this in mind, it is a good practice to follow GB Studio’s recommendations when placing your actors, but we’ll expand on the “true” limits in a later article. For now, let’s place an actor and see what happens. We’ll start with the player_platform sprite, and only have the idle animations loaded in the sprite editor.

When added to the scene, you can see the total number of actors changes to 1/10 (makes sense, we just added 1), and the sprite tiles reads 9/96. But where does this number come from? Currently, the Actor has an idle animation set to it, which is itself made up of 6 Animation Frames, each one 2 sprite tiles wide and 4 sprite tiles tall. So you might think the math would add up to 6 x 2 x 4 = 48 sprite tiles. While the total number of tiles being rendered by the Game Boy to display that sprite are in fact 48 over the course of its animation cycle, many of the tiles within the frames are duplicated. In the same way that a background is built by making a tileset index and laying it out over the scene to save on memory, GB Studio automatically detects duplicate frames and “reuses” them to save on graphics space. This can be demonstrated using Pautomas’ tile counter tool, which shows a heat map of any image loaded, in this case the player_platform.png from the sample project:

With this tool, the more red a tile is, the less often it is repeated in the scene. This can be used to help developers and artists when they are trying to figure out where they can save on tiles for backgrounds as it will point out potential issues. In addition, it can also help visualize what tiles are being repeated in our sprite sheet. Something like the green background is used over and over again, so it has no red at all, but some of the tiles, like the face and idle animation body parts are also fairly “light” in terms of this heat map. GB Studio performs a similar process when building the sprite data looking for duplicate tiles to optimize for your actors. Even though this looks good from a utilization standpoint, there is a better way to optimize your sprite tile usage, allowing you for more complex sprites and animations.
For the example I used above, I copied the same technique I used from my previous article, where I selected entire sprites as they were laid out in the sprite sheet in the first row, but notice that at the bottom of the sprite sheet there are disembodied heads? When you select a range of tiles from the sprite sheet and place them in the canvas, you are actually placing multiple 8 x 16 sprites together to form a “metasprite”. These do not have to line up with the the original sprite sheet components at all and can be repositioned, rearranged and layered to get more flexibility while also saving on your tile counts. Let’s try it out.
Make a duplicate of the player_platform.png in the assets>sprites folder. For the first frame of the idle animation, highlight just the bottom half of the first sprite in the tile selector and place it in the bottom portion of the canvas.

Next, scroll down the sprite sheet in the tile selector and highlight just the head. Place it on the canvas and overlap the body where the hair lines up. If it doesn’t line up on the first try, you can use the arrow keys on your keyboard to nudge it into place.

Copy and paste this frame five times to get six frames total. Now select frame three, and hold shift while clicking on the two sprite tiles that make up the head in the canvas. Nudge these down one pixel to mimic the look of the head bobbing frame from the sprite sheet.
Finally, let’s replace the face on the last frame to the version where the sprite blinks in the sprite sheet. Since only the right half of the face is different, you can select just that portion in the canvas, delete it with the delete/backspace key on your keyboard, and then select just the right side of the face in the tile selector and place it.
What we have now is an almost identical idle animation to what was created prior, with just a bit of an overlap on the hair giving away that third frame in the “bobbing” animation. With a bit of time, one could edit the sprite sheet so that the body was completely separate to fix this.
Here’s the original animation:
And here’s the “optimized” one for comparison.

So what was the point of all this? Take a look at the “Unique” count under each animation listed above. The original animation lists 9 unique tiles for that idle sequence, the same number that was shown in the game world when we added the actor to the scene, whereas the optimized version lists 5! Wow, we’ve saved almost half the sprite tiles by putting together the sprites manually!
This might not seem like much at first glance, but consider that this was just the idle animation, none of the running, jumping or climbing animations have been placed yet. With a simple background like this, you can get away with “wasting” tiles, but if you want to have more complex backgrounds or more sprites on screen, these overages can add up quickly and you will end up running out sooner than you think.
Let’s look at another example.
8 Way Movement
I’ve been working on a Game Boy port of Kevin Hanley‘s excellent NES game, “NEScape!” for the better part of this year. It is a point and click escape room puzzler that has pushed the limits for me personally in what can be done with GB Studio. One such challenge is the cursor. Featuring eight directional movement, the player icon is an eye that “looks” in the direction you are going. I initially thought I could easily cheat this with sprite flipping until I noticed that the pupil has a single pixel denoting a “sparkle” in the eye, and flipping it just didn’t work. In addition to the eye cursor needing all this movement, the icon needed to be able to change according to what the player was interacting with (such as a hand grabbing). Here’s my original sprite sheet to try and solve this:

Since the eye icon is only 8×8 pixels and GB Studio uses 8×16 pixel sprites, this made sense. But wow, that’s a lot of frames for just the eye, and when all the frames were placed, this sprite took 12 unique tiles total including the hands. Knowing what techniques are best for making complex sprites like above, can you guess how I optimized this? Here’s what I came up with:

That’s right. If you look at the eye, the only thing that’s really changing is the position of the pupil. So instead of having 9 separate frames for each direction, I simply stacked the pupil on top of the eye and repositioned it for each directional state, cutting down the sprite tiles used from 12 to 6! This allows for more tiles available for the other sprites I need in the game, which is important as the complex backgrounds don’t give me much leeway. The results made me quite happy.

That’s it for this part of the Sprite Editor tutorial. This technique of composing complex sprites from smaller components is nothing new. Check out the sprite sheet for Ninja Gaiden, notice how the main character Ryu is composed of a “slanted” set of sprites? Games like The Legend of Zelda: A Link to the Past also separated Link’s head from his body to give it a little bobble as he ran. Think about how you can separate the parts of your sprite and piece them back together using the editor to optimize the sprites, and don’t forget to use those tile flipping tools too! Some other considerations:
- Think about your sprites like paper cut out puppets. What pieces can be reused to save on tiles.
- Only tiles used in the canvas will count to the total tiles, so you can create a larger sprite sheet comprised of “full” frames to use as a reference.
- The “onion skin” tool is really useful for lining things up.
- The size of the canvas does not count towards the tile count, make it larger if you get glitches or artifacts.
- Switching animation states is less resource intensive than switching sprites, so try to put all the different sprites you want for an actor in one sheet and use animation states to define them.
- You can can change the palettes of overlapping sprites to get more colors!

Audio Engineer, Mac Technologist and Video Game Developer. Managing Editor of GBStudio Central. (he/him)
