
Tile and Tile again
We have had the ability to swap tiles in GB Studio for quite some time. GBVM has offered us the ability to do so since the release of version 3.0. Those who dabbled in the dark arts of GBVM to learn how to replace or animate background tiles were able to use it quite fluently, but it’s often something out of reach for developers who prefer the simple event-based systems of GB Studio, as they are one of the reasons why so many have fallen in love with this engine.
Enter GB Studio version 4.0. We now have built-in events for swapping tiles, including a specific event for animating them. So, what’s different? What are the pros and cons of each? Let’s get into it, as we dive into the magical world of tile swapping 2.0!
Within Cells Interlinked
The [Replace Tile At Position] event is the basis for how to tile swap. We have components which may seem a little vague in the official docs, so we will focus on what each of these options actually mean.
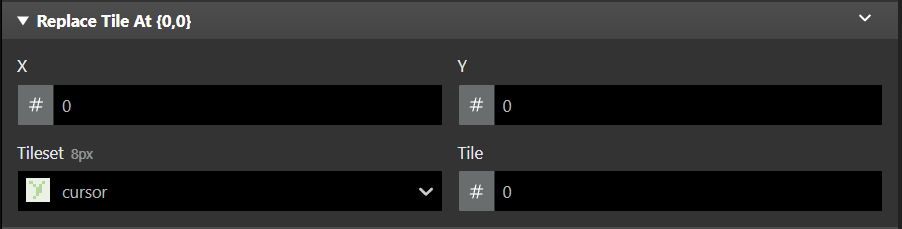
The X and Y positions at the top refer to the scene placement. You can set the numbers manually or switch to variables by clicking the # sign and select “Variable” from the pop-up menu. The best way to determine the coordinates of where you want the swap to happen is to roll your mouse over the tiles in the scene, and the tool will show up on the bottom left, near the Debugger menu:

It is important to remember that tile swapping at its core is using unique tiles (or 8×8 squares with exclusive artwork unique to that space) to let us replace them in memory. If you are not replacing an 8×8 or 16×16 section of the scene that is entirely unique, then every version of that tile will be replaced. This could be used with intentional design to animate flowers or grass swaying in your environment in every place that specific tile exists, but be sure to plan accordingly!
Next is the Tileset option, and that dropdown menu might be empty, which is okay. Tilesets are basically backgrounds that contain the tiles you want to swap from. Once you create one, it will go into the assets\tilesets folder within your project. You’ll also notice to the right of the word Tileset is 8px. This is the size reference for what you are swapping. If you want to instead replace a 16×16 section (two by two tiles), you can click this and change it to 16px.
Finally, we have our Tile value. Starting at 0, which is the top left part of the tileset, any increase to this offset will select the next tile in the tileset, which wraps around from the right side back to the left. This can also use a variable to define, if needed.
Sequential Algorithm
The other half of our duo of new events is the [Replace Tile At Position From Sequence] event. This event is exclusively used for animation, but requires some additional tools to set it up. It is important to understand that using a [Replace Tile At Position From Sequence] event requires it to be placed inside of an [Attach Timer Script] event, a [Thread Start] event with a “Loop” event within it, or in the On Update section of an actor to work. If the event only runs once, it will not continue the sequence and will simply replace the intended tile or tiles once, similar to how [Replace Tile At Position] events work.
First, we’ll look at the setup of the animation tileset and how it differs from the regular “Replace Tile” event. In the “Sample Town” scene in the sample project we’ll look at how it uses tilesets, as that is a perfect example of not only how to use the event, but how to set it up. In the On Init script for the scene, you’ll find a Timer there with some “Replace Tile” events within. There is an event for three animated elements in this scene: the flowers, the waterfall, and the ripple effect as the water flows into the pond.
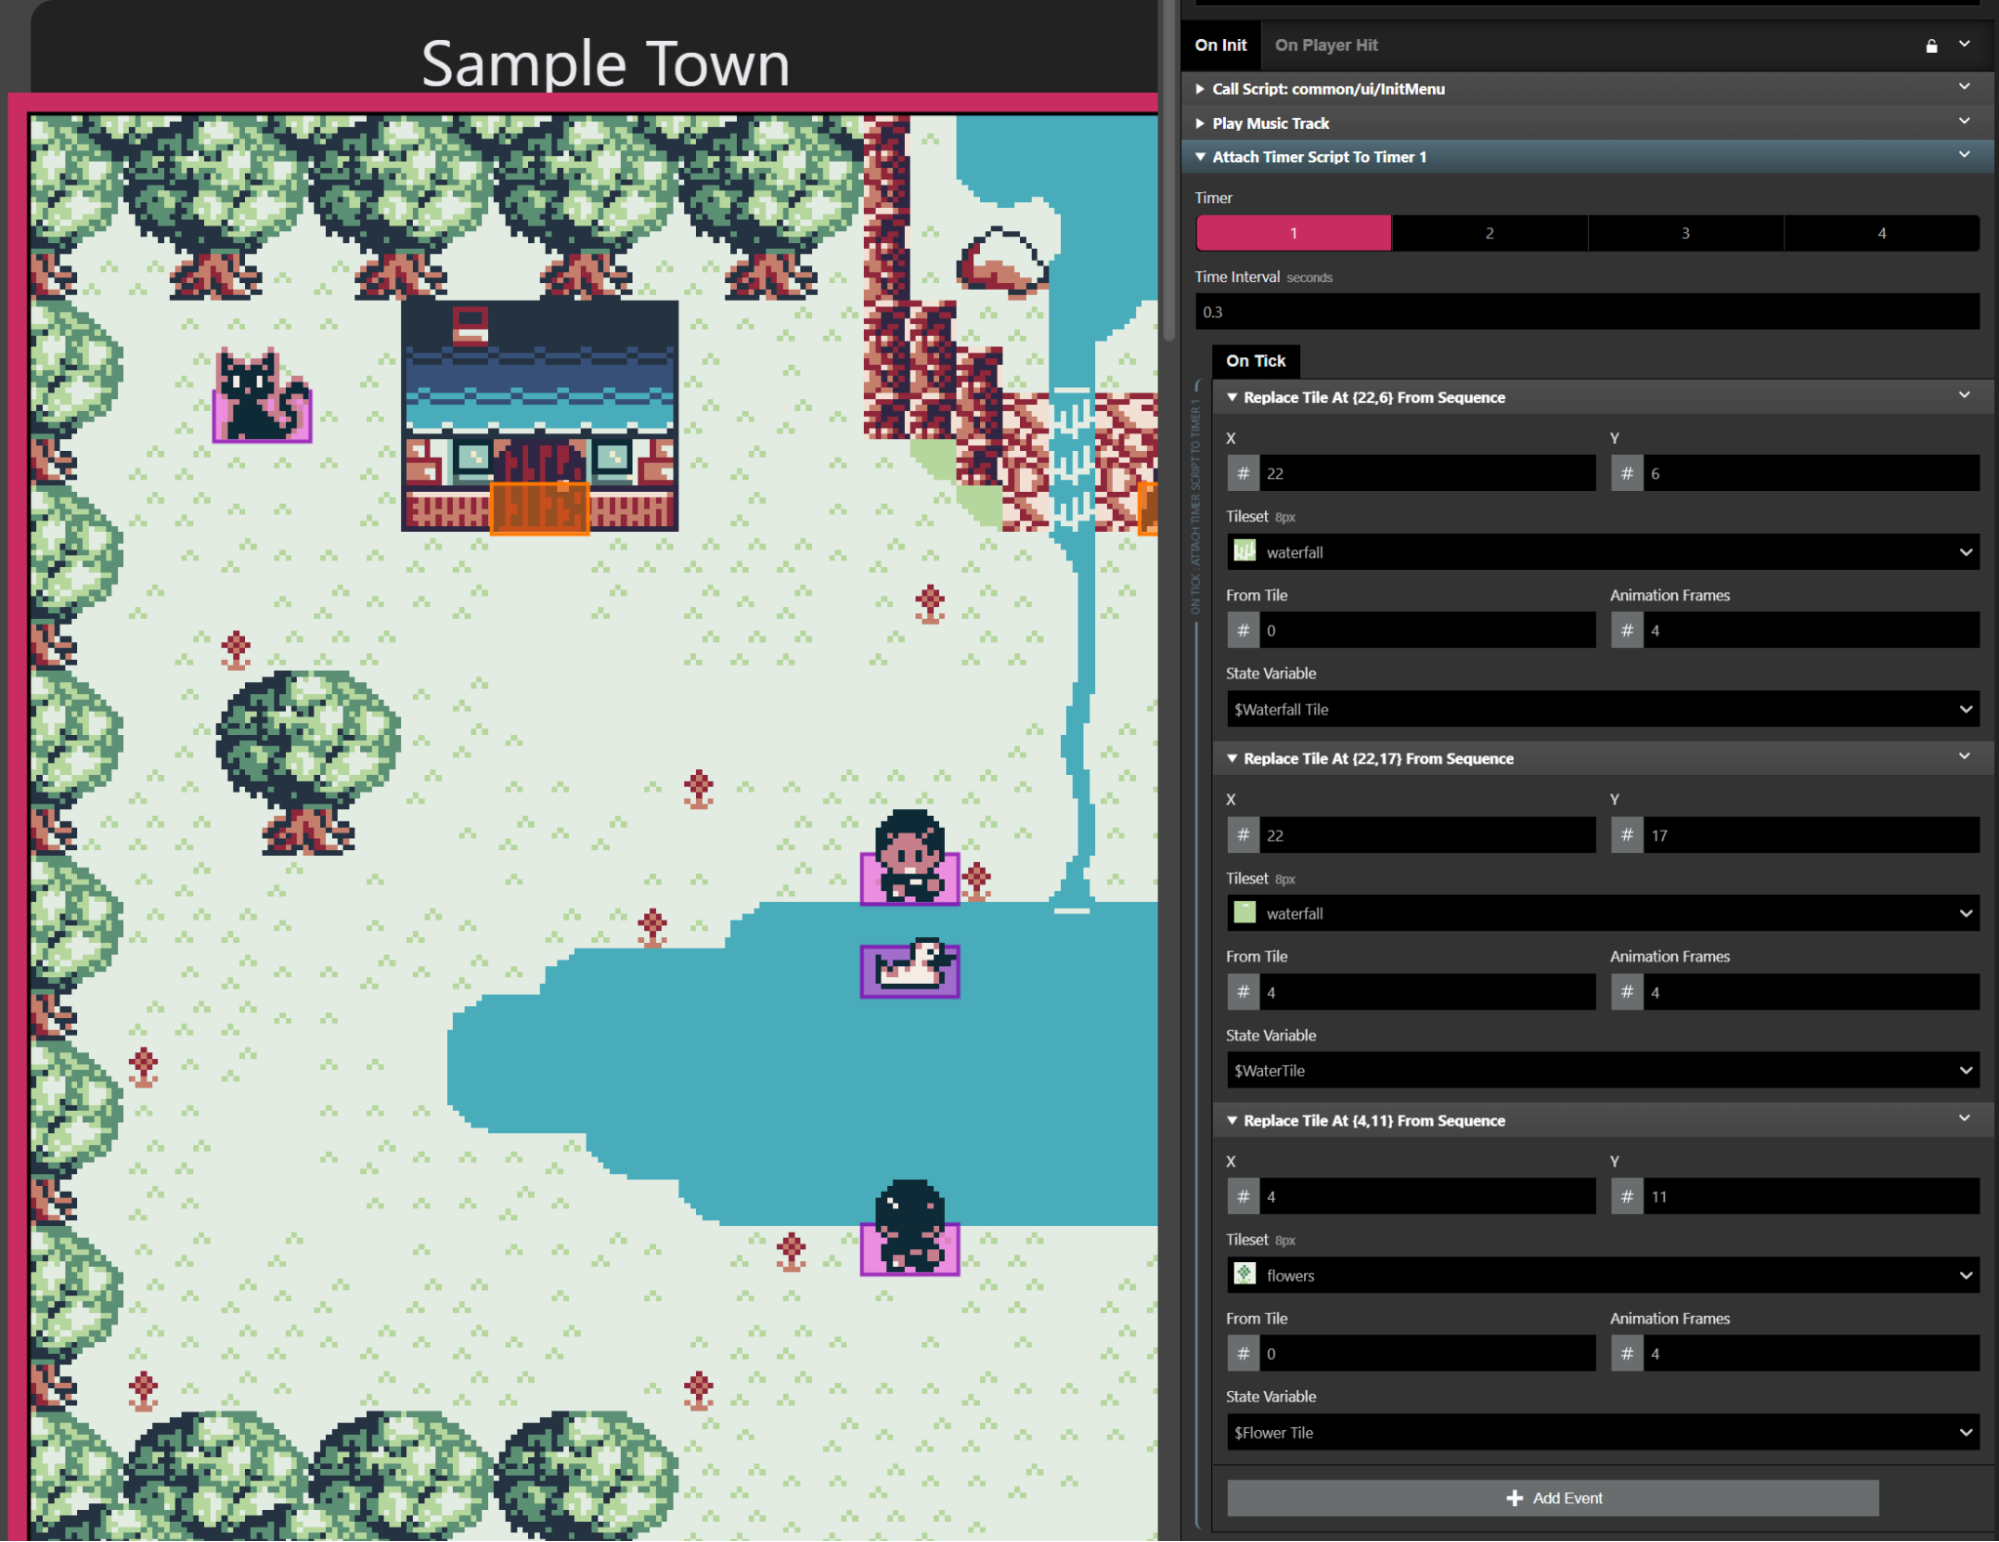
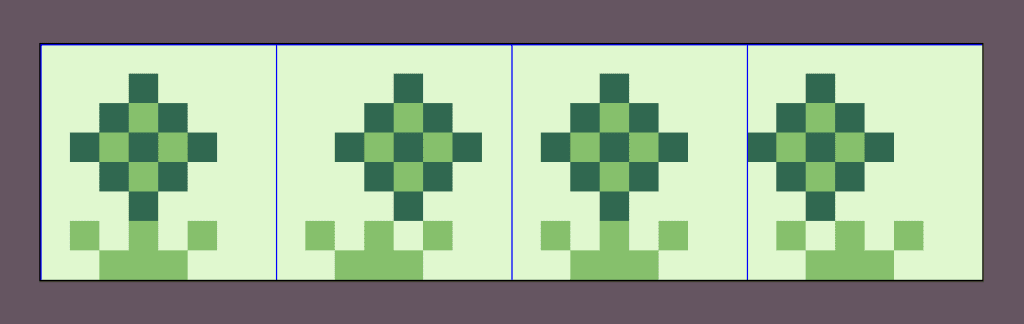
Starting with the animated flowers, in this layout, our first animation tile is the leftmost one, which is frame 0 (not 1), then the next three finish out the loop at frame 3, which is actually the fourth frame in the sequence. You might have also noticed both frame 0 and 2 are identical, which uncovers a pretty big revelation: You do not need to have only unique tiles in your tileset. The last bits of the [Replace Tile At Position From Sequence] event are set up with the value of From Tile set to 0, and Animation Frames set to 4, since we have 4 tiles in our set that we want to animate.
Next, we’ll look at the waterfall and pond water swaps together, as they are both referenced in the same tileset. This makes setup a little more complicated from before, as we now have to use offsets to determine where to swap from. When using “Replace Tile” events for an animation, you want to ensure that your tiles in that animation set are next to each other horizontally, and wrap around to the next line, starting from the top left of the tileset.
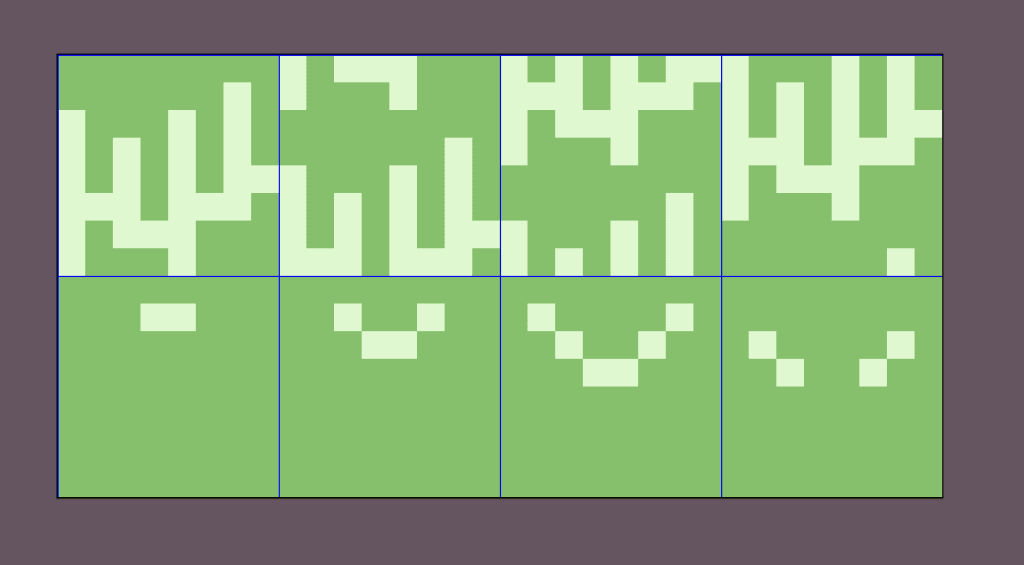
With the waterfall and pond ripple, both sequences are still using four frames, but if you look at the From Tile offset in the event for the ripple, you’ll notice it is set to 4. The reason for this is that those tiles begin in the fourth slot of the tileset, and as they wrap around to the left they continue on to the seventh. It’s a bit confusing at first, but after enough practice, remembering that the first tile is actually zero will come naturally and help you design around that peculiarity.
Swap This Way
Now that we know the ins and outs of how to swap tiles and tile sequences with these new events, we should probably compare them to the old way of doing it. Whether typing out GBVM scripts, using the new built-in events, or even utilizing the popular Swap Tiles plugin, your results will be relatively the same, but it’s important to understand the differences.
GBVM is a tried and true method and is extensively documented. You can use variables, swap from different sheets within the same script, and it ultimately gives you individual control over each aspect of the swapping itself. It does take longer to write and requires referencing to work, whether it is the background itself or the variables you are using to control your setup. You also need to include the backgrounds you are swapping from inside your project as their own scenes. It is worth mentioning, however, that a handful of games have successfully been published using GBVM scripts to handle tile swapping, even though the Swap Tiles plugin was available at the time.
Since GB Studio 4.0 with its built-in [Replace Tile At Position] and [Replace Tile At Position From Sequence] events, tile swapping is now a faster method of accomplishing what GBVM scripts can do, especially without calling external references and worrying about syntax. It’s not without some trade-offs, though, as you have to use multiple events to swap larger areas of tiles and have to manually count out the Tile or From Tile offset to use one tileset for multiple events. Additionally, using one event for each tile you need to swap can be taxing and slow to set up, making it almost as much of a chore as using scripting to do it.
Using the Swap Tiles plugin can offer additional features beyond what we have readily available with the other options. One of the greatest features is being able to add a multitude of tiles to swap to each event, giving you back the functionality you lost when switching from GBVM with the ease of doing it all through an event instead of writing a script. You also have clear text within the event that tells you what each option or input does and how to use it. The best feature of this plugin in my opinion is the ability to pinpoint with X and Y values, exactly which tile from the background swap sheet.
It’s not without its setbacks, as within the Swap Tiles plugin, you unfortunately will need to convert back to the old ways of sourcing your tiles, and just like GBVM, you need to create a scene for a background to reference. If you set the scene type to “Logo,” however, you won’t need to make your swap tile sheet all unique tiles, which is otherwise a painstaking process.
Now that you know how to swap tiles and all the pros and cons of each method, you can unlock one of the easiest ways to maximize efficiency and resources while activating some pretty neat tricks along the way. Tile swapping isn’t an end-all solution to the limitations of Game Boy development, but it certainly helps push the envelope even further than before. Sometimes the best way to move mountains is swapping them, 8 pixels at a time!

Writer, Game Designer, Engine Bender, Retro Enthusiast. Co-creator of In The Dark. (He/Him)