
With the release of GB Studio 3.0, there’s been a lot of buzz around GBVM, the underlying language that now powers GB Studio. We’ve already seen the amazing features it brings to GB Studio, and a lot of advanced functions that can be performed by those who understand it – but that leads to the question, what exactly is GBVM, and how does it work?
The following is an article written by one of the lead developers of GBVM and a maintainer of its underlying toolset, GBDK-2020 – toxa. It does go fairly deep in terms of how GBVM works and not everyone who wants to work with GBVM needs to know all of the information presented here, but having a grasp of how it plays can help immensely if you decide to start diving into GBVM. If nothing else, this article can help understand what’s happening “beneath the hood” of GB Studio, and what exactly happens when you hit that run button.
This is not an explainer on how to use GBVM, but we are excitedly working towards bringing you those tutorials in the near future.
The GB Studio Core
To understand GBVM, you must first understand GB Studio’s “core” that is used to compile and build a functional ROM.
At the lowest level, GB Studio is powered by GBDK-2020, a cross development kit which consists of a C compiler, assembler and a library. It allows Game Boy development on both Windows and Mac platforms. GBDK-2020 is used to build the basic design components in the ‘abstract’ of the Game Boy game being created. That underlying abstract defines what is a “scene”, “actor”, “projectile”, etc. This level also defines things like actor collisions with each other and the scene as well as driving some of the low level parts of the game like the music and sound driver, input, UI rendering and so on. These parts of the code can be rather complex, and attempting to change it may result in performance impact to seemingly random parts of a game. Anyone who goes poking in this area must be very careful and understand what they’re hoping to do and why.
When looking at the code as a whole, the next layer up are the “game states”. These parts are also written with GBDK-2020, and declare the “rules” of the different scene types, like Top-Down, Platform, Logo, etc. For example, within the platform state, gravity for the platformer game type is defined, or some of the hardware manipulations for the “Logo” scenes. Game states can be added or modified by experienced users. Modifying an existing game state, if written without errors, affects only that game type. There are plans to add functionality for game types with user-defined states in future versions of GB Studio.
On the higher level, there’s the “GBVM” that runs user-defined scripts and allows a developer to customize their game. Scripts written in “GBVM Assembly” can interact with the lower levels of the core – calling functions like “play sound”, manipulating aspects of the game states, and even call low level assembly-written code.
With those three parts of the core, compiling will result in a working ROM. But without any user content or instructions, a game made only with the basic layers doesn’t actually do anything. This is because the core functions more like a library, than an actual game.
On the top of all this “base” exists the user assets which make your game unique. Backgrounds, level design, sprites, music, scripts, etc. None of this is created in native Game Boy code, it is all data, which is interpreted by the core into a functional game.

What is GBVM?
GBVM stands for “Game Boy Virtual Machine”. It is a piece of software that interprets bytecode and calls internal functions that make changes to the global state of the game. Why is that needed? Can’t we just write everything in C or, better yet, Assembly? The answer is “we can”, but a Virtual Machine gives many advantages, which can’t be easily achieved with native code:
- Control over execution. You can stop or continue execution of user script at any point.
- Safety. It is much harder to cause a failure with user scripts than with native code. But it is still possible, of course.
- Concurrent execution of multiple scripts (multi-threading).
Considering GB Studio is aimed for users who are not experienced developers, those advantages are very important. The downside is lower performance. The classic Game Boy uses an 8-bit SM83 CPU which runs at 3.5 MHz, which gives less than 1 MIPS (million instructions per second) performance. The fastest native instruction “NOP” which is “No Operation” requires 4 cycles and the slowest “CALL” is 6 cycles. It also only has 7 8-bit CPU registers which makes compiled C code tricky to optimize. It still makes sense to virtualize scripts, because the main measure of success is the balance between functionality and performance.
How does GBVM work?
GBVM works by interpreting bytecode – binary data. The Virtual Machine (VM) is fed a pointer inside the script currently being executed (“PC” or Program Counter) as well as a function, which executes one instruction of that script. The function byte for that pointer identifies a “GBVM instruction”, which it uses to look up an instruction table. This table contains the list of native function pointers which implement individual GBVM instructions and the amount of bytes on the native CPU stack for passing of parameters to each of those functions. Those bytes are copied onto the CPU stack from the script data, which is then followed by the GBVM instruction byte. After that, the native function is called.
The native function manipulates some data, which may be either the VM state (instructions like VM_JUMP), Game Boy hardware (VM_SOUND_PLAY), engine state (VM_ACTOR_MOVE_TO), or game state (VM_SET_CONST_INT16 for some state internal value like _plat_min_vel, which is minimal velocity for the player in platformer mode).
After performing that native call, the PC is advanced to point to the next instruction code in the script data. After that, the VM stepping function exits, allowing the main core cycle to do other things, until core decides to execute the next instruction of the user script.
In reality, that function is more complex than this description, because it deals with ROM banks, several VM contexts which are required for concurrent execution of scripts, and also “quants” of execution, which balance the performance of the system in general.
GBStudio Assembly
While GBVM interprets bytecode. An intermediate representation of that bytecode data is in a human readable form and can be easily composed by a GB Studio User by hand. That text representation is called “GBStudio Assembly” or “GBVM Script”.
GB Studio compiles the visual scripts/events and generates them as GBStudio Assembly files, which are then used to compile into binary script data. You can take a look at those files with the “Eject Project Data” command under the Game > Advanced Menu. This will generate a bunch of files with names like “script_s0a0_interact.s”, which contain GBStudio Assembly programs. The rest of this article will make reference to these files.
So what exactly are these files? They’re SDAS assembly files. SDAS (sdasgb) is an assembler (compiler for programs, written in assembly) for the Game Boy. You can write native SM83 programs with it if you want to, but in our case it is not used for native code. Instead, there is a macro definition file, which defines the macro for each GBVM instruction. Those macros emit data, not code.
For example:
OP_VM_SET_PRINT_DIR     = 0x4C
.UI_PRINT_LEFTTORIGHT   = 0
.UI_PRINT_RIGHTTOLEFT   = 1
.macro VM_SET_PRINT_DIR DIRECTION
        .db OP_VM_SET_PRINT_DIR, #<DIRECTION
.endm
Let’s look at what this code block does. This is a definition for the VM_SET_PRINT_DIR instruction, which receives an 8-bit parameter for direction of printing text in the UI. When you want to use it in a GBVM Script, you can write something like:
VM_SET_PRINT_DIR .UI_PRINT_RIGHTTOLEFTThat is translated into two binary bytes: 0x4C, 0x01. The equivalent of that program is:
.db 0x4C, 0x01If you were to simply use the code in binary form, it would be fully functional, but not human readable at all. You can now see the main advantage of GBVM Script: a human readable intermediate representation.
You may be asking yourself, why is SDAS being used and not something else? The answer is that SDAS is a powerful tool able to compile native code for the Game Boy and it is already a part of GBDK-2020. It can process macros, compute label addresses, reference external assets or code, and link things together with your game core and assets. We could make our own language, with our own syntax and rules, but:
- That is not an easy task if you want to make it consistent.
- Integration with the native code and GBDK-2020 library will be complicated.
- You will have to support a new custom compiler.
- It takes resources from developing GB Studio itself.
The downside, as usual, is that you have to deal with not obvious things that come with Assembly language, such as program structure, macro parameter syntax (you must enclose your expression with /^ … / if it contain spaces, add # for immediate values…) and so on. Those challenges are all solved within the SDAS manual, and the advantages of this approach outweigh the negatives.
Virtual Machine architecture
Imagine a Virtual Machine is like an imaginary computer. It has everything that is needed: CPU (the state of VM including the PC pointer); Program Memory (where script bytecode lies); RAM (where all script variables and stack are located). Program Memory in this imaginary computer is separate from RAM, you can’t easily access bytecode directly from the script, which allows you to draw some parallels with Harvard architecture.
Virtual Machine RAM
VM RAM is different compared to what is used in conventional computer RAM. Every cell in VM RAM is a 16-bit value (word), as opposed to “normal” computers where those cells are usually bytes. RAM is defined in the vm.c file as a script_memory array. It has a specific layout. At the beginning of that array lies the “heap” area, which is 768 words by default (VM_HEAP_SIZE). In that area GB Studio will allocate global script variables. After that, in the same array, is the stack of each context. Stack size for single context is VM_CONTEXT_STACK_SIZE, and equals 64 words by default. The total number of contexts is 16, which means we can execute 16 scripts in parallel. That is quite a lot of memory: 3584 bytes, taking into account that the Game Boy has only 8 kilobytes of WRAM.
Pointers to VM RAM, which are used by GBVM instructions, are indexes of those 16-bit values in the script_memory array. If we want to access a variable stored at index position “5”, it can be called as script_memory[5]. “5” is the value of the VM pointer. Rather than using the index’s numerical value, you can also define something like VAR_MY_VARIABLE to 5, then it all becomes more readable: script_memory[VAR_MY_VARIABLE]. This can then be used to store an integer value by that VM pointer with something like script_memory[VAR_MY_VARIABLE] = 100. This simply means the memory will store the value of “100” at the index position “5”, but it is easier to read. Keep in mind this is a snapshot of how things look on the engine side of things. In GB Studio, you can assign a value to a global variable like “My Variable” and it can be accessed in GBVM Script as VAR_MY_VARIABLE without having to worry about the script_memory index. The generated GBVM Script would look like this:
VM_SET_CONST VAR_MY_VARIABLE, 100This diagram may also help understand how VM RAM is organized:
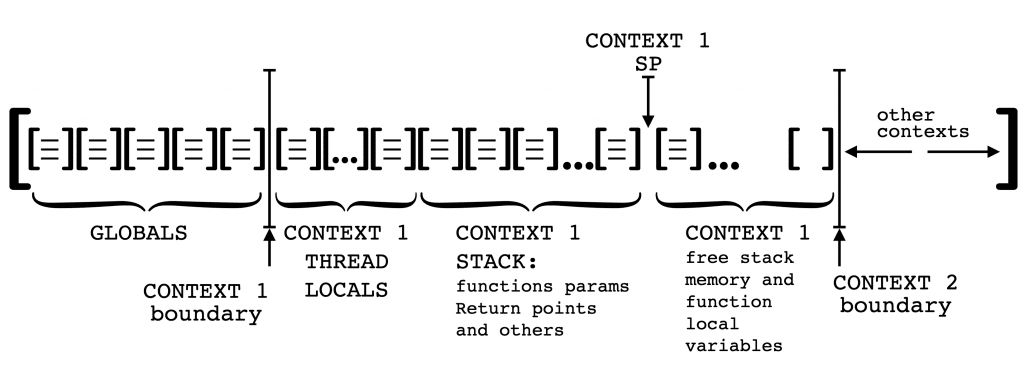
Context stack
A Context Stack Pointer (SP) is a native CPU pointer inside the script_memory array. Concept in the use case of the stack is actually the same as in a real CPU, like the Game Boy’s SM83, with only difference being in which direction the stack grows. Since the stack shares the same script_memory array, every value that is put onto the stack is also 16 bit. This allows storing of native CPU pointers in the VM stack. For example, when the VM_CALL and VM_RET instructions are used, the current PC is pushed onto the stack and the PC is then assigned to the address of the function which is about to be executed. Later, when VM_RET is called, the value is popped from the stack and PC is assigned to that value. Doing this allows the execution to return to the next VM instruction from the point of call.
The Context stack may be also used to pass function arguments into subroutines. This mechanic is similar to regular stack parameters on “real” systems, but they are accessed differently by using negative values. Negative pointers don’t work on the real CPU, but in GBVM a negative index indicates an offset from the context stack pointer. Almost every VM instruction that receives a VM pointer as a parameter will check first if that value is negative. For example, if you use a function with a pointer “A”, and the value is negative, it will access the stack for those parameters (context.SP + A). Otherwise it will use the positive value to access the global variable from the start of script_memory array (script_memory + A). If you examine GBVM code, you will notice a bunch of definitions that are often used in functions: .ARG0, ARG1, etc. All of these are just negative numbers, which are designed for convenience when you need to access the values on stack.
For example:
VM_PUSH_CONST           0
VM_RTC_GET              .ARG0, .RTC_HOURS
This code pushes the value “zero” to the top of the stack. The next instruction uses “.ARG0” which is actually “-1” to indicate to the VM_RTC_GET instruction that it should look at the topmost value on the stack. The instruction will use the reserved place on the top of the context stack to read the “hours” value from the cart RTC clock and overwrite that temporary zero, which we pushed earlier.
As with the real CPU stack, the VM Context stack must be balanced. That means that the number of values which are pushed onto stack must be equal to the number of values which are disposed from stack using VM_POP at the end of a function. If this is not taken into account, the VM_RET instruction at the end of a subroutine will read garbage, and that will lead to crash. It’s important to remember that the VM Context stack is relatively small with only 64 values. Overflowing this stack will spoil the next VM stack, and that will also lead to crash. Take care when pushing values to it for this reason. Unfortunately, there is no runtime checking for overflows due to performance reasons, the Game Boy is a very limited system when it comes to performance, and we must always remember that.
VM Architecture Overview
This diagram gives complete overview of the GBVM architecture:
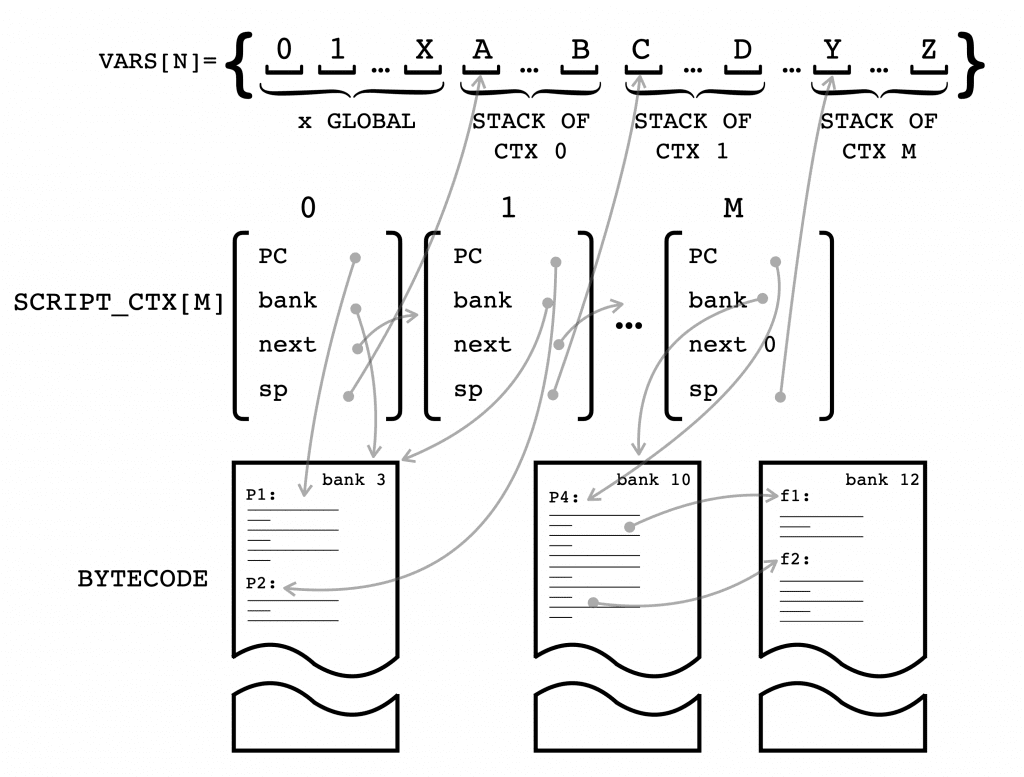
Here we can see the VM RAM array with the regions for the “heap” area and areas for multiple context stacks, VM contexts themselves with PC and SP pointers, and the bytecode of user scripts in ROM banks (bank numbers are given as an example). While it may look complex, this gives an idea of how all the parts work together.
We know the information detailed here may not be easily grasped by the larger GB Studio community, but if you decide to try using GBVM you may want to revisit this article at a later point and see how it relates to the code and the syntax. Our next GBVM article will provide some concrete examples of using GBVM Script within GB Studio, as well as the tools to figure out how to write it on your own.
Special thanks again to toxa for putting this article together!

Audio Engineer, Mac Technologist and Video Game Developer. Managing Editor of GBStudio Central. (he/him)
