
If you’re looking to put your GB Studio game on the web for public (or private) consumption, Itch.io is a great resource. Not only do they have a wonderful community full of game jams and inspiration, but they will host your project for free.
In this article, we’ll show you the process from start to finish to get your build online. Before we begin, you’re going to want to make sure your game is set up correctly. You may have been debugging your title to determine whether or not your game works perfectly, but you need to ensure the build is playable for others, so get that set up before starting the export process. Make sure your player character is on the correct starting scene and that all your variables are in order so the players get a great first experience.
Exporting from GB Studio – Web Build or ROM
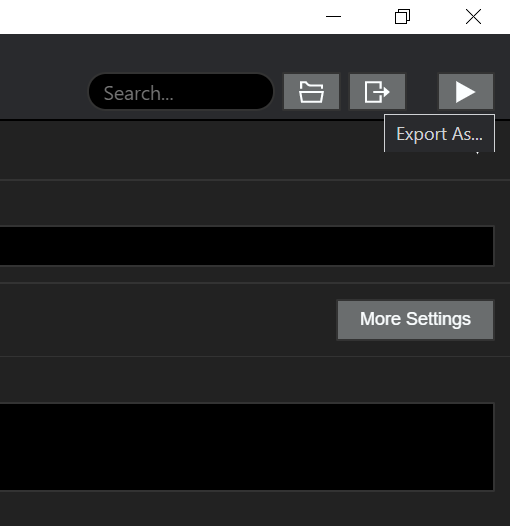
Getting a web build or ROM exported is fairly simple within GB Studio. All you have to do is click the “Export As…” button at the top right of the main screen (looks like an arrow pointing out of a box)..
Within that menu, you’ll need to click “Export Web” if you want to make the game into a web build that someone can play on their browser – GB Studio will make a folder inside your project’s build folder called “web.” It will also open the folder it just made to show you the files. To prepare the files for Itch.io, you need to zip all of the files in this web folder into a .zip file, and you can name it whatever you wish (on both macOS and Windows, creating a zip file should be as easy as right-clicking and selecting compress, but there are also apps and tools that can do this).
If you want to only export a ROM, you can click “Export ROM” instead, and GB Studio will take a moment to compile it, then output it to a “rom” folder inside of the build folder in your project. Again, it will open it to show you. The ROM will be called game.gb, and you can rename it now or can rename it later when you upload it to itch.io.
Uploading to itch.io
Once you have your .zip file or ROM ready to upload, you’ll need to go to the dashboard of your Itch account. If you don’t have an Itch account, you can create one here. On your creator dashboard, click “Create New Project.” Here you can fill out the information about your game such as the title, description, add screenshots, set prices, all important considerations. Before you upload your game, you need to tell Itch what type of game you’re uploading. If you want to upload a web build, find the section that says “Kind of project” and change it to HTML. If you are only going to offer a ROM to download, leave it as “Downloadable.”
Next, turn your attention to the section that says “Uploads.” Click on the button that says “Upload files”, then navigate to and select your .zip file or ROM. If you uploaded a ROM, congratulations, your file is ready to go! You can choose to change your display name for the game, set a price, fill out the rest of the information and then move on to upload the web build. If you only want to have it available as a downloadable game, then skip ahead to read about getting paid.
If you uploaded a web build, check “This file will be played in the browser” under the file options and continue reading to learn more about the process.
Web Build Settings
There are a couple more options for the web build process that you should know about. First off, the game runs in a viewport on your project’s page, and you can choose what resolution you want to display it at. If you go with the default resolution (640×360), you will have black bars on both sides of your game. In order to maximize visibility for your players, you can choose a resolution such as 480 (width) x 432 (height) to make the game run in a square format. You could also double the resolution to fill the horizontal space on the page (960×864), but it’s almost obnoxious at that size.

Did you know that your web build can run like a mobile emulator on someone’s smartphone? It actually works pretty well. Set the embed option “Mobile friendly” to turn on this feature. You can choose in the embed options to automatically start the game on page load, which is simply a personal preference, and add a fullscreen button to your game that shows up in the bottom right corner so players can maximize the game on a desktop device.
Getting Paid
Itch has two ways for you to collect payments for your hard work. People that download your game can donate whatever they choose with a suggested donation, or they can just pay a minimum amount for the download. Keep in mind that a web build can be played freely and other than setting up your own solution, you cannot charge players to play your game online.
Once someone buys or donates to you for downloading your game, you can see the information on the Payments page on your Dashboard. There are two options: paid later or direct to you.
Itch.io defaults to paid later and will use their own payment provider to pay your final totals, less fees. You can access and change this option in your account settings, found when you click your profile drop-down menu on the top-right of Itch’s homepage and select “Settings” under the “Account” subheading. Keep in mind that there is a required Tax Identity check that is a flat fee of $3.00 for this option, and you will also have to wait 7 days to claim payments after they have been completed. You can access these options from Itch’s Payouts page on the dashboard.
Note from the Editor: If you reside outside of the US, there is a portion of the Tax interview where it asks for a Tax Identification Number to get a tax exemption. Use your country’s equivalent of a Social Security Number (for example, a Social Insurance Number in Canada) in this place to avoid having 30% of your sales collected for US income taxes.
If you choose to get paid “direct to you”, you need to set up a payment processor, either Paypal or Stripe, and provide the necessary information to set up for transfers. There’s a Payment modes guide on Itch’s site to provide you more information about setting that up and what to expect. Make sure you know what you want to use and have it set up before uploading and listing your game for sale, or you will likely have to go through the additional processes to have Itch pay you directly.
Final Thoughts
After uploading your game, be sure to change your game’s description to give players important information about your game (controls are a great thing to add here), and load the page up with screenshots, which can include gifs. With an uploaded build of your game, you can now easily share it with others by providing them a link to your page.
Itch.io is such a great resource for allowing people to test out your game – even when it’s not complete, and is a valuable tool to find like-minded developers and other games to derive inspiration from. Even better, it’s a great way to get paid for your work without paying extravagant developer fees! Good luck!

Writer, Game Designer, Engine Bender, Retro Enthusiast. Co-creator of In The Dark. (He/Him)
