
To make the most out of a game, it’s a good idea to have a clear representation of health, your amassed wealth of coins, or any number of things. You could create a menu to show this information, hiding it away from the main play screen and keeping everything clean, but sometimes you want to leave that info on the screen, available at a glance. Providing a player with a visual indication of their progress or current status is an excellent way to communicate to your players, and it’s pretty easy to pull off.
In this article, we’ll cover the basics of getting a HUD set up for showing the player’s health, discuss what makes it work and talk about some ways that code can affect its appearance, such as changing the sprite or hiding it. For this article, I am using the Sample Project for the base, and the HUD art comes from Core Machina, a game I worked on in collaboration with Salt and Pixel.
Pinning an Actor
To begin, our HUD is made by pinning actors to the screen. Move your actor to where you want it to stay on the screen, then click the pin in the top right of the actor settings. Finally, click the Pin to Screen checkbox to make it stay there.
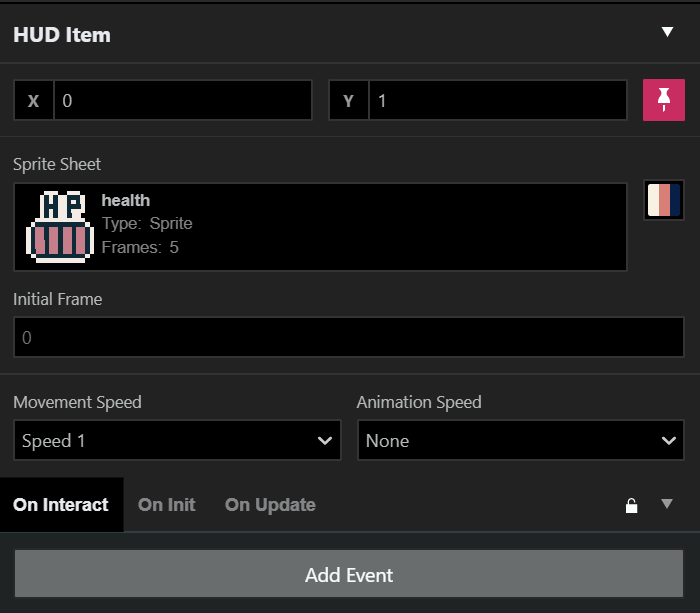
Now that your HUD actor is pinned in place, you need to determine what you want to do with it. Do you want it to represent your player’s health, or should it be some other kind of indicator? The most common use for it is to show a health meter, so our example will help you set up a system like that.
Setting up your sprite
To make a health bar or system that changes when you get hit, there are two ways to do it:
- Swap sprites between different sheets, or
- Make one sprite sheet that has several frames.
My favorite way of doing this is by setting up a sprite that is sectioned out in several frames, so let’s go ahead and set that up. Remember that our sprite is 16×16 pixels in height and width, but we’re going to be adding additional width to the image file to create additional frames for it.
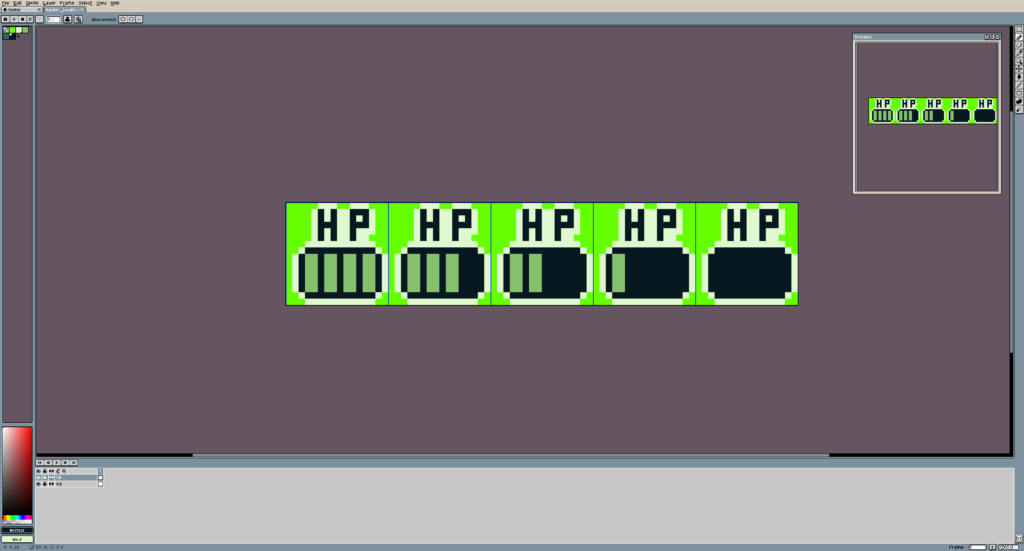
The art program I prefer is called Aseprite, but you can use whatever software you feel most comfortable with. You’ll notice that I already have my sprite set up in this picture, and for each ‘frame’, you’re going to want to add 16 pixels to your image’s width. So in this example, my image file size is 80 (16 x 5 = 80) x 16 pixels. Remember to make the background transparent so it appears to be floating above the action.
If your program offers it, turn on guidelines or a grid to show you where the edge of each sprite is (and remember to set it to 16 pixels), as it will help to ensure you’re ‘drawing within the lines’. Draw your first frame and then edit the other ones to show the meter or amount going down in each frame. You don’t have to use five frames either; get creative, and make sure it’s clear what the HUD element means or your player might not understand it!
Setting up the Health variable
Once you have saved your sprite into your sprites folder inside of your project folder, you should now be able to assign it to your pinned actor. It’s a good idea to set your animation speed to “None” now if you haven’t yet, unless you plan on having your pinned actor animate while playing. For our case, you want to ensure it’s set to none.
To be able to make our HUD move between frames and show the health decreasing, we have to put some code together to make it work. It’s good practice to create a variable to represent the value of health that the player character has. We can use math functions to make it go up or down. Specifically [Variable: Increment by 1] to increase the variable’s value or [Variable: Decrement by 1] to decrease it.
Let’s go ahead and set up our Health variable. We’re going to name it “Player Health” and have it set On Init in this scene. That means it will set to this amount every time we load this scene, so do keep that in mind!
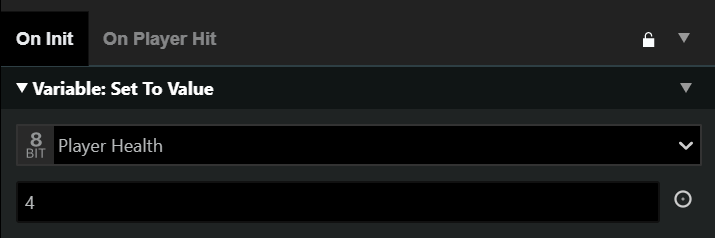
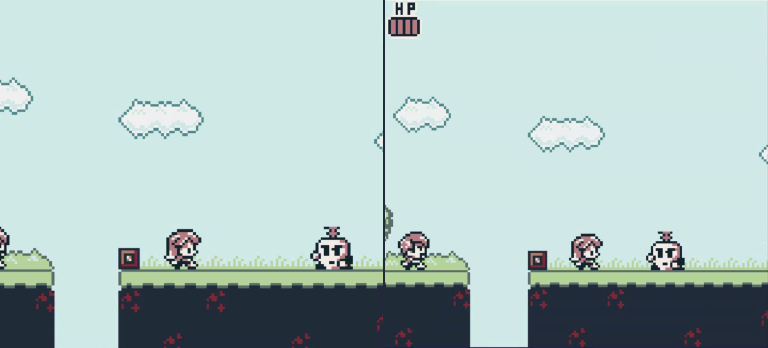
My example sprite has 5 frames (frames 0 through 4), so I am going to set the value to 4 and move through the frames each time that goes down, all the way to 0. To do that, we need to check when the player is hit, and then decrease the value of Player Health.
Getting Hurt
GB Studio can handle collisions by enemies in two ways: in the Scene or on the enemy Actor. We’re going to put it directly on our Actor, the evil Turnip. Once you pick the Collision Group for your enemy (we’re using Group 1), then you can set up the code within the Player section of the On Hit tab.
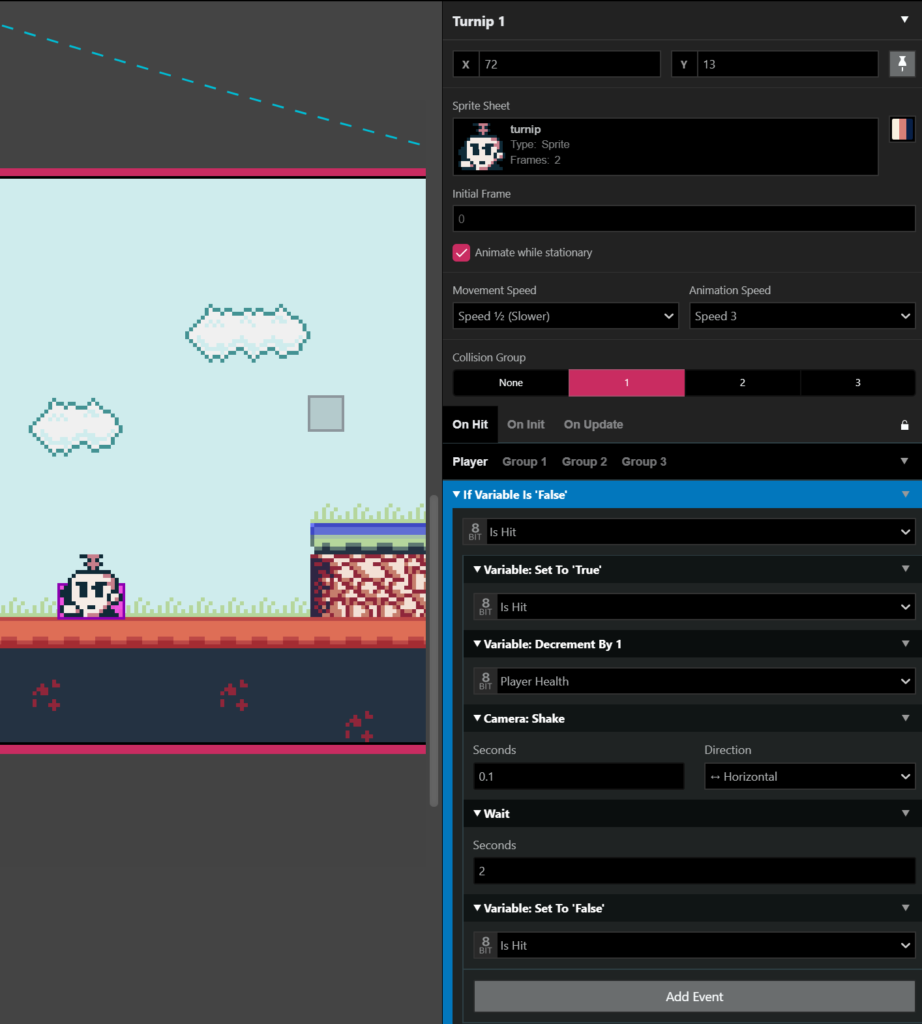
Let’s start the breakdown of the script by explaining the [If Variable Is ‘False‘] part. You need to add a check to see if you’ve been hit, otherwise, it will restart the script each time you are hit, registering multiple hits in a row, and will disregard any Wait timers. I used the Local 0 variable and renamed it to ‘Is Hit’ to accomplish this. By checking to see if ‘Is Hit’ is False and then immediately setting the value to True, I force it to finish running my entire script before setting it to False again (restarting the script). You’ll also notice I added a [Camera: Shake] to the script to visually indicate to the player that they’ve been hit.
Each time you’re hit, it will decrease the value of the ‘Player Health’ variable by 1. Even though I set my [Wait] to 2 seconds, you can change the length to whatever you desire if it is too long or short for what you need.
A good piece of advice here is to make sure that each enemy you want to hit the player is updated with a script like this, otherwise only the first enemy Actor you changed will affect the HUD. Now that we have that set up, let’s make it actually do something.
Making damage affect the HUD sprite
To tie the damage we are receiving from the Turnip to our HUD, we need to set up our pinned HUD Actor’s script. Again, we have a couple of options for how to do this. You could use either a Switch or check the value in On Update and swap frames when it finds a change in value. We’ll stick with the less complicated of the two and just check the variable value.
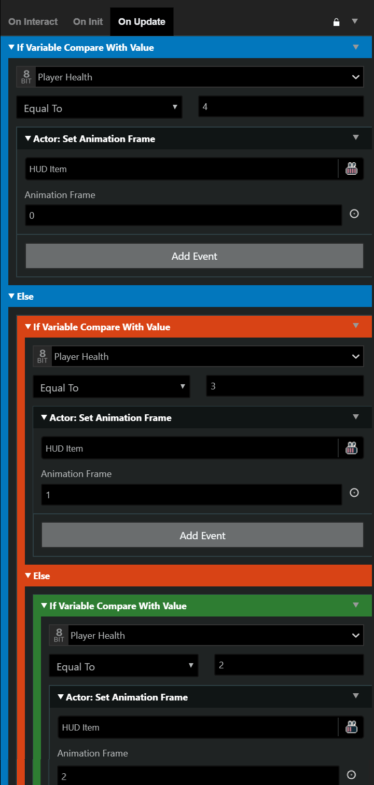
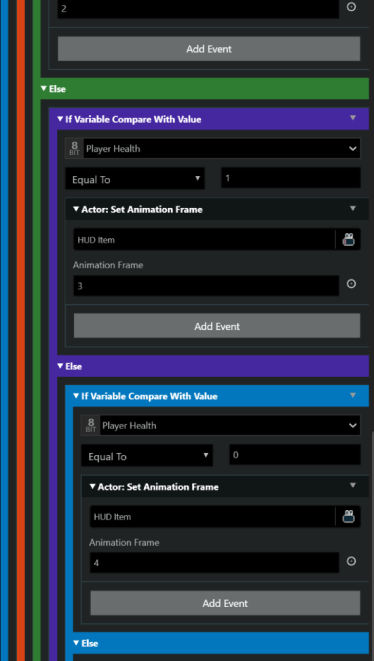
We’re going to use [If Variable Compare With Value] and the Else command to set up a chain of checks to determine what frame we should show. Please note that each check that follows is nested inside the previous one’s Else branch – this is required so the On Update script isn’t running multiple checks (which can cause slow down).
Since my initial health is full and the HUD Sprite’s animation frame 0 shows full health, I don’t necessarily have to set the frame for this value, but just in case I decide to add a health pack feature to add health back, it’s a good idea to have it here for continuity’s sake. If you did everything right, then you should see the health value change each time you’re hit by the Turnip enemy we set up.
Once the health value reaches zero, you should have something in place like changing the scene to a Game Over screen. Or perhaps you could get even fancier with setting up a lives system (again, something best suited for switches) and send them to Game Over after they are all gone. You could also place a sound effect in each [If Variable Compare With Value] check before the frame change to signify to the player that they’ve been hit.
Hiding the HUD or swapping sprites
Let’s say you had a cutscene where you wanted everything to look clean while you are showing off your characters moving and delivering their dialogue. You could use [Actor: Hide] to achieve this, just make sure you use [Actor: Show] after the cutscene is over or you’ll lose your HUD elements!
Another thing you may want to do is allow for upgrades to your health bar and you can do that by just swapping the sprite with [Actor: Set Sprite Sheet]. This would likely be something you’d want to check a variable for during On Init so it swaps before the scene loads. Don’t be afraid to get creative with it, it’s a very versatile tool to have in your arsenal!
Good luck with setting up your UI! I can’t wait to see what you all come up with.
The project file used here can be found on our itch page.

Writer, Game Designer, Engine Bender, Retro Enthusiast. Co-creator of In The Dark. (He/Him)
