
This tutorial was developed using GB Studio V3.1.0 and is applicable to that specific version.
So you want to make an auto scroller but avoiding spikes and pitfalls is too bland. You want a massive boss that chases you. But how do you do it? What smoke and mirrors does the Game Boy or GB Studio have?
In this two part tutorial I will discuss how to implement these key concepts:
- Moving the camera independently of the player
- Detecting player position relative to the camera to create dynamic 1D collision boundary
- Utilizing the window/overlay layer and invisible sprites to create a screen-sized moving boss
Part 1 – Auto Scroller
How-to auto scroll the screen
This is fairly simple in concept, you have to decouple the camera from the player and move the screen using the inbuilt events. Follow these steps to set that up.
Add a scene and in it’s “On Init” tab, add a [Lock Camera to Player]event. Uncheck the axis you’ll be scrolling. This will result in the camera no longer following the player on that axis. Next, add a [Move Camera To] event, and set it to where you want the camera to initially be located. Now add an actor, pin it to the screen and hide it. This will act as the “updater” of the camera position
On that actor’s On Update tab, add a [Move Camera To] event, and set it to the desired end position. When you run the game, the camera position is initialized, then scrolls to the target position using this script. The player will be able to freely leave the screen, so it’s up to you to place collision boundaries.
Dynamic Collision Boundaries
As of writing there are no built-in features that allow for changing collision during gameplay, and unfortunately this is not a particularly easy task to get working without issue. GB Studio is designed to use pre-defined collision detection rather than dynamic edges based on game conditions. To achieve dynamic edge collision, you can compare the player’s position to the edge of the area you want them to collide with and then and adjust the player’s position (push back) with movement to ensure the player remains within bounds.
The [Store Actor Actor Position in Variables] event retrieves the player’s position in pixels but there is no equivalent for camera position. Instead GBVM can access two variables, “_camera_x” and “_camera_y”, which correspond to their names. Let’s put that into practice and create two lines of GBVM code which store the position data into variables named CX and CY (for Camera X and Camera Y)
; get the camera position and store them in global variable
VM_GET_INT16 VAR_CX, _camera_x
VM_GET_INT16 VAR_CY, _camera_y
Calculating the screen boundary
The variables _camera_x/y are relative to the center of the screen only when the camera axis is decoupled from the player, otherwise it will be the player’s location.
Here’s four different math expressions you can use to calculate the edge of the screen according to the camera’s position.
| Screen Edge | Variable | Expression | |
| Left | $CL | Camera x – (screen width / 2) | $CL = $CX – 80 |
| Right | $CR | Camera x + (screen width / 2) | $CR = $CX + 80 |
| Top | $CT | Camera y – (screen height / 2) | $CT = $CY – 72 |
| Bottom | $CB | Camera y + (screen height / 2) | $CB = $CY + 72 |
These variables will be used later in our calculations, so you can adjust the screen width and height values for the bounds of the screen edge collision.
Calculating the player collision boundary box
When manually handling collision detection, you’ll need to calculate the player’s collision boundary box at its current location every frame. Luckily this can be done with standard events, requiring no GBVM code. If you do use GBVM, the _player_x and _player_y variables return sub-pixels, which can be converted to pixels by dividing by 16.
| Player Edge | Variable | Expression | |
| Left | $PL | player x | $PL = $PX |
| Right | $PR | player x + player width | $PR = $PX + 16 |
| Top | $PT | player y | $PT = $PY |
| Bottom | $PB | player y + player height | $PB = $PY + 24 |
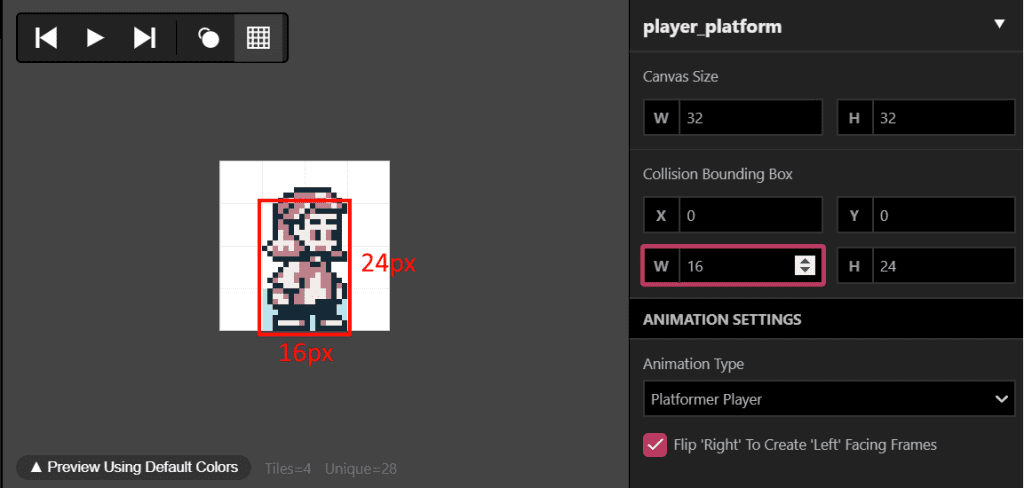
The default platformer player has a collision boundary box of 16 x 24 pixels, smaller than the height of the art. If you adjust them, you can use these values in the calculations above. So the order of events would be to first get the player position, then use a Math Expression to calculate the collision boundaries.
Checking player screen-edge collisions
This is done using the [If Math Expression] event. The follow expressions will be used to determine each edge of the screen.
| Player collided with left screen edge | $PL <= $CL |
| Player collided with right screen edge | $PR >= $CR |
| Player collided with top screen edge | $PT <= $CT |
| Player collided with bottom screen edge | $PB >= $CB |
Player edge collided
Push back is the amount you adjust the player’s position so they never exceed the edge. The amount of push back will depend on the rate of the camera speed, player velocity, the scene complexity, and how quickly the On Update script is processed. Ideally you want the smallest amount, so the player appears to be pushing against the edge. If the edge is moving, this becomes even harder to achieve cleanly.
There are different events that can be used for applying push back:
I’ve found that specifically setting the player position gives the best result, but setting relative position removes the need for you to manually calculate the position.
Manually calculating push back
For edges to the right or bottom you’ll need to factor in the width or height of the collision box. To do this, you’ll need to first run the expressions listed above to calculate the values needed, then calculate what the push back should be accordingly. Finally, set the player’s position using that calculation. Some examples:
| Player collided with left screen edge | $PX = $CL + 5 |
| Player collided with right screen edge | $PX = $CR – 26 |
Smoothing collision
When the player collides with the edge you will need to experiment with ways of smoothing out the interaction, particularly with a moving edge. Simply pushing back the player’s position away from the edge may not be enough. Player movement may update faster than the On Update script, allowing the player to brute force beyond the dynamic boundary or get stuck on it. To mitigate this problem, you can temporarily disable the player movement by zeroing walk and run velocities with an [Engine Field Update] event. The period of time you disable movement for will vary. If set too short the player will get stuck on the moving edge, while if set too long it will result in laggy controls.
So the script’s flow to use this effect is as follows:
- Apply the Push Back
- Add two Store Engine Field in Variables events for walk and run velocities
- Add two Engine Field Update events, to set walk and run velocities to 0
- Add a Wait event with a length of at least 1 frame
- Add two Engine Field Update events, to restore the walk and run velocities to the stored variabl
Putting it all together
Finally, we need to implement the collision detection using a second Actor’s On Update script. The camera movement and collision detection might be able to be applied using a single actor, but it is much more difficult.
- Add a second pinned sprite to the screen
- Add the following to the second sprite’s “On Update”:
- GBVM to read the camera position
- Calculate the screen edge(s)
- Store the player’s position in variables
- Calculate the player’s collision boundary box
- Check for player edge collisions
- If collided:
- Stop player movement
- Push back the player’s position in the away from the edge
- Wait a number of frames
- Restore the walk velocity and run velocity
Optimization
Only apply collision detection for as few edges as possible. The more calculations you do, the slower your game will run.
The push back and the movement delay is highly dependent on your scene, player speed and camera speed. Tweak the values, including the boundary calculations, to find the correct combination.
You may be able to hard code the player velocities or store them in a scene’s On Init rather than reading the current values on every collision check.
In Part 2, we’ll use this camera movement in conjunction with an animated Overlay to create a large boss chase scene!

Aussie software developer, retro game collector, chiptune vinyl enthusiast, did someone say reinvent the wheel but buggier with less features?
