
The RPG Series
RPGs are one of gaming’s most popular and longest-lived genres, and some of the most popular series in the world have had entries (or even got their start) on the Game Boy. And now, thanks to GB Studio, it’s your turn to create an RPG of your own!
In this series, we will cover how to use GB Studio’s built-in events to create a basic RPG system that you can expand on for your own game. All project files will be available to download at the end of the article, and inside you’ll have all the examples and assets we use in each article (along with some additional comments). You can use these as a reference or even expand on them to create your own game.
Quest 2: Rewards & Leveling Up
With our battle system’s core mechanics and flow outlined in Quest 1, we’ll move on to fleshing out the resolution of a battle to prepare for the rest of the game. In today’s quest, we’ll cover how to provide the players with rewards for winning a battle and how to handle defeat.
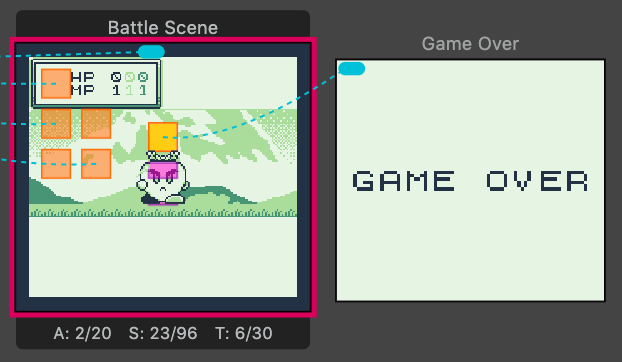
Adding a Game Over Screen
To differentiate our battle results, instead of sending our player directly back to the Boot Screen, let’s send our player to a Game Over screen instead. This will also begin to prepare our game for when we have more options (such as loading a saved game or quitting back to a main menu).
First, we’ll add a new scene called “Game Over.”
Back in our Battle Scene, we’ll update our Monster Turn sequence to now send us to this scene when we are defeated, and we can spice up the sequence a bit by adding some music and a simple screen fade.
In GB Studio 4, dialogue events were improved to add more advanced features to control how your text displays. For our “You Died…” message, we’ll set this to text box to close “Never (Non Modal)” – this will keep the text displayed while our script continues to run, allowing us to time the music with a wait event and not need to wait for the player to press A. As our game over music plays, the screen will fade out, and take us to our new scene.
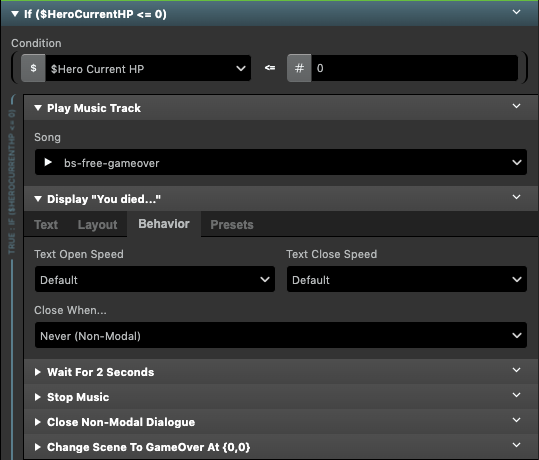
We’ll need to use the new [Close Non-Modal Dialogue] event before we change our scene to make sure the text box we kept open doesn’t reappear on our next scene, too.
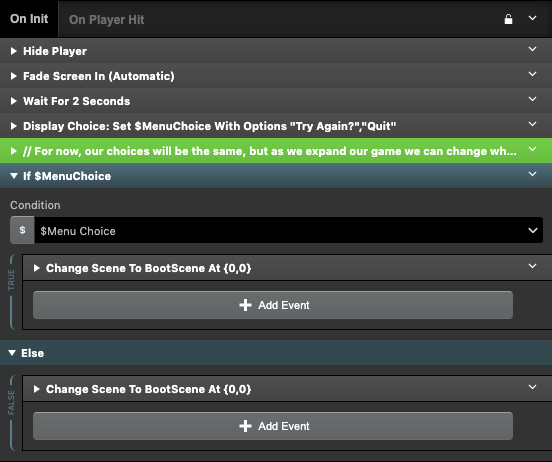
For now, we’ll keep our Game Over scene very simple. We’ll give the player a choice to continue using the [Display Multiple Choice] event, but for now we’ll have both answers return to the Boot Scene. We’ll come back to this later on in the series!
Now that we’ve added that, don’t forget to update any other scripts that check for the player’s defeat (such as in our Poison damage script!).
Creating Our Victory Sequence
Next, we’ll update what happens when we defeat the monster. Right now, we only need to update the sequence in our “Fight” trigger.
Currently, once the enemy has reached 0 HP, we just send the player back to Boot Scene – kind of anti-climactic, isn’t it? Just like our Game Over sequence, let’s spice that up by adding some music. We’ll also want to use [Hide Actor] on our enemy sprite, since we’re no longer going to immediately leave the scene.
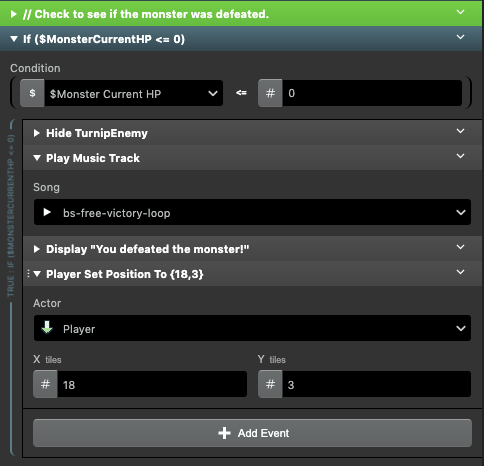
Instead of sending the player to a new screen for our Victory sequence, let’s add a new trigger (named “Victory!”) to handle this script as part of our trigger based menu and send the player there.

Rewarding Victory
With our victory trigger created, it’s time to hand out some rewards! In most RPGs, defeating monsters will reward gold, items, and experience points (XP). We’ll set up our battle system to reward all three, but you can tailor the types of rewards to different types of battles if you’d like.
Gold
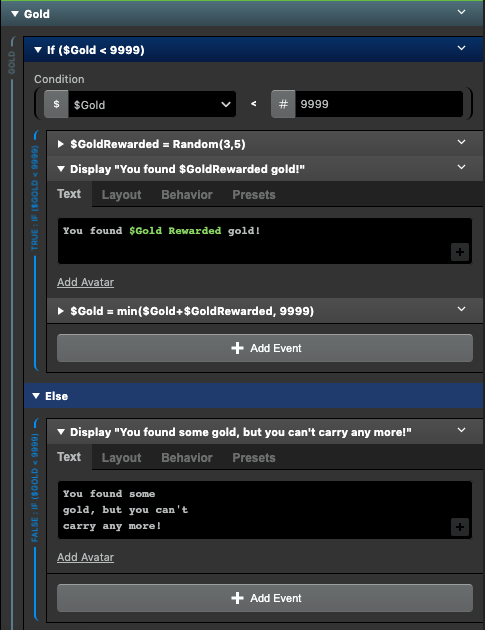
Let’s start with giving the player some Gold for defeating our monster. First, create an [Event Group] to keep your script organized. In order to make sure our player doesn’t earn more gold than they can carry, we’ll first check if they already have max gold. For this, we’ll assume we’re limiting the player to 9,999 gold, but you could also use a variable here if you wanted to allow the max gold to change over time (but remember, a variable can only go as high as 32,767).
If our player doesn’t already have 9,999 gold, we’ll use a [Math Function] to reward a random amount of Gold. Let’s set one of our trigger’s local variables (renamed to $Gold Rewarded in our examples) to this amount. Then, we’ll need to use a [Math Expression] to actually update our player’s Gold.
Create a global variable (in our project, this was variable 13) named “Gold.” With our Math expression, we’ll see if the amount rewarded to make sure our gold doesn’t go above 999 using the “ min( “ function. This will reward the lower of the two options – either our “Gold + Gold Rewarded”, or 9,999. Add a few dialogue events to tell the player their reward (or lack of reward), and we’re all set!
Items
Managing an inventory can be complicated, and there are many different ways you can create an item and inventory system. For our game, we will be giving our player 10 inventory slots to hold items, and each will take up a whole slot in our bag.
First, create 10 global variables, named Item 1, Item 2, and so forth. These are what we’ll use to see if our player can hold an item. We’ll also need to determine what our variables represent. For example, while Item 1 = 0, we know this inventory slot is “empty,” but once it has a value it will represent a different item.
As we introduce more items and shops into our game, we can determine what these values represent. For now, we’ll assume that a value of “1” is equal to a “Potion.”
In our Item event group, we’ll first want to check if we have an open inventory slot to give the player an item. To do this, we’ll need to stack a series of [If Variable False] events, checking if our Item variables are empty.
If Item 1 is false (“0”), we can reward the player with the item and store it in that variable, but if Item 1 was true (any non-zero value), we’d use the “Else” function of our event to check our next variable.
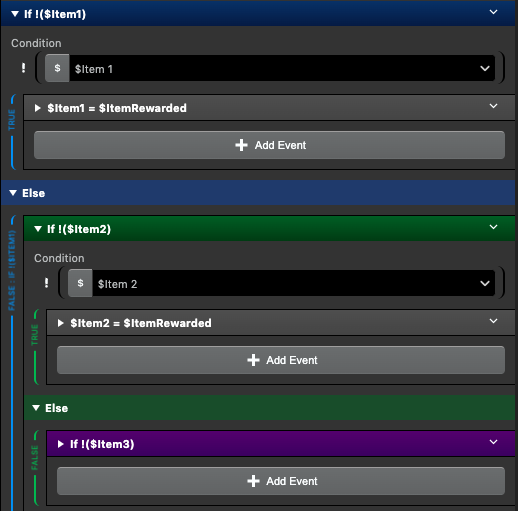
We’ll repeat this for all 10 Item variables. If all our Item variables are true, in our final “Else,” we can add a dialogue box that tells the player they didn’t receive an item because their bags are full.
To actually set the variable, we’ll use a [Set Variable to Value] event at the start of our script. By setting a local variable (renamed Item Rewarded in our example) to a value, we know that his monster will reward that specific item (remember, a “1” = a potion), and by using a local variable, this makes it easier for us to change this in the future – if we copied this event for another monster, we could change the items that that monster gives out, or we could update this in the future to give a random item.
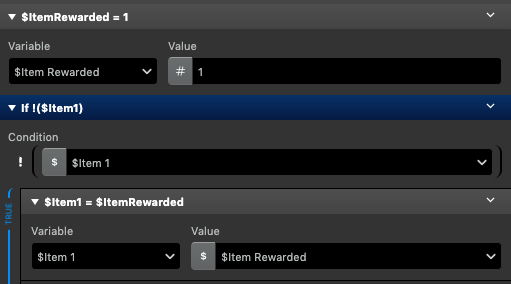
In each of our Item checks, we can then use another [Set Variable to Value] event to set the Item global variable to the Item Rewarded; this just simplifies the repetition – we don’t need to go and change every event to a new value if we wanted to change what item is rewarded; instead we’d just need to change the first event.
Experience points
Finally, let’s give the player some Experience Points (XP). Like most RPGs, defeating monsters in our game will reward XP, and after a certain amount of XP is gained, our player will increase their level and grow stronger.
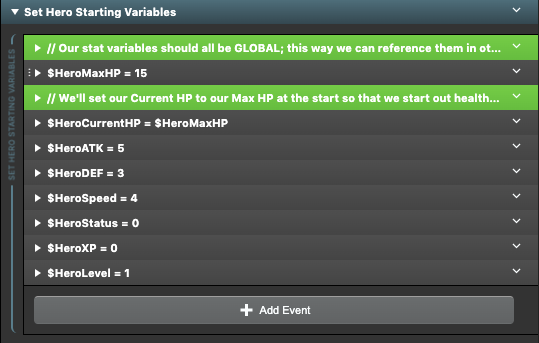
First, we’ll create three more global variables: Hero XP, Hero Level, and Monster Level. For our game, we’ll use a very simple formula to determine how much XP a monster is worth to our player: if a monster is at a higher level than the player, we’ll give out double XP, but if our player is at a higher level than a monster, we’ll give out half the XP.
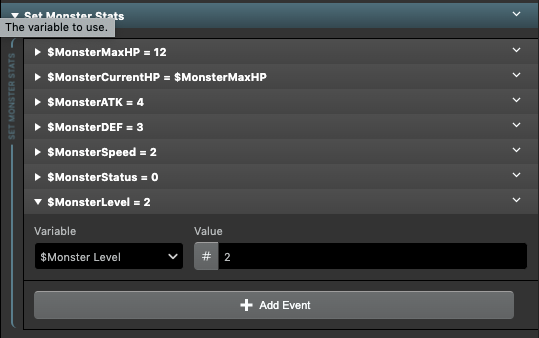
In our Battle Scene On Init script, we’ll add a new event in our “Set Monster Stats” event group to set our Monster’s level to 2.
In our Boot scene, we’ll also want to set our player’s Level to 1 and their XP to 0.
Back in our Victory trigger, we’ll add our XP formula. First, we’ll determine how much XP our Turnip is worth – let’s go with 10 XP to start. Using a [Set Variable to Value] event, we’ll set a local variable (renamed XP Rewarded) to 10.
To set up our formula, we’ll use [Compare variable to variable] events. First, we’ll check if the monster is higher level than our player, and reward double the XP Rewarded variable if that’s true. In the Else, if the Monster Level is lower than the Hero Level, we’ll use another Math Expression to half the XP Rewarded variable. And if the Hero Level and Monster Level are the same, nothing will change.

After that, add your XP Rewarded to your Hero XP using a Math Expression.

Finally, we can add a dialogue event to show how much XP the player earned, and with that, we have a simple XP reward script.
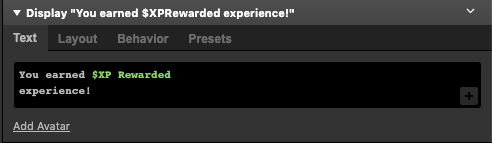
Nice and easy! But what now that we’ve earned that XP, what do we do with it?
Leveling Up
To check if our player has earned enough XP to level up, we’ll use a simple formula to increase the amount of XP needed every level. This way, our player progressively needs to earn more XP every level.
Our formula will be $Hero Level * 100 * 1.25, which gives us the following progression for experience points:
| Level | XP to Level Up |
| 1 | 125 |
| 2 | 250 |
| 3 | 375 |
| 4 | 500 |
| 5 | 625 |
| 6 | 750 |
| 7 | 875 |
| 8 | 1000 |
| 9 | 1125 |
| 10 | 1250 |
| 11+ | etc |
Now, after we reward XP, let’s check if the player has enough to level up. We’ll calculate the XP we need to reach the next level using a [Math Expression], and set that value to a local variable (renamed XP Needed). If our Hero XP variable is greater than or equal to the XP needed, we’ve leveled up!
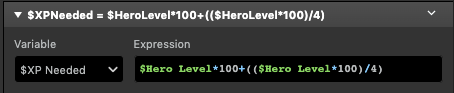
Note: Since we can’t use decimal places in GB Studio, we’ll need to represent “1.25” as our value divided by 4. This looks a little more complex, but that’s math!
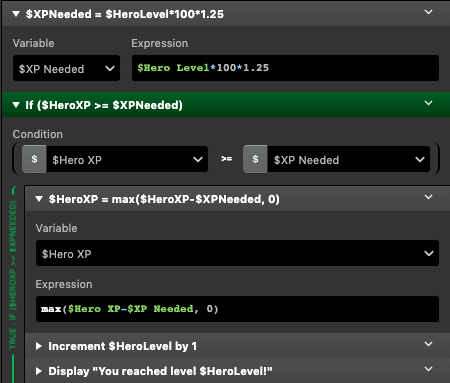
When we level up, we’ll use another [Math Expression] to reduce our Hero XP by the XP we needed (spending it), and we can use the ‘max(‘ function to make sure we don’t go lower than 0 when we subtract (but if you’ve done the math correctly, this should never happen!).
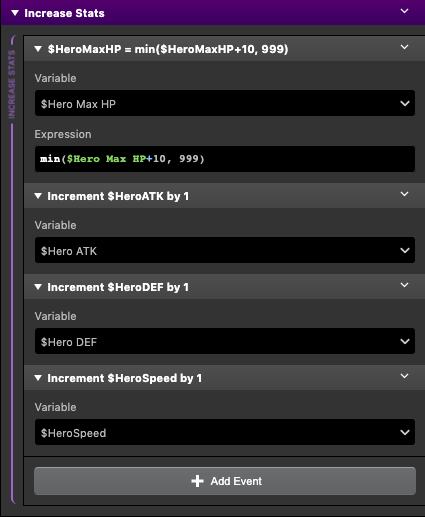
After we’ve leveled up, we need to increase our stats! For now, we’ll simply increase all our stats by 1 and raise our Max HP (and make sure we don’t go higher than 999).
In a future article, we’ll cover how to actually allocate points to specific stats and gain more control over leveling up. Until then, experiment with your own system for stat increases – perhaps you could randomly gain a point in one of your stats, or maybe even gain larger increases! The choice is yours!
Next Quest:
Now that we’ve rewarded the player for beating a monster, it’s time to spend that gold! In our next quest, we’ll take a break from the battle system to actually explore the map and visit RPG staples like a shop and an inn!
You can download the project files here, and don’t forget to visit the project page on itch.io to ask questions or provide feedback. See you next time.
Designer’s Note:
Thanks to feedback shared on our project’s itch page, there’s been a minor adjustment to the size of the battle screen background. The background size has been increased to 176 x 160, and a black border added to the scene. This makes the screen shake events look smoother. I’ve also made an aesthetic change to the text box borders. Neither of these changes will impact the lessons, but will make our project look slightly nicer moving forward.
Remember, if you change your background size, you’ll need to adjust any events that refer to specific coordinates (such as our Replace Tile or Set Position events)!

Friendly Neighborhood Game Designer (he/him)
GB Studio Games | Tabletop Games
