Isometric games have been a popular genre since the 8-bit era. They provide a unique perspective that allows players to view the game’s world spatially, while still utilizing simpler 2D graphics on less capable hardware. Games like Atelier Marie, Qbert*, Kirby’s Dream Course, and Final Fantasy Tactics show how this perspective lets players interact and move through the game world in a more dynamic way. However, isometric movement can be challenging to implement in GB Studio. GB Studio 3.0 added the ability to use pixels instead of tiles for movement events. In this tutorial, we will create our graphics, and use this addition to set up our controls.
Setting up the scene
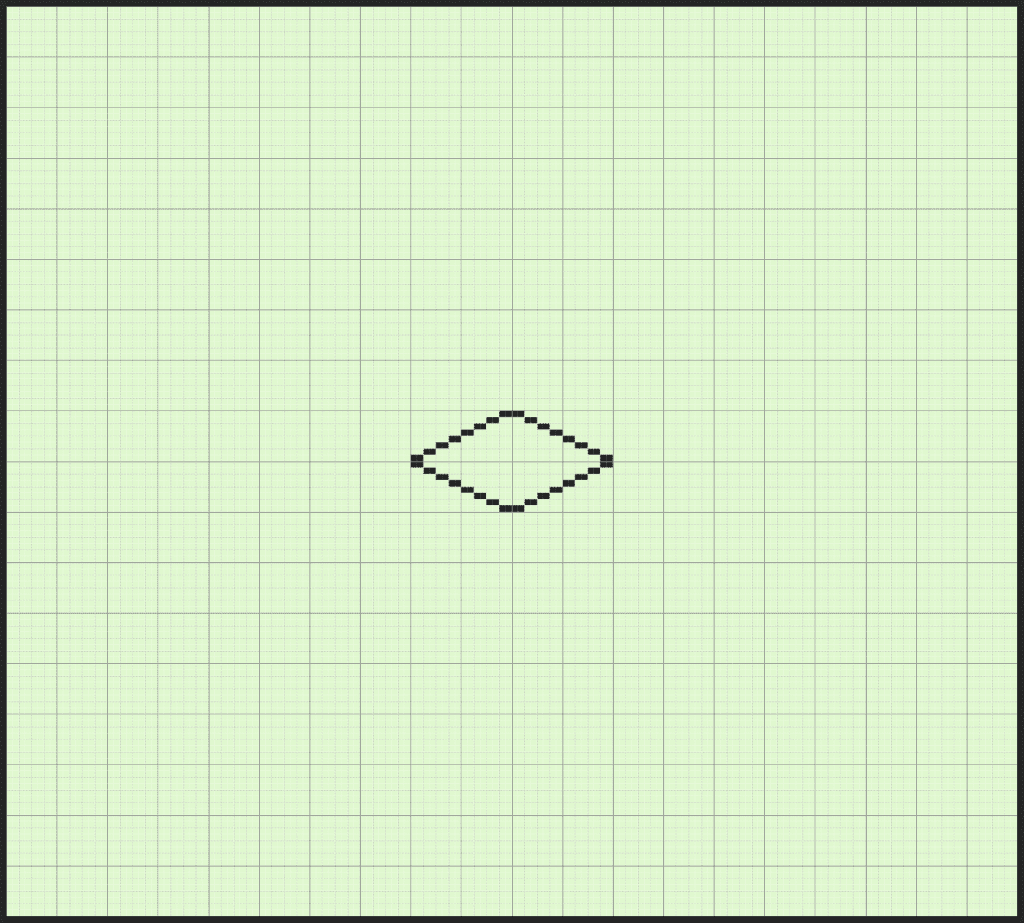
Let’s create a background that our player can walk on. In your art program of choice, create a 160×144 image and draw a diamond shape whose lines follow a 2 pixel, 1 pixel pattern, as pictured. Scale plays a role here, so for this example we will build to accommodate a 16×16px sprite.

Use your single tile to create a floor by duplicating it. Be mindful of the grid and keep everything aligned properly.
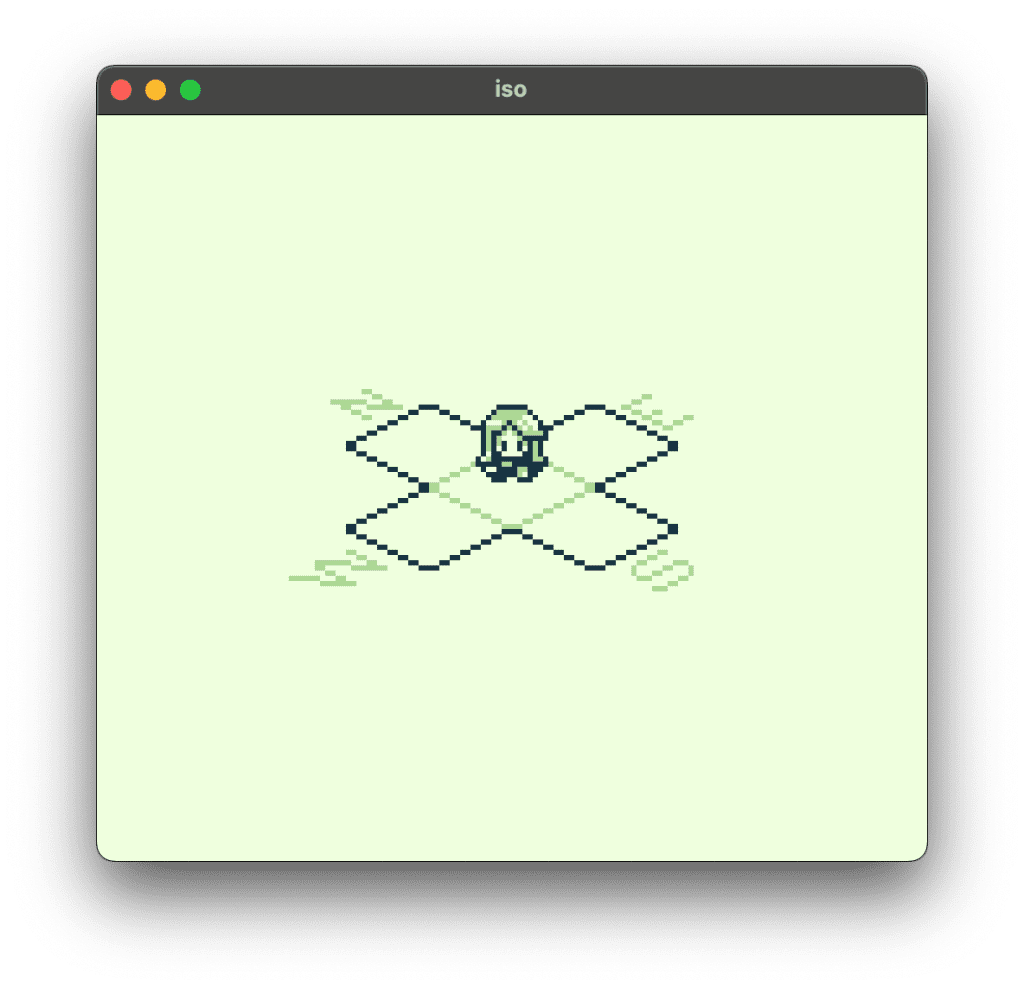
I’ve added the cardinal directions here for the sake of the tutorial.
Setting up the animation states
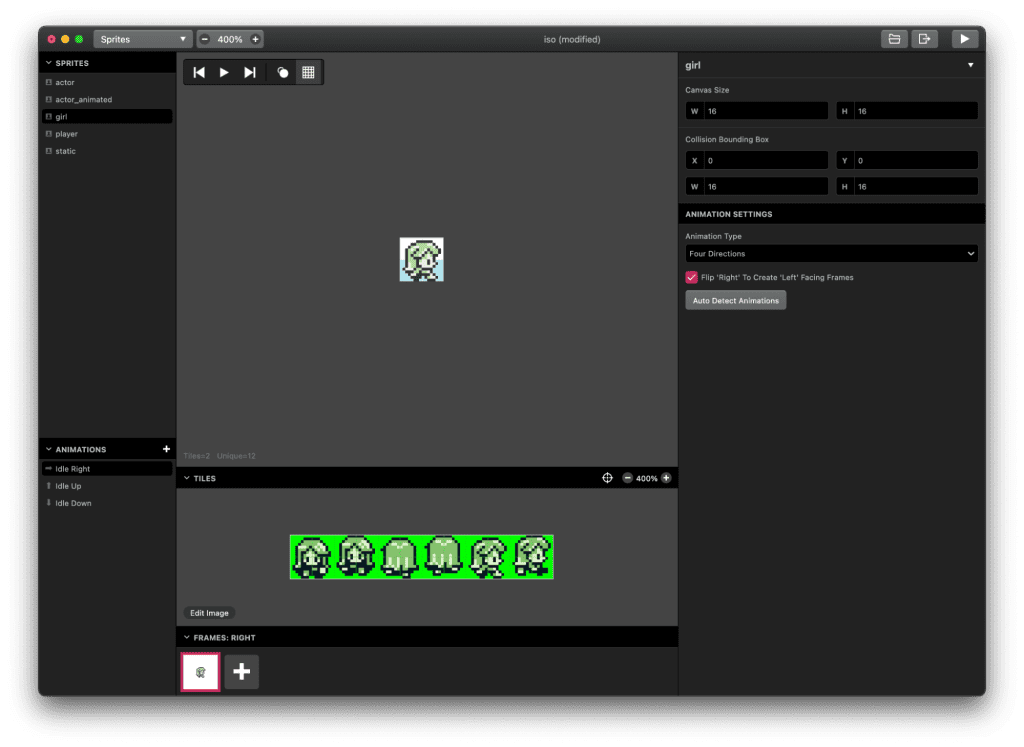
Next, let’s set up our player. Use a three direction sprite sheet similar to the player sprite sheet in the GB Studio example project.
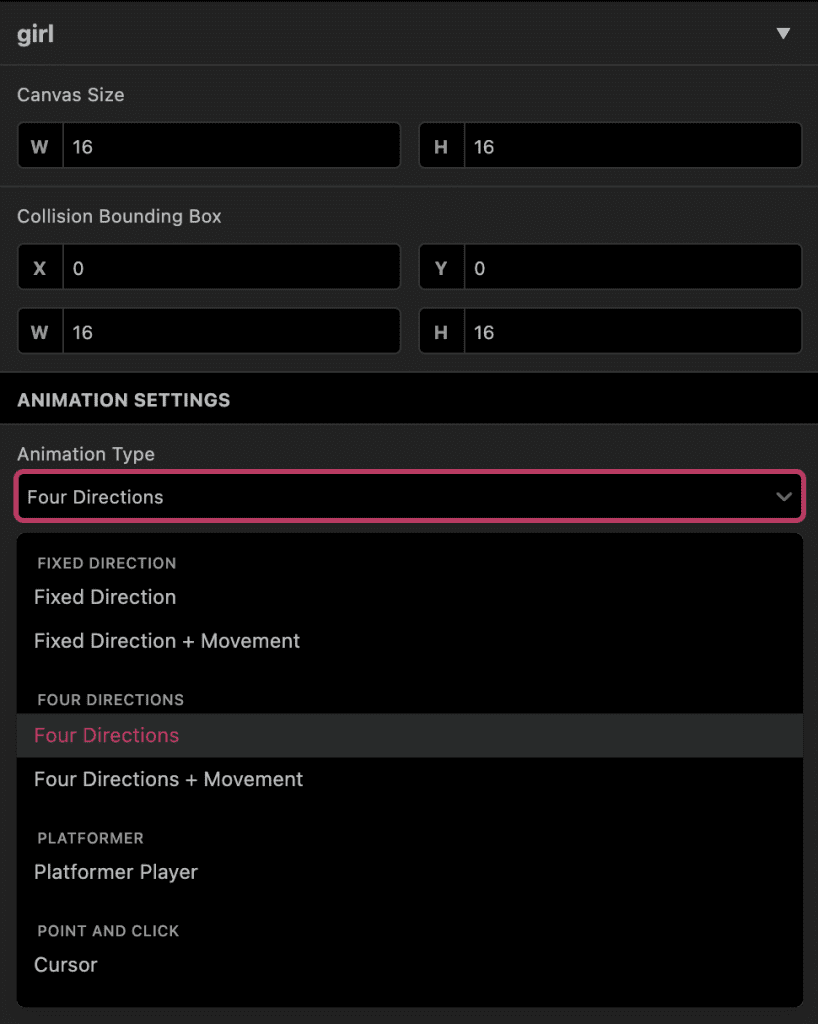
We’ll set up five Animation States for this example: an idle and our four directions. This is necessary because we need to manually call them when scripting the movement later.
In GB Studio, open the Sprite Editor. Select the sprite on the left sidebar you intend to use for the player. In the bottom left pane, you should see the default sprite state that GB Studio has created. In the right sidebar, Change the Animation Type to Four Directions. Make sure Flip Right To Create Left Facing Frames is checked unless you want a unique left facing idle. Fill out the canvases for each of the animations. This will be our default idle state.
Next, let’s set up states for our individual cardinal directions. I’m using cardinal directions here, since isometric operates in pseudo-3D space and it is a more illustrative description than “right-up” or “down”. In the Animations pane in the bottom left, click the ‘+’ symbol to add a new Animation State.
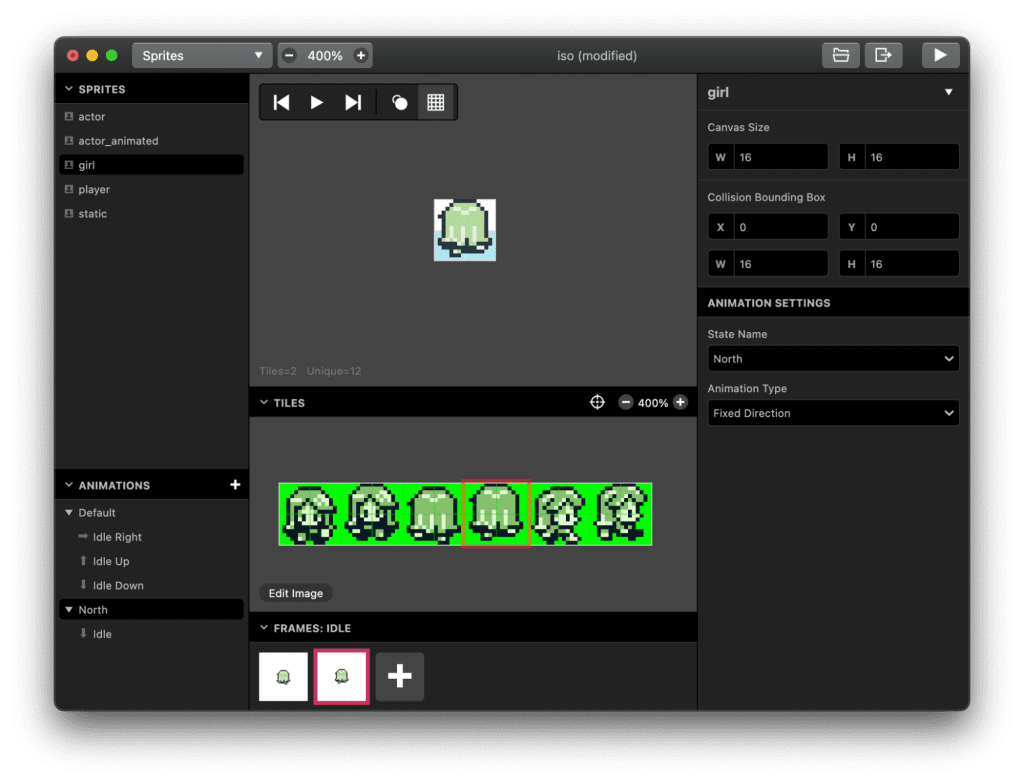
In the right sidebar, you can rename an Animation State and change the Animation Type, which changes the type of animation you can assign. Rename the state to “North” by hovering over the left side of the Name field and clicking the pencil icon. Change the Animation Type to Fixed Direction. Add your walking frames using the up-facing sprites.


Repeat the steps to create the rest of the renamed Fixed Direction states for each of the other directions. Each cardinal direction will correspond to a direction on the D-pad. Create your frames for each state as follows: North for up facing, east as right, west facing left, and down for south.

Alternatively, you can copy and paste to create a duplicate state from the one selected. Click the state you want to copy from the Animations pane. Click the triangle in the top right of the sidebar to bring down the context menu. Click Copy. Bring down the context menu again and click Paste. Rename your duplicate state and change the sprites accordingly.

For facing left, you can use the tiles for facing right and flip them using the flip horizontal button. Select the sprites on the canvas you want to flip and these options should appear in the right sidebar.
Setting Up Controls
Now that we’ve done all the preliminary work, let’s bring it together by attaching the states to the controls and set up movement.

In the On Init of the scene, add an [Attach Script To Button] event set to Left. Check Override default button action to override the default controls.
In order to have the player move while holding the directional button, input needs to be checked on every frame. Attach Scripts only work on the first initial press and do not continue to check for input. Adding a [Loop] inside of the script fixes this.
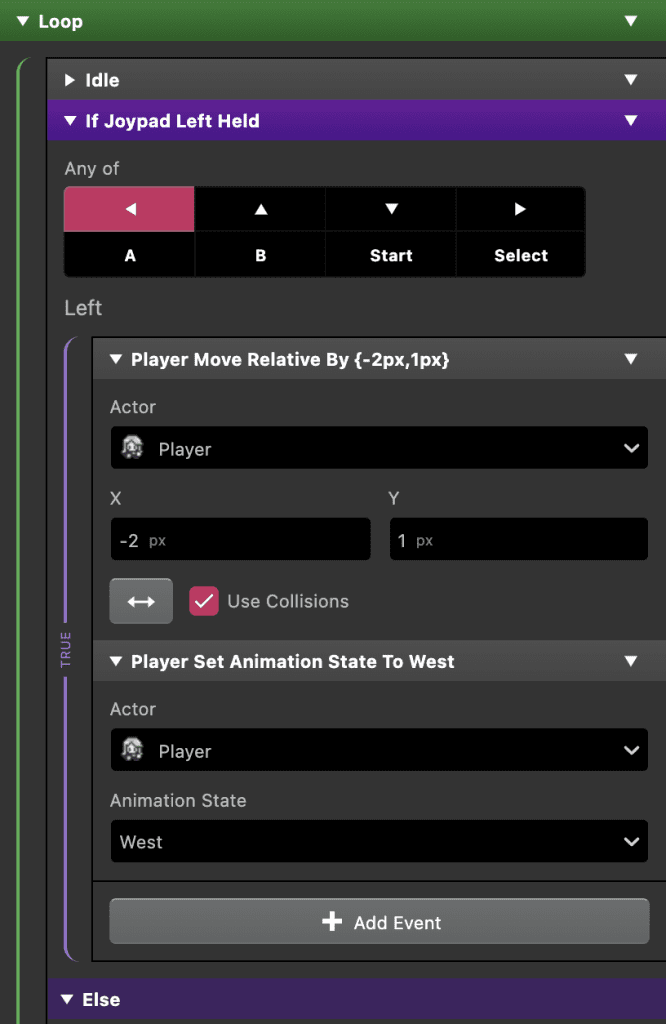
Create a new Loop event inside the Attach Script to Button event. Inside the loop, place an [If Joypad Held] event and set it to Left. Now, when left is pressed and held, the game will continue to check this script.
If Joypad Held is made up of a True section and a False section. The True section is for everything we want to happen when the player holds the button assigned. The False or Else section is used for what we want to happen when the player quickly taps or releases the button.
In the True section, add an [Actor Move Relative] event inside the If Joypad Held event. Set this to Player. Set X to -2 and Y to 1.
Setting X to a negative will move the actor to the left while setting Y to a positive number will move an actor downward. Combined, this will move down and to the right diagonally.
| Moverelative | X | Y |
| North | -2 | -1 |
| South | 2 | 1 |
| East | 2 | -1 |
| West | -2 | 1 |
By default, this parameter will be in tiles. Click “tiles” to switch to “pixels”. Check Use Collisions to ensure the player will not walk through walls.
You’ve probably noticed these values are similar to the pixel pattern we used to draw our base floor tile. If you were to change these values, you’d need to redraw your base tile to reflect this. Decide your movement parameters before committing to a whole map design.
Let’s change the player’s animation state to the corresponding cardinal direction. Place an [Actor Set Animation State] event immediately after the [Move Actor Relative]. Set Actor field to Player and State to West.
Now, we have set up the movement when the button is held, but what about when the player taps or releases the input?
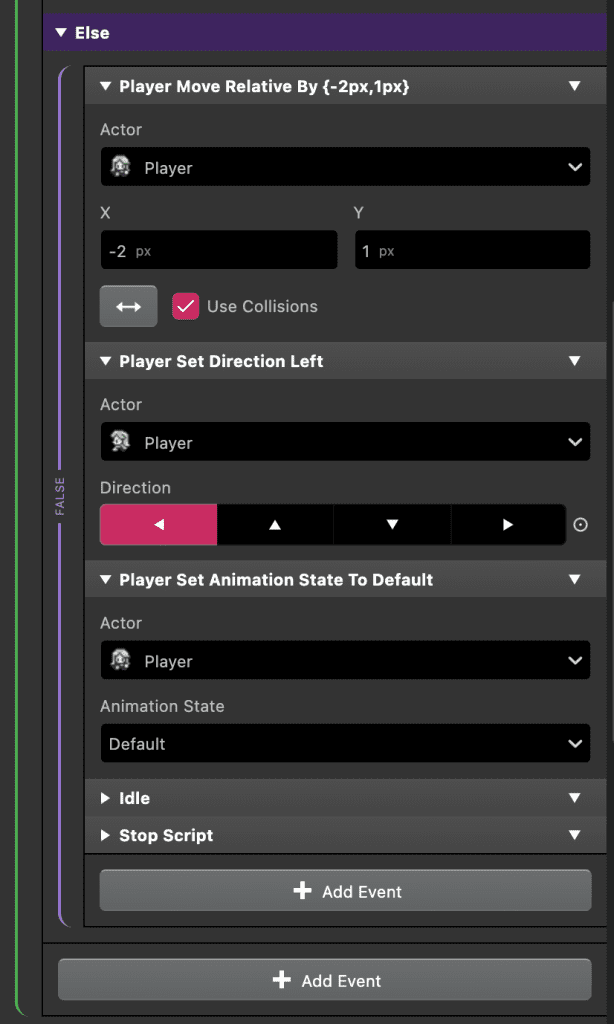
Inside the Else of our If Joypad Held event, insert another Actor Move Relative. Use the same settings, remembering to change “tiles” to “pixels”.
Now a tap and release moves the player, but we need to change the player’s state away from West and back to Default on release. Add an [Actor Set Animation State] event. Set it to Player and the state to Default. Now we can set the default state to face the direction we were holding using [Set Actor Direction]. Finally, we need to tell the loop to stop when we let go of the button, so we’ll add a [Stop Script] event.
You may have noticed the two Idle events pictured. The hardware will execute all of these commands quickly. Too quickly, so we need to add some Idle scripts to slow it down. Idle is similar to a Wait but for a single frame, which is slow enough for the CPU but undetectable to the player. One Idle needs to be placed at the start of the loop before the If Joypad Held event, so that when the button is released, there will be enough of a buffer before the CPU has a chance to check again when looping back around. Without this Idle, the script will be locked in the loop. The same is true for exiting the loop. Inside the Else we’ll need another one before the Stop Script event.
Now, all we need to do is duplicate each of these for the other directions. Be sure to change the directions on both the [If Joypad Held] and [Set Actor Direction] scripts, change the animation states to the proper directions, and make sure the units are set to ‘pixels’ on your Move Relative scripts.
Our player should be moving in all four directions. There is, however, one more step: Pressing multiple directional inputs yields unsatisfying movement, so we should restrict the controls to one input at a time. We’ll need to add a conditional lock to achieve this.
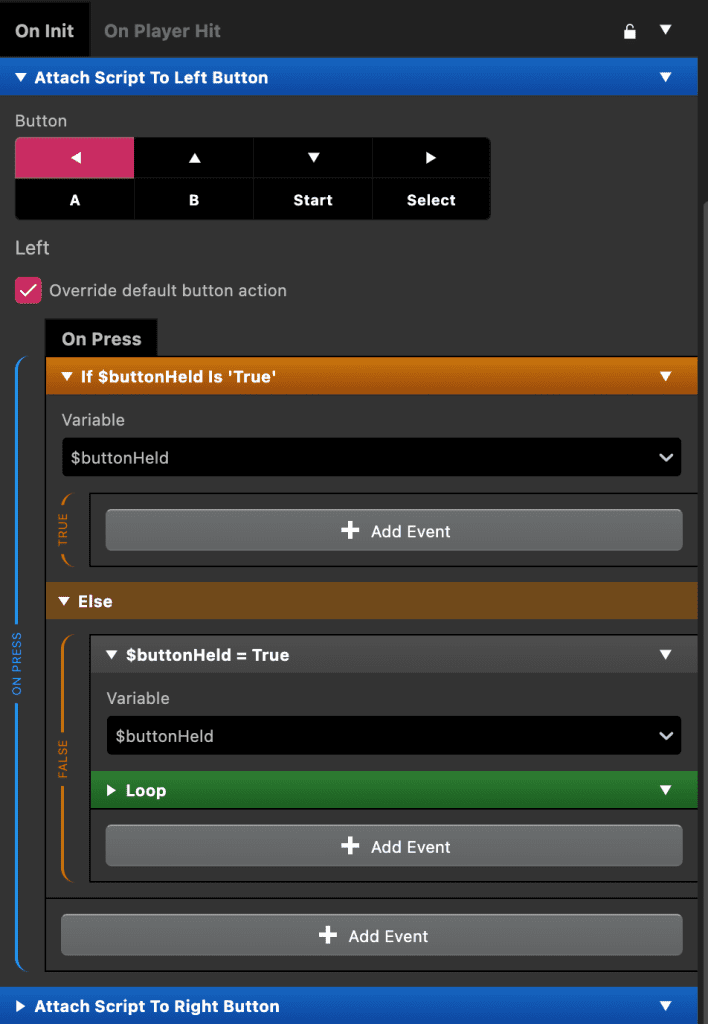
Inside our Attach Script to Button events, we will need to add an [If Variable Is True] event and choose a new variable. You can rename it to buttonHeld or whatever you wish.
Next, drag the loop inside the Else of If Variable is True. Insert a Set Variable to True event and move it before the loop.
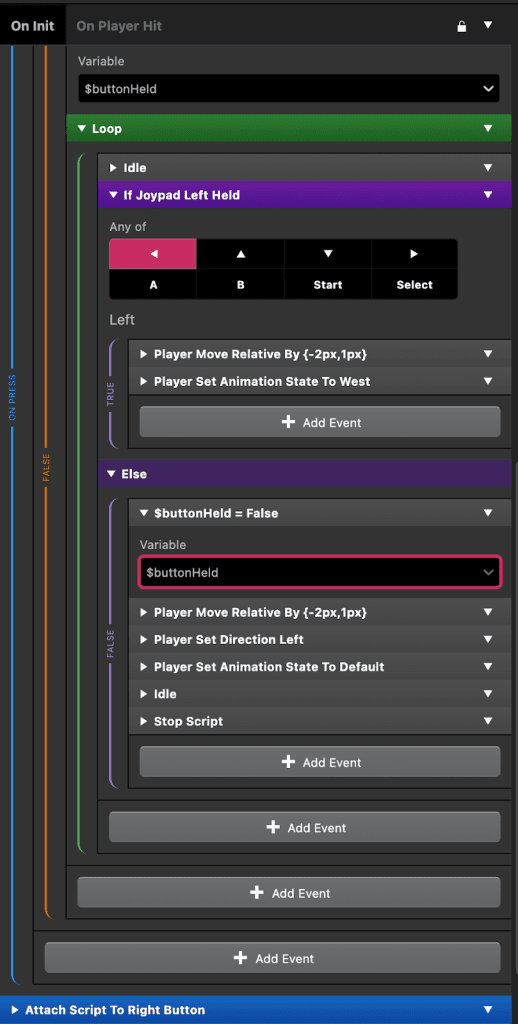
Finally, we can open up our loop. Inside the Else of our If Joypad is Held event, insert an [Set Variable to False] script and set it to our $buttonHeld variable.
Once you have done this on all four directions, when any of our directional buttons are held, they will first check to see if $buttonHeld is true. If it is—meaning we are holding an input already—the new movement command will not be executed. Once the player releases the directional input, the variable will be set to false allowing new inputs to be triggered.

And that’s it! Now you can create an adventure in a new dimension. Try it out and see what else you can add or change to make it your own.
You can find an example project file on our itch page: https://gb-studio-central.itch.io/iso-gbs-project
