
Recently, a way was discovered to compile the web exported versions of a GB Studio ROM into a stand alone executable (Windows or macOS). Thanks to the GB Studio Discord user MrPlayerYork for releasing this info on his Youtube Channel (video linked below).
Some of the things outlined in his video are a bit unclear, so I am going to go through the process and detail some of the issues I had along with the solutions.
Before You Begin
This tutorial expects you to have some comfort or knowledge of using a Terminal or Command Line Interface and a Text Editor. Everything is laid out step by step, so even if this is your first time using those tools, you should be able to follow through it. Regardless of which platform you build with/for, you will need Node.js 14.15.4 which can be found at https://nodejs.org/en
Note: Older versions of Windows can install older version of Node.js, and it should still work, though some functions like compiling a dev/test build may not.
If you are on Windows, you can download and install Visual Studio Code at https://code.visualstudio.com/ for an easier workflow. This process can also be done with any text editor (Notepad on Windows or TextEdit on macOS for example) and simply the Terminal or Command Line Interface if you choose. We haven’t been able to use this method to successfully cross-compile (use Windows to build for Mac and vice-versa), but there may be some dependencies or a step we are missing.
Export Your Game
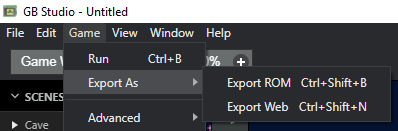
First we need to export your game for the web. This is easy, in the menu bar go to Game>Export as>Export Web. GB Studio will compile the game and open a folder. We will need this later, so keep this folder open for now.
Folder Structure
Folder structure is important for your team’s sanity, even if it’s only you. While it’s not necessary, it’s highly recommended to follow this file structure and create these folders:
*Note: Your folder names should not have spaces.
ProjectName:
    > builds
    > src
      |-> assets
      |-> game
Copy the contents of the newly compiled web build folder into the /Project name/src/game folder. That’s it for this step.
Build Parameters
If this is your first time compiling software, this could seem a bit daunting. If you take it slow and follow step by step you there shouldn’t be a problem.
Windows
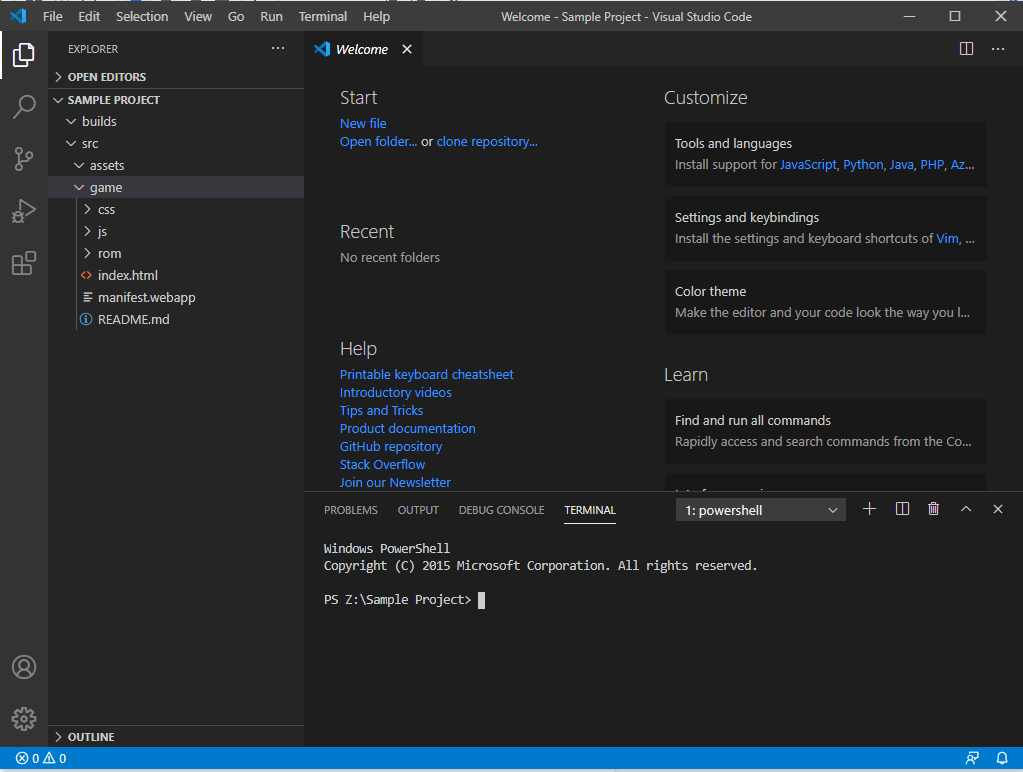
Load up VS Code and open up the project folder. Go to Terminal>New Terminal, your window should look something like this:
In Terminal, input this command:
npm init -y
You should see some alerts appear in the console, these are perfectly fine and nothing to worry about. Once it’s done, you will notice on the left hand side a file named “package.json” appeared. Next in Terminal enter:
cd ./src
Then:
npm init -y
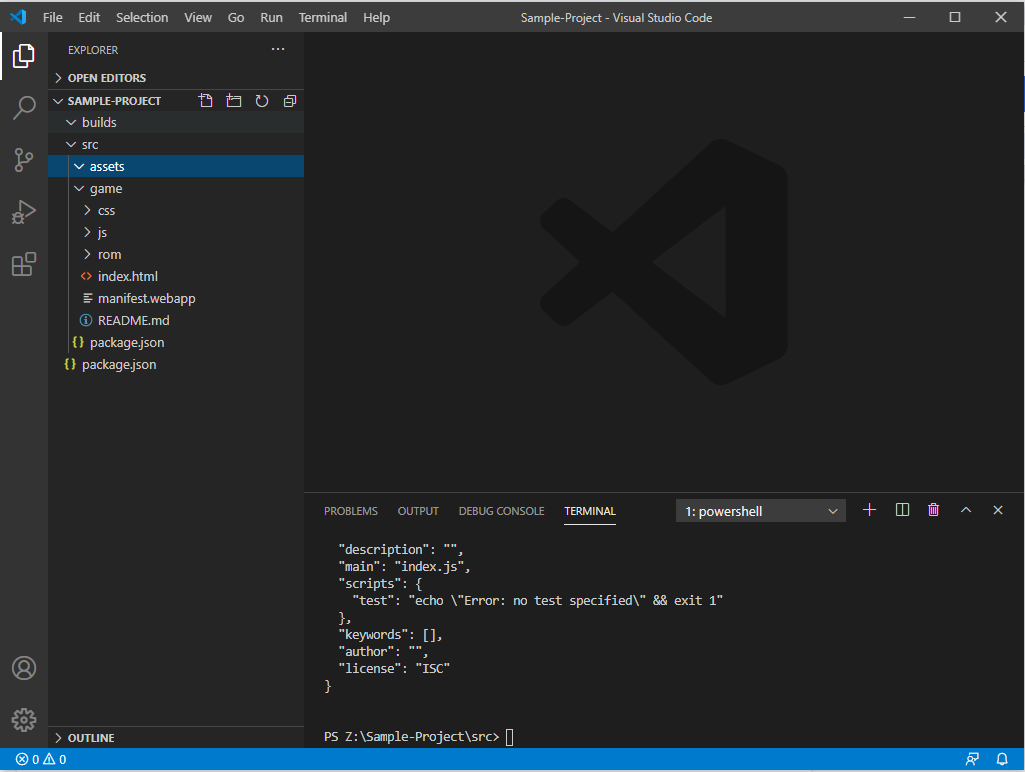
This will make second “package.json” appear in the src folder. Next move up a level to your project folder by typing:
cd ..
When finished, it should look like this:
Next we need to change some information in the 2 newly created “package.json” files. This can be opened directly in VS Code by clicking on them.
If you see a yellow line under your project name, that’s because you used capital letters in its name. You can fix this by simply changing your project name to all lowercase. Go back to the terminal and enter:
npm i nw@0.50.1 nwjs-builder -D
This step could take some time depending on your internet connection. You will notice that a few new things will have been added to your project: a file called “node-modules”, a file called “package-lock.json”, and the dependencies part of the “package.json”.
It should now look something like this:
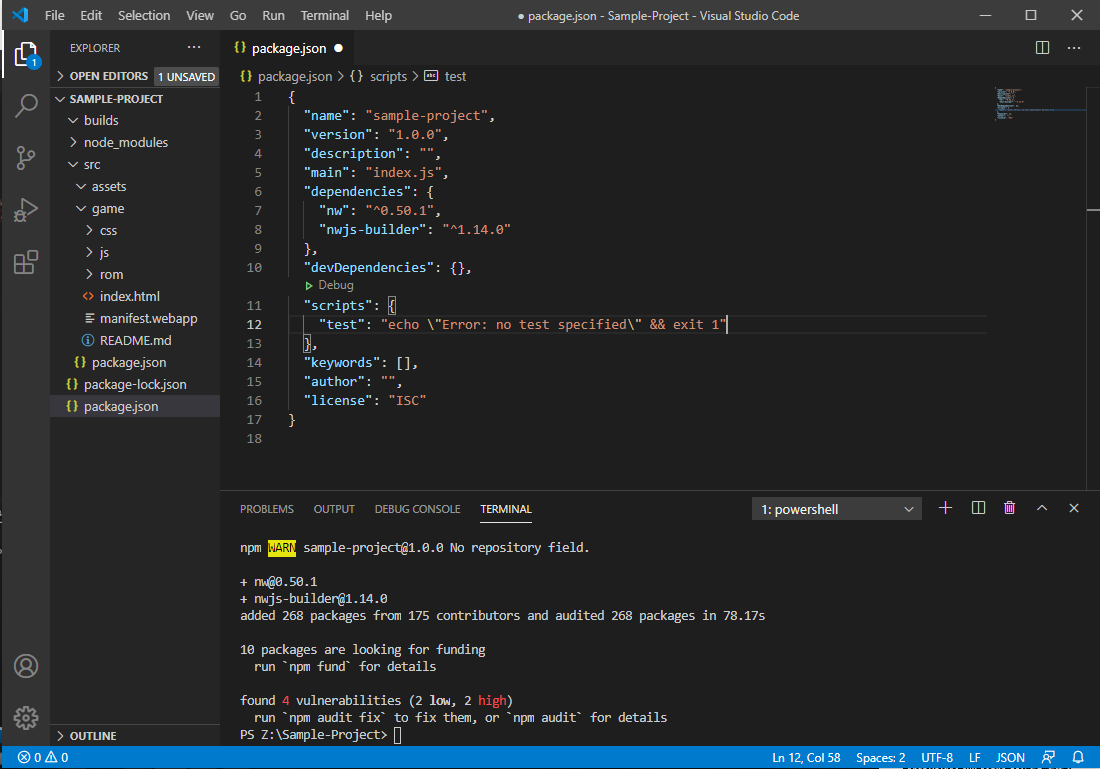
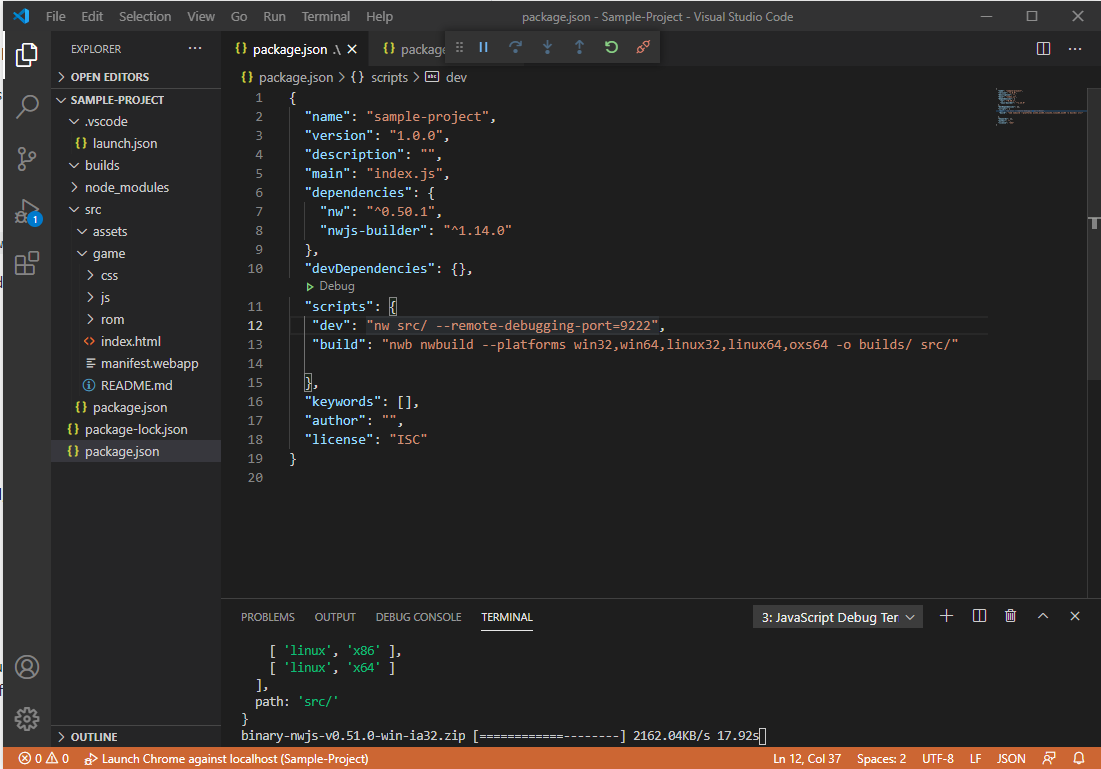
Next up we are going to make some more edits to the “package.json” in the root of the project folder.
Delete this entire line:
"test": "echo \"Error: no test specified\" && exit 1"
And replace it with these 2 lines:
“dev”: “nw src/ --remote-debugging-port=9222”,
“build”: “nwb nwbuild --platforms win32,win64 -o builds/ src/”
Don’t forget to save the file when you have made the edits, it should look something like this when you are done.
Next up we are going to open the “package.json” inside the src folder, the first change we are going to make is to this line:
“main”: “index.js”,
We don’t have this file so we want to direct it to our web build index.html tile in the game folder. Do so by changing it to this:
“main”: “game/index.html”,
Next up we are going to set the window information for our application to the “package.json” file under the scripts section, this is what we are going to add (make sure to copy all the text):
“window”:{
     “title”: “Sample Project”,
     “toolbar”: true,
     “fullscreen”: false,
     “frame”: true,
     “width”: 320,
     “height”: 288,
     “max_width”: 480,
     “max_height”: 432,
     “min_width”: 160,
     “min_height”: 144,
     “resizable”: true,
     “position” : “center”
},
Any of these can be changed to suit your needs there are also plenty of other options available on the nw builder github.
Now you should be pretty much ready to test the program. You can do this by running this in your terminal.
npm run dev
You should be greeted with your game in a window. Here you can play around with the window settings listed above and see them in action before building your ROM into an EXE.
When you are ready and happy with your exe, build your game by simply typing this command:
npm run build
This will output all your builds into the build folder of your project.
Resource Hacker
The next step is to customise your app and make it your own. We are going to do this on Windows with Resource Hacker found here: http://angusj.com/resourcehacker/
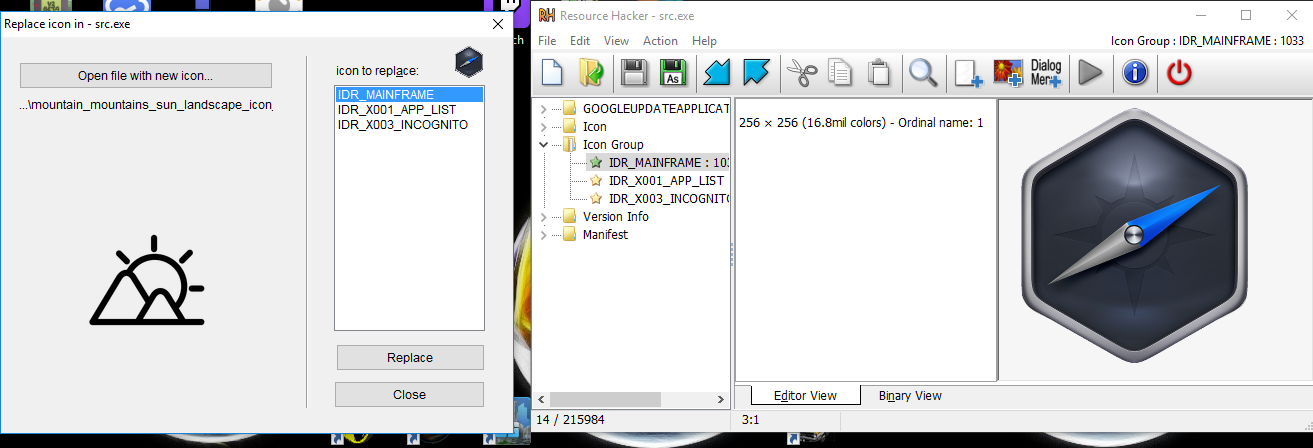
Open your exe in resource hacker to make some changes. I’m going to change my icon with a random image I found on the internet, but you can create icon files in gimp amongst other image editing software.
When your exe is loaded into Resource Hacker, go down to “IDR_MAINFRAME”. Right-click on it and select the replace icon action. There are three files here, but I believe only the first is used.
Next up we want to change the version info as it’s currently representing of node js not our app. Go to version, click on the only file in that category.
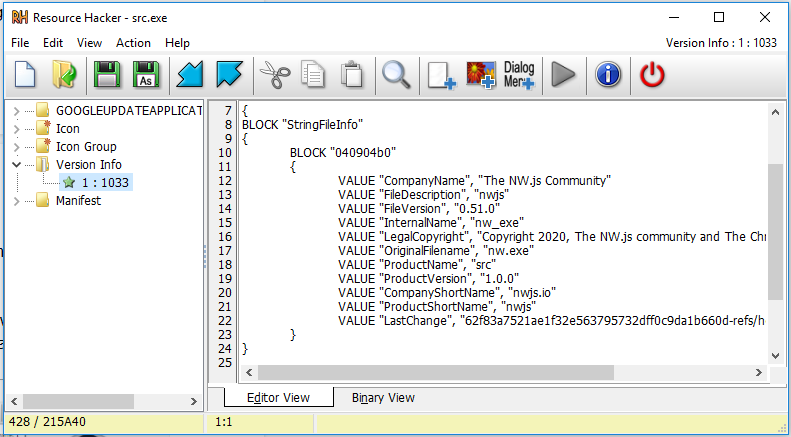
Change this info to your liking, but maintain the structure to keep Windows happy. Hit save and your exe will change accordingly.
Building an installer
If you would like to make an installer Inno Setup is recommended, you can find it here: https://jrsoftware.org/isdl.php#stable
Follow their wizard to input all your info, select your exe and the folder that contains your build files and it will build a setup script. Go to Build>Compile and it will make your setup for you. You can then find the installer in the output folder and also under the build tab.
All that’s left is to add that to the platform you wish to distribute your game on, whether it’s github, itch or maybe even steam.
Original video by MrPlayerYork
macOS
Building a standalone app from your web build is somewhat easier depending on how in depth you go. This is adapted from a video made by Sparckman. The same prep is required as before, make sure you have your GB Studio Web Build already exported and Node.js installed on your computer. This also only seems to work when building on a Mac, so you will need access to one in order to do this.
Go to the web folder where your index.html file is stored.
Create a file named “package.json”.
Paste the following code into the “package.json” file and save it:
   {
    "name": "nw-builder",
    "version": "3.5.7",
    "description": "nw-builder",
    "main": "index.html",

    "dependencies": {

    }

    }
For these next steps, you will need to open the Terminal app and use a command called “sudo” to force the command to run as an administrator. You may get a warning to only use this command if you know what you are doing, but these commands shouldn’t cause a problem. Still, we need to warn that running commands as sudo shouldn’t be done without knowing what you’re doing.
The first command installs the needed tools within node:
sudo npm install nw-builder -g
Next, change your directory to where your index.html file is. You can do this by typing in “cd“, space, dragging and dropping the folder and pressing enter.
Paste the following command into Terminal (don’t forget the period at the end):
sudo nwbuild -n "Your_Game_Name" -p osx64 .
And that’s it! You should see a build folder appear with your game as an app and few other files. You may still want to tweak the package.json like listed above to play with the window settings, and you’ll probably also want to make a custom icon. Icons on a Mac are built from 1024×1024 png files, if you have one created you can follow this tutorial to convert into an icns file. You can then go to File>Get Info on both your icon file and your app, and copy and paste the icon in the top left of each info window.
Did you know, Dragonborne is now on steam? Spacebot Interactive was able to follow a similar process to get their game into an executable and onto the store front. While providing a downloadable ROM is great and itch offers cross-platform compatibility in the browser, making a standalone executable offers for an offline way for those to enjoy your game who may not have the best success with emulators or hardware and provides more options for platforms to distribute your games.
Special thanks to Anima/SōdoDev and maxoakland for testing out these workflows and their feedback.

Game Boy Enthusiast, Hardware Fanatic, Mad Man. (he/him)
