
Level design is a huge topic to cover! It is impossible to go over everything in a single article, so I will be focusing on providing strategies that can be applied to a broad range of game genres. Luckily, as developers working with GB Studio and therefore limited to the realm of two dimensions, have the advantage over those working with 3D assets. Designing content limited to only two dimensions allows us to more easily design systems and tools that are far faster to implement than a developer in the 3D realm can hope to achieve. With that in mind, let’s get into it.
At this point in development, you will have constructed a Prototype of your game. Perhaps you have a first draft of a title screen, a basic menu system, and one or two scenes in which you can control a player character and interact with the world they inhabit. The prototype should be at a stage where you have ironed out most of the game-play features – at least the core aspects – and you are happy with the way everything feels. Now it’s time to build some scenes and populate them with instances of whatever actors and triggers you will be using at large.
Depending on the genre of game you are developing, these first example scenes act as a proof of concept for your levels or worlds. For example, if your game is an action platformer, then your scene might feature some platforms, a few unique enemies, an obstacle or two, the basic move set for the player character, power-ups, collectables, and ultimately, allows the player to achieve a win state (whether its a simple ‘get to the far right of the scene’ trigger or ‘destroy all enemies’ etc.).
The example scene will now act as a ‘master scene’ from which all other content can be copied as needed. It is very important, therefore, that you do your best to debug the scene fully before moving on, so that problems do not propagate as you build levels in the future (it’s best to use Custom Events whenever you can for this reason too). Additionally, if you want to have multiple worlds in your game, you might set up a master scene per world, each with its own unique enemies and obstacles.
With our master scenes designed and debugged (don’t forget to put in SFX custom events!), we are now ready to begin creating levels!
Strategy 1: Putting Pen to Paper
Best suited towards: Platformer, Role-playing Games, Adventure, Top-Down Action and Strategy games.
This strategy has been used by developers since the inception of game design. It allows you to design a level’s geography and place interactive elements throughout the scene before ever touching your keyboard. This is a way to think about how the player moves through your level or world, and quickly iterate and re-iterate without having to redo code or set up .png backgrounds in GB Studio.
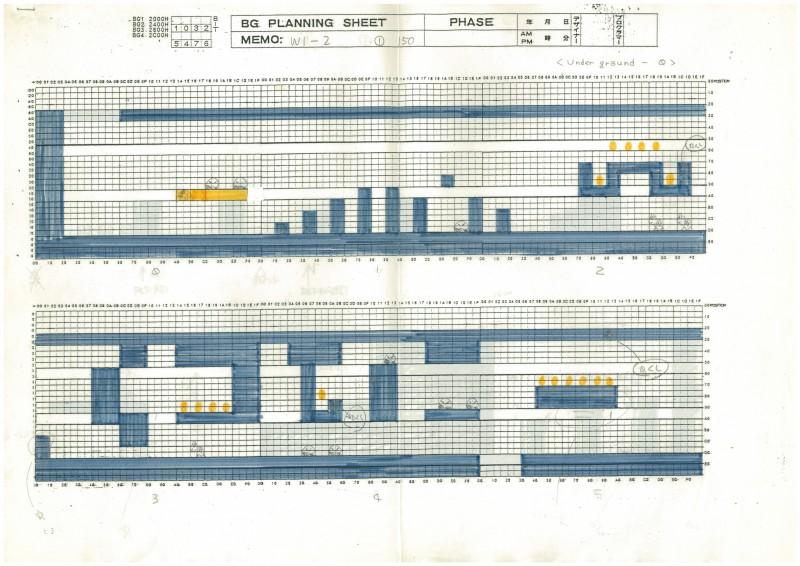
If you are designing a map for an RPG, then you would consider how the player moves through the space, how much backtracking they would be doing (if any), points of interest on the map and where collectables, weapons, health, upgrades, enemies, NPCs etc. are located.
Be sure to differentiate locations within your maps so that points of interest stand out, and sections of your map have their own unique feel (such as a jungle or city). This will avoid visual repetition and prevent the player from feeling lost.
Putting this information on paper makes it much easier to visualize playing your game rather than just trying to imagine it in your head. You will undoubtedly discover better ways to design the player experience as a result.
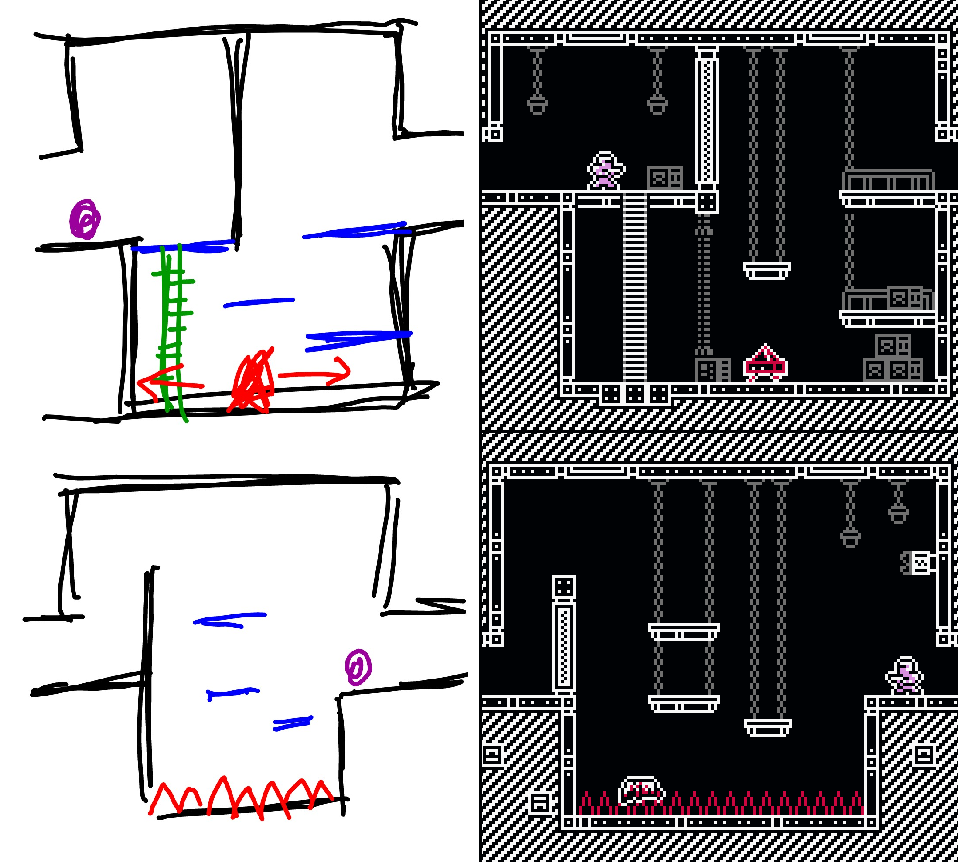
These ‘Pen to Paper’ designs are also guided by the process of play-testing. Once you feel you have the beginnings of a level on paper, implement your design in GB Studio using your copied Master Scene as a base and see what it feels like. If you find in play-testing that the level has elements or areas which impede the player enjoyment, or sections where more could be done to enhance enjoyment, then you can go back to the literal drawing board and make the necessary changes before testing again. On each iteration, your paper designs should evolve to include what you’ve learnt in play-testing, i.e: how much height / length to allow for when placing geography, enemies or obstacles within a level for example.
This is why your levels will always benefit from re-iteration!
Remember, your goal is to find out what about the mechanics you have created make them engaging. Combine them to create novel scenarios through experimentation. Over time, you will learn how best to utilize your mechanics. While each project is unique, the do’s and don’ts will emerge naturally as you design more levels and discover what is (and isn’t) engaging. Play-test your levels to see how they feel and repeat the process. Your level designs (and your game at large) will be a record of your findings presented to the player for their enjoyment and while level design may seem somewhat nebulous at times, practice makes perfect.
The best way to improve is, of course, practice but it also pays to analyze the level design of similar games to your own. Ask yourself why an enemy was placed precisely where it was. Does moving it higher or lower make it harder or easier to deal with? How does the game ease the player into a satisfactory difficulty curve? How long does the game use the same ideas before they become stale? How does the game make sure the player notices an important detail as they play? The questions are endless and the possibilities infinite.
For a more detailed exploration of game specific level design, you can check out my GB Classics series. Here is one on organic tutorials through level design alone, or another that explores one way to approach easing a player into character movement familiarity. Just about every game out there will offer its own lessons when you approach them analytically – even bad ones!
Strategy 2: Building with Blocks
Best suited towards: Puzzle, Strategy and Sports games.
Did you know that Hideo Kojima used his son’s Lego blocks to design the levels in Metal Gear Solid? Using physical objects to represent the elements within your game means that you not only have the luxury of designing levels quickly, but you will also be able to play your game without having to code a single line!
Trying to figure out how best to represent your game with physical objects you can manipulate is a creative process in itself. As every game and its mechanics will be unique, you will need to create a system that lets you easily take your level design ideas from your head to the table top using your chosen materials, and test them to see if they are engaging.
Here’s a list of things I’ve used in the past to assist with my own level creation:
- Plastic Building Blocks
- Board-game Pieces
- Cut up Cardboard/paper with markings/writing
- Old Toys
For example, when I was designing levels for Unearthed (a logic puzzle game about collecting mining resources using a Mech that can dig underground), I used Lego bricks to build the levels before I even touched GB Studio. Below is an example of one of the tutorial levels. It features a surface and underground scene which the player navigates with the goal of collecting the mining resource before exiting.
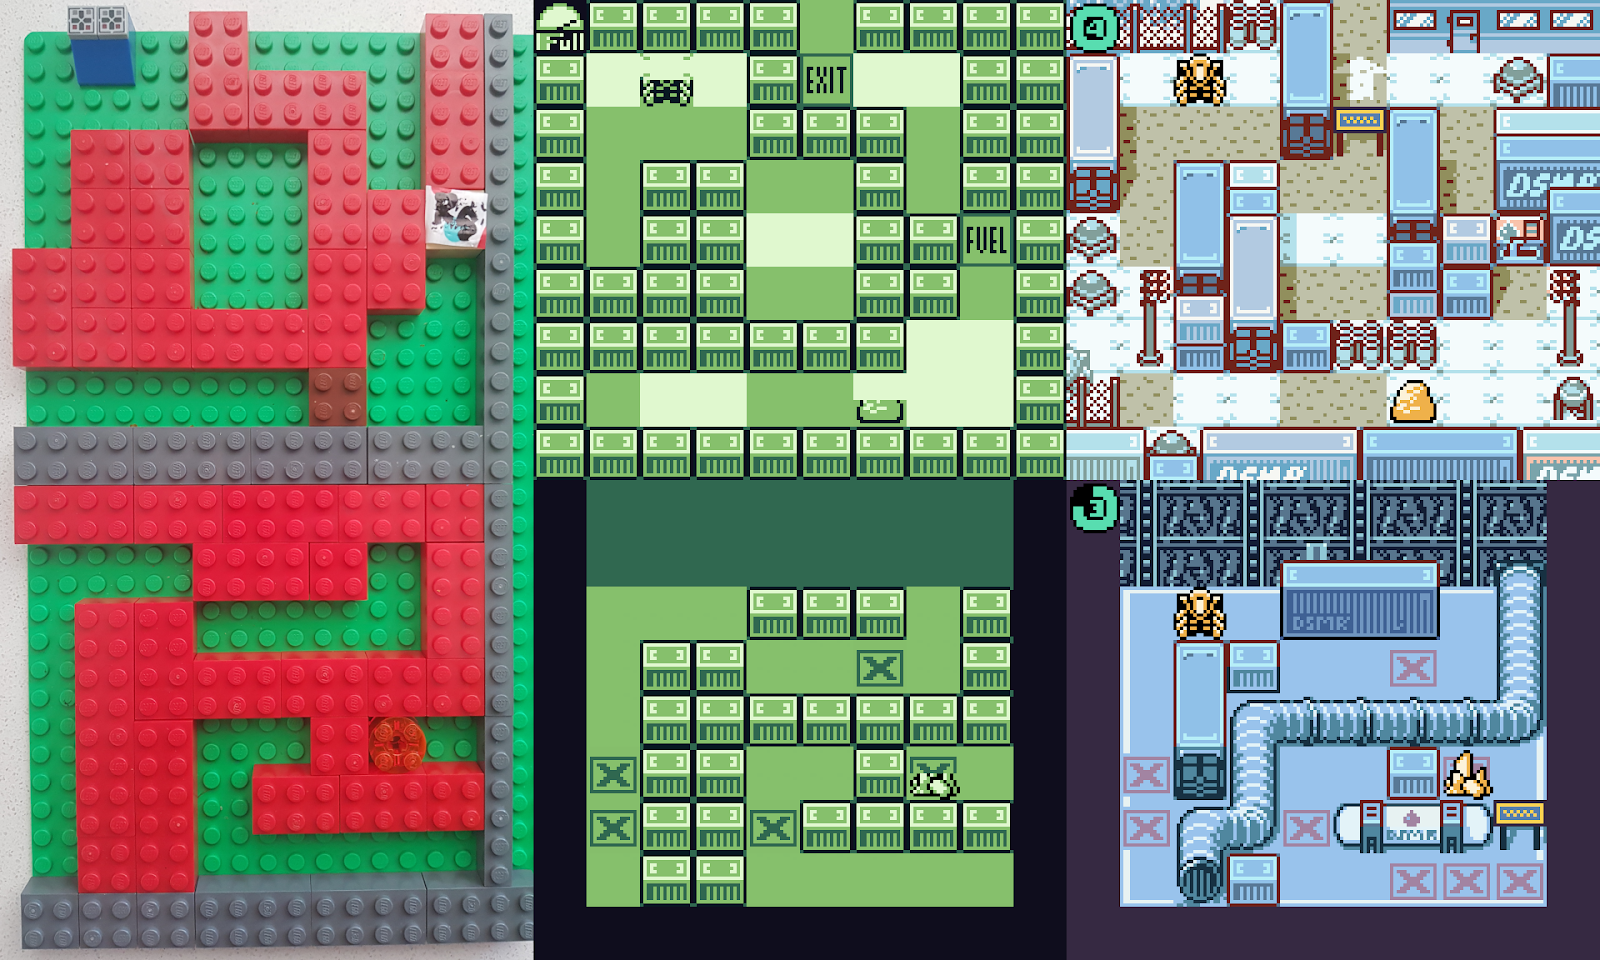
Let me take you through the process in more detail. Each stud on the Lego brick represented a single 8×8 pixel tile in GB Studio. By building a perimeter that translated to the size of a single Game Boy screen, I could then lay out walls, obstacles and actors, enabling me to physically interact with them and play the level to completion. I used different colored blocks, some with labels stuck on with tape, to act as the various actors in the scene. I could then make changes based on my experience as I saw fit. All I needed to do was follow the rules of the mechanics I would be implementing in-game. This method also allows for stringent testing of the proposed mechanics themselves and how they cooperate with each other. It is not uncommon to find that your actions will have unplanned consequences – some a pleasant surprise, and some not so much. Therefore, this process can assist with polishing the functionality of your mechanics as well.
Once I was happy with the level design on the Lego board, I photographed it as a record and reference for later.
Before long you will have many designs ready to be implemented inside GB Studio. That being said, it is wise to resist the urge to beautify your designs with elaborate artwork at this point. Even though you will have ‘played’ your levels using physical models, you will no doubt find yourself still tweaking your designs even after they’ve been coded and play-tested in-game. For this reason, I recommend slapping them together with placeholder artwork until you have at least play-tested your designs a few times.
In Part 2 of this chapter, we will continue exploring the process of level design. Specifically how best to tackle reiteration through rigorous play-testing.
Independent Games Designer, Artist, Film Enthusiast and Full-time Dad (he/him). Check out my games here!
