Color reproduction on the Game Boy line of consoles is important for many developers, yet there is little discussion on this topic. I want to explain color differences between devices and emulators compatible with GBC software in this article, and why it’s something that should matter.
Let’s begin with the basics: how do color screens display colors?
If you look at your screen closely, you can see three colors inside a pixel, red, green and blue. These are known as additive primary colors.
It is possible they might be arranged a bit differently, but they’re always the same colors.
They can look rather simple, but they’re the only colors necessary to create thousands of other colors in a display. Each subpixel can output a range of luminosity independent from each other, the result of which displays a specific color pixel (This luminosity range is usually 0-255 in most computer monitors, 0-31 on the GBC).
All color displays use this method: your computer monitor, your phone, your TV, and of course, your Nintendo handheld.
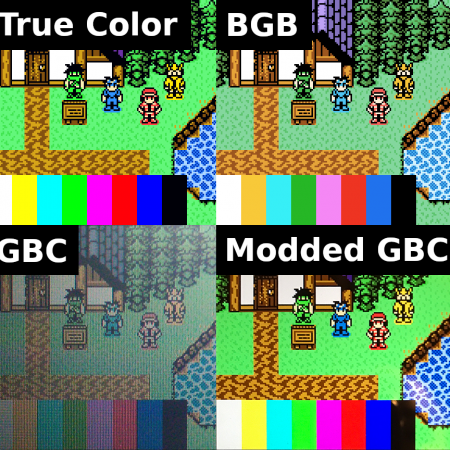
However, Nintendo handhelds have different types of screen, which affects how colors appear on each screen. This is something to keep in mind when developing games or software. You need to take into account how the user will see the final image as it might not be what you want. I made a scene to illustrate this better, here’s how the image looks with raw, unmodified colors.
This scene contains many useful bits to identify differences, like 100% SMPTE color bars (The Society of Motion Picture and Television Engineers standard color test pattern), dithering, and colors like brown and purple to help see tones. This is how BGB and GB Studio handle it respectively:
As you can see, the colors are not as intense (highly saturated) as on the raw image. This is because both the BGB emulator and GB Studio use a different way to generate colors to emulate how it would look on an actual GBC screen. Other emulators such as Emulicious or SameBoy also provide options for adjusting the color and brightness for the player. The thing is, knowing what that screen is supposed to look like is really hard:
How games will look on the non-lit, imperfect Game Boy Color screen depends on many factors, like lighting, for example. You won’t get the same tint if you play under the sun on a cool, bright morning as apposed to in a lit room with warm lights. Also, as the previous screenshots suggest, it doesn’t use perfect RGB, so colors like the green might have a small hint of cyan, for example.
Nintendo wanted to make a cheap, cost-effective screen. This is why it doesn’t look very good. In fact, this was Nintendo’s trend for many years, to make fun out of limited or cheap hardware. We can see this in many consoles, especially pocket devices. Even up to the Nintendo DS, which was under-powered compared to the PSP (which also had dull colors, at least the phat model).
But this is just the CGB model, the Advance line of Game Boys is a bit different. This is how the same scene looks on a GBA:
The colors are a little bit more accurate than on the GBC, but there’s still a problem (and it’s worse too), the brightness.
The Game Boy Advance line, or at least the non-backlit models, suffer from a dark screen. This is why many GBA games looked more washed out than similar games on the GBC. They had to compensate for the much darker screen. Games like Pokémon Gold and Silver can look really dark at night or in caves, even with the light on. The Game Boy Color screen looked dark because of the lack of a light, the Game Boy Advance screen looked dark because that darkness was part of it.
However, games made specifically for the GBA were designed with the relatively dark screen in mind, and so the developers increased the value and saturation of colors to compensate.
For the Game Boy Advance SP (AGS-001), they finally added a very welcome addition, a (front) light! Nintendo was almost finally catching up to the technology of the Sega Game Gear and the Atari Lynx! This helped for native games, but not so much for older GBC titles as they still looked dark. Thankfully, the AGS-101 model added a proper backlight, which made the colors pop, almost like true RGB!
There isn’t much documentation on this matter online, and it’s a shame. We now have bright, crystal-clear IPS or OLED panels which can do near-perfect colors, yet the original look is often ignored.
There has been a resurgence for CRT screens (there’s an entire subreddit, if you’re curious), since many people are now looking for that old-school look that gamers back in the 80’s and 90’s enjoyed. However, there’s little-to-no talk about handhelds, and I think it should be brought up more! Considering the amount of mods that change the original screens of these consoles to brighter, more colorful alternatives, and the amount of people that are interested in visual accuracy.
As I mentioned previously, these kinds of mods often don’t take into account color accuracy.
I hope this article helps spark some discussion about color and the differences on not just the Game Boy line, but also other consoles, and why accuracy can sometimes be important. To explore the differences in color display on various emulators and hardware yourself, you can download the sample scene shown in this article here.
Huge shout-outs to Emi for providing the equipment and some of the pics, Gumpy Function for helping and Tyler Barnes for the macro shot!

a/k/a “Anima” – Game Developer Wannabe, Average Internet Enjoyer, Human Being. (he/him)


