
Want to add more color to your project? Or maybe you’re feeling ambitious and want to unleash the full power of GB Studio’s Color Mode? Whatever the case, this article will guide you through everything you need to know about GB Studio’s “color” mode, covering topics such as:
- Enabling Color Mode
- Picking Palettes
- Painting the Scene
- Copying and Pasting Hex Values
- Hands-on example
- Automatic Background Palettes
Enabling Color Mode
There’s something nostalgic about creating monochrome games, bringing back memories of the original Game Boy’s early days. But depending on your project, adding color might make it more visually appealing and engaging. Maybe you’re working on an action-packed game with lots of effects and actors on screen at once. Sounds exciting! But how do you enable Color Mode?
There are a couple of ways to do it. One method is through the settings:
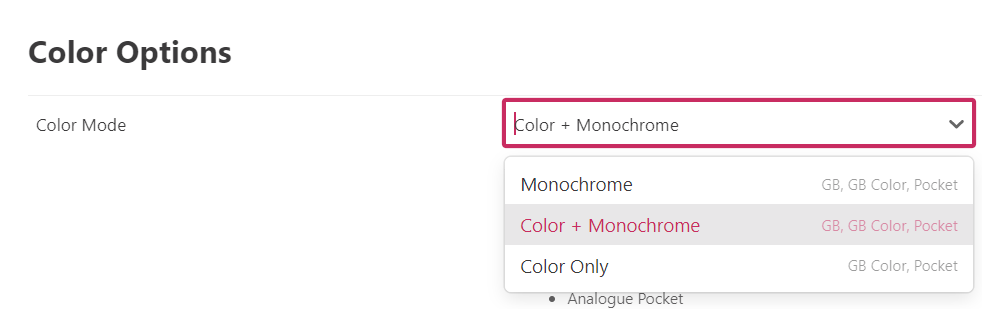
- Go to View > Settings (or press Ctrl+8)
- Navigate to Color Options > Color Mode
- Here, you’ll find different color modes, each with a short description and the platforms they support.
For this tutorial, we’ll focus on the Color + Monochrome mode.
| Another easy way to enable it is by clicking on an empty area of your workspace (anywhere outside of a scene). This will open your project’s general settings, where you can also find the color mode option. |  |
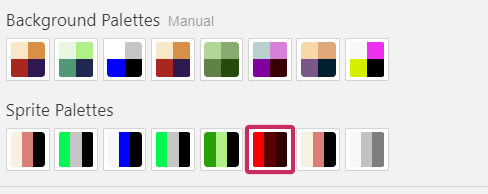
Once you enable Color Mode, you’re not just doubling the system’s capabilities—you’re unlocking the ability to apply colors to both backgrounds and actors! GB Studio gives you access to 8 customizable background palettes and 8 more for actors, giving you plenty of creative freedom to bring your game to life.
Picking Palettes
Once Color Mode is enabled, a new Palettes section will appear in the scene properties. But how do we select different palettes?
It’s super easy! You have 8 palette slots, and selecting one is as simple as clicking on it. This will open a window displaying all the available palettes. If you have a lot of them, you can scroll through the list to browse your options. When you find the one you want, just click on it to apply it to the selected slot. Note that the 8th palette in a scene will also be used for Dialogue Windows and menus.
Alright! We’ve picked our palettes—now, how do we actually paint with them? Let’s move on to the next section.
Painting the Scene
 | Once you’ve selected the scene you want to paint, all you need to do is click on the palette icon in the quick-access bar on the left side of the workspace—or simply press Z. It’s the Colorizer Tool. |
This will open a brand-new toolbar filled with color palettes and a variety of useful icons. Before going wild with painting, let’s take a moment to understand what these icons do:

- Brush Size: The first two icons determine the brush size. The first one paints 8×8 pixel tiles, while the second one paints 16×16 pixel areas at once.
- Fill Tool: This works like the classic paint bucket—clicking on a tile will fill all connected tiles of the same color with the new selected palette.
- Magic Wand: A super useful tool that will apply the selected palette to all tiles of the same type within the scene.
- Palette Selection: Below these tools, you’ll find the 8 palettes you previously assigned to the scene. To paint, simply select a palette and click on a tile to apply it. You can click carefully tile by tile, hold the mouse button to paint freely, or use a helpful shortcut: Click on a starting point (Point A), Hold Shift and click on another tile (Point B). This will draw a straight line between Point A and Point B. The palettes used in the Colorizer Tool can be swapped out for existing palettes (such as the UI palette) by long-clicking on a palette.
- Tile Priority: This tool allows you to create a layering effect where actors appear partially hidden behind the background, except for the first color in your palette (which remains visible). Keep in mind that this feature only works in Color Mode, as it requires extra resources. If you test your project on a monochrome-only system, this effect won’t be visible.
- Hide Layers Button: The last icon in the toolbar hides all overlays, triggers, links, and actors, so you can paint your scene without distractions.
Painting Sprites
Well, painting sprites is a very different technique. Rather than painting, we select the color palette that corresponds to each sprite tile. First, we’d need to decide which color palettes we’ll need for the sprites in our scene. Let’s take a closer look:
 | This time, we’ll go to the sprite options after having previously selected the scene. We can press Ctrl+2 to get there directly. |
 | Once there, all the project’s sprites will appear. We’ll select the one we want to use in our scene. |
 |  |
Next, we’ll select all the tiles we want to change color one by one or as a group, and then on the right, we’ll choose the color palette that corresponds to that group.
 | The drawing must be created carefully so that if we want to have a tile with different colors, it does not overlap with another area: |
Continuing with this method, the sprite will be completely colored and will automatically have those colors in the scene we are working on.
Creating or Editing a Palette
By default, your project comes with a set of pre-made palettes, but you can modify them or create entirely new ones.
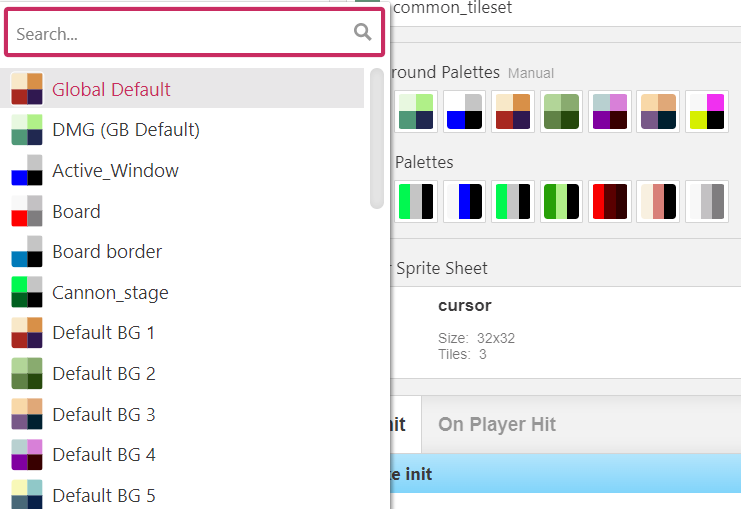
 | To access the Palette Editor, you can either click on the palette icon in the quick-access bar on the left or press Ctrl + 6. |
 | On the left side of the editor, you’ll see all the palettes available in your project. You can use the search bar to find a specific one or click the “+” button to create a new palette. |
 |  Once you’ve selected a palette, you’ll see its four colors. There are several ways to adjust these colors: simply select color 1, 2, 3, or 4 (keep in mind that color 3 is only used for backgrounds, not sprites) and tweak the parameters to your liking. Once you’ve selected a palette, you’ll see its four colors. There are several ways to adjust these colors: simply select color 1, 2, 3, or 4 (keep in mind that color 3 is only used for backgrounds, not sprites) and tweak the parameters to your liking. |
| If you find it tricky to pick or edit colors this way, don’t worry! You can copy and paste colors directly from your favorite drawing software using HEX codes. |
If, like me, you find color selection a bit challenging, or if you’re new to palette creation, you can always use professionally crafted palettes. Websites like LoSpec (https://lospec.com/) offer a wide range of palettes to choose from. Just make sure to credit the original creator if required!
 | To use a palette from an external source: 1. Copy the full HEX code of the color you want. 2. In GB Studio’s Palette Editor, right-click the HEX input field and paste the code. 3. GB Studio will apply the new color—or at least the closest possible match within the system’s color limitations. |
This is how you can fully customize your palettes to bring your scenes to life.
Now, let’s put everything we’ve learned into practice! In the next section, we’ll apply our custom palettes to a scene and explore potential challenges that might arise in our colorful adventure.
Hands-On Example
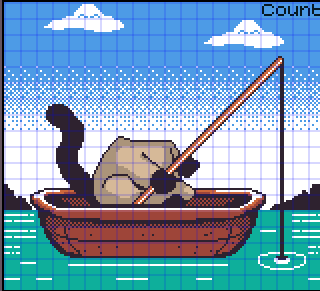
Let’s use the project from the previous chapter as an example—the one where Linda goes fishing. If you don’t have the project file handy, you can download it again from this link:
Applying color to detailed artwork can sometimes be a real challenge, so for this example, we’ll start with the easy part.
 | We’ll begin by applying our pre-created palette to the sky. |
 |  Next, we’ll paint the ocean. To save palette slots, we can also use the same palette for certain parts of the boat. This way, we reduce the number of palettes needed while keeping a consistent look. |
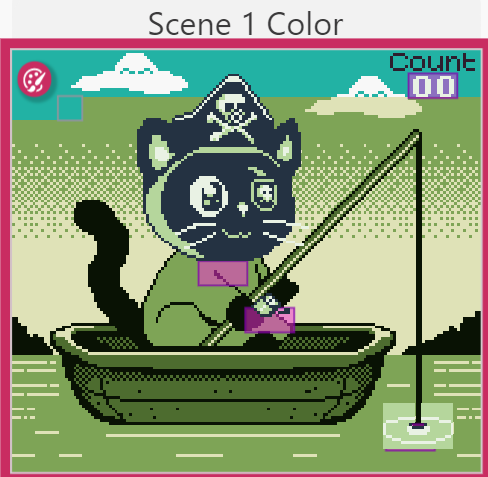
 | As we start painting Linda the cat… Whoa! We’ve hit our first problem! Some areas of the cat don’t match well with the same palette used for the rest of her. |
 | To fix this, we’ll need to create a new palette for tiles where the cat overlaps with the sky. Since we only have four colors per tile, we’ll have to sacrifice a secondary color from the cat to replace it with a shade that blends better with the sky. |
The cat’s head is a bit easier to manage. We just need to assign the right colors to each tile of the sprite, as explained earlier.
In some cases, this process can be tedious and may require adjusting the original artwork to fit the color limitations. The key rule to remember: Each tile can only have four different colors.
But what if I told you there’s a way to skip a lot of this manual work and let GB Studio handle the coloring for us?
Let’s find out in the next section!
Automatic Background Palettes
Please, don’t throw tomatoes at me! I know that was a long explanation, but it was necessary. Even though this tool is incredibly useful, the same restrictions still apply—we’re still limited to 8 palettes. If we create something that exceeds this limit, we’ll run into issues. That’s why it’s important to understand where these problems come from and how to fix them.
With this method, the idea is simple: We can color our scene however we like using our favorite drawing software. Let’s take a look at how my example turned out:
Oops! The cat’s head is missing! That’s because, as we mentioned earlier, the head is actually a giant sprite, not part of the background.
Now, let’s head back to GB Studio and see how to activate Automatic Palettes:
 | Select the new background once you’ve colored it in your drawing software. |
 | In the scene palette section, you’ll notice that the default mode is set to Manual—this is what we’ve been using so far. Click on it, select Automatic Mode, and activate it. |
 | Voilà! That’s it! GB Studio will automatically generate the necessary palettes to match the colors of your imported background as closely as possible. However, keep in mind—it’s not as simple as it looks. I had to tweak several parts of my original artwork to ensure that it stayed within the 8-palette limit. |
I hope you enjoyed this tutorial and that you’ll put it into practice in your own projects!
In the next chapter, we’ll take a look at how to easily create one of the most classic games of all time…
See you soon!