In the previous article we built a simple “Boing!” sound effect. However, it is not ready to go into GB Studio just yet. This lesson is heavily focused on Furnace Tracker. You will need to know quite a bit about Furnace Tracker’s effects to make truly powerful sounds. We can’t cover all effects that Furnace Tracker has, but we’ll show you how to use them so you can research or experiment with other effects on your own.
Adding Essential Effects To Our Sound
Last time we looked at how to put down notes. In order to fully take advantage of all that VGM sound effects can do, you will need to learn effects in Furnace Tracker as well. At the bare minimum, you’ll need to use an effect called “Stop Song” which tells GB Studio the sound is done playing.
If you play your sound as it is now, you’ll notice the sound fades away around row 22 of the pattern. It moves very fast as well. This presents a problem. A GB Studio VGM needs to end before about the 13th row or so. If it goes past that, it will cause issues like ringing out infinite sound or muting a channel.
To fix this, we can use the tempo effect to make our sound “move slower” through its pattern. The following image shows how the slots are laid out in the Furnace Tracker pattern.
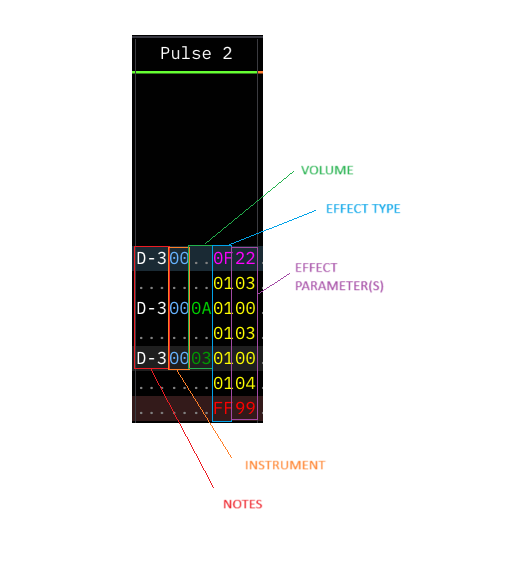
To add a tempo change, in the very first row, we want to add effect type 0F (change tempo) and a parameter of 22 (in hex, that is a value of 34 which is fairly slow). Now press enter; now our song fades around the 6th row instead of the 22nd! Much better. Now on the 7th row, put a FF99 (which means Stop the song right away).
At this point we basically have a sound we could put into GB Studio. It meets the basic requirements of not going past the 13th row and has a Stop Song indicator. But, let’s go even further, we can make the “boing” sound echo away and this allows us to learn a few more things in Furnace Tracker.
Adding Volume Changes and More Effects
Notice the 3rd column of the pattern is labeled Volume. If you leave this blank a sound will start at the volume level you defined in the instrument in Lesson 1. However, if you put a number here you change its starting point. Lay down two more D3’s and then add the volume settings as shown in the image. Now press enter, now our sound echoes away nicely!
We can take it one step further by adding a springy sound by having our sound bend upward after it plays. Enter the 01 effect type column values as shown as well as the effect parameters. Notice we have to put a 100 in order to stop the effect from continuing endlessly.
Now that’s a full-fledged sound effect! In the final article, we will look at how to port this into GB Studio. To learn how to use other Gameboy Effects available in Furnace tracker see the manual.
Here is the demo sound effect .fur file up to this point in the tutorials.

Beatscribe has composed and produced soundtracks for games on Nintendo DS, Nintendo Switch, PS4, Xbox1, Sega Genesis and numerous iOs and Android games for over a decade, but his true passion is creating epic moods on ancient hardware like the Game Boy and NES.